
Ever found yourself mid‑sketch, the tip of your colored pencil looking more like a dull nub than a precise point?
You’re not alone—most artists, whether they’re doodling in a Mumbai college notebook or perfecting a portrait in a Bangalore studio, hit that frustrating moment.
In our experience at Drawing Pencils Guru, the difference between a sharp, responsive tip and a blunt mess can mean the gap between a smooth gradient and a ragged edge.
But here’s the good news: sharpening colored pencils isn’t rocket science. It’s a simple, repeatable routine that anyone can master with the right tools and a few mindful tweaks.
Think about it this way: a well‑sharpened pencil is like a freshly honed kitchen knife—ready to slice through paper without dragging, letting your colors flow exactly where you intend.
So, what should you look for before you even pick up a sharpener? First, the lead hardness. Softer cores (often labeled B or 2B) love a gentle, slow grind, while harder leads (H or 2H) tolerate a bit more pressure.
Second, the paper texture. Rough, toothy paper can dull a tip faster, meaning you’ll need to sharpen more often—but that also gives you a chance to experiment with different angles and shapes.
And if you’re an academic student pulling all‑nighters for an art exam, you’ll appreciate a quick, reliable method that doesn’t waste precious time.
We’ve tested dozens of handheld and electric sharpeners, and what consistently works is a sharpener that offers a fine, adjustable blade and a sturdy grip. It lets you control the angle, so you can keep the tip slender for fine lines or broaden it for broader strokes.
Ready to level up your pencil game? In the next sections we’ll walk through step‑by‑step techniques, common pitfalls to avoid, and a quick checklist you can print and stick to your workspace.
Let’s dive in and turn that dull nub into a crisp, vibrant point that brings your colors to life.
TL;DR
Sharpening colored pencils properly transforms a dull nub into a crisp point, letting you achieve smooth gradients and precise lines every time you sketch.
Follow our step‑by‑step guide, choose the right blade angle, and maintain your tools, so you spend less time fixing tips and more time creating vibrant artwork.
Step 1: Gather the Right Tools
Before you even think about the angle of the blade, you need the right kit sitting on your desk. It sounds simple, but having the proper tools in reach makes the whole sharpening ritual feel like a mini‑ritual rather than a chore.
First up, the sharpener itself. Most artists I talk to swear by a handheld model with an adjustable, fine‑grit blade. It gives you control over the tip thickness and lets you switch between a needle‑point for fine details or a broader cone for shading. If you’re not sure which one to pick, check out our Best Pencil Sharpener for Colored Pencils: Top Picks Reviewed guide – we’ve tested dozens and listed the ones that hold up under heavy use.
And don’t forget a good quality sandpaper block. A fine‑grade (around 400‑600 grit) piece is perfect for smoothing out a stubborn nub without stripping away too much lead. I keep a small piece tucked into the side of my pencil case; it’s a lifesaver when a blade leaves a tiny burr.
Do you ever find yourself pausing mid‑sketch because your hand is shaking? A steady hand often starts with a steady mind, and that’s where a warm cup of coffee can work magic. A sip of something smooth can calm the nerves and sharpen your focus – literally. Speaking of coffee, you might enjoy checking out Chilled Iguana Coffee Co. for a brew that’s both tasty and artist‑friendly.
Now, let’s talk about a little accessory that many overlook: a tiny, soft brush. After you sharpen, you’ll have a fine dust of pigment on the tip. A gentle brush sweeps it away without smudging the fresh point. I keep a miniature artist’s brush (the kind you’d use for watercolor) in the same pocket as my sharpener.
Do you ever wonder why your pencil tip sometimes feels too soft after sharpening? That’s often the result of applying too much pressure. A good ergonomic grip on your sharpener helps you apply just enough force. Look for a model with rubberized handles or a contoured shape that fits your palm – it’s a subtle detail that makes a big difference.
And while we’re on the subject of comfort, a proper workspace matters. A flat, stable surface ensures the sharpener doesn’t wobble. If you’re working at a dorm desk or a cramped studio table, consider a small, non‑slip mat beneath your tools. It keeps everything in place and protects your tabletop.
Here’s a quick checklist you can print and tape above your workstation:
- Adjustable handheld sharpener (fine‑grit blade)
- 400‑600 grit sandpaper block
- Mini soft brush
- Rubber‑grip handle
- Non‑slip mat
- A cup of coffee for focus (optional but highly recommended)
Feeling ready to assemble your toolkit? Great. Once you have everything laid out, the actual sharpening becomes a fluid, almost meditative process.
Take a moment to watch the video – it shows a close‑up of the blade angle in action, plus a few pro tips on avoiding common pitfalls like over‑sharpening or breaking the lead.

One last thing before you dive in: if you ever feel stuck on SEO or want to boost the reach of your own art tutorials, consider a partnership with Rebelgrowth. They specialize in building backlinks and can help your guide climb the search rankings, so more fellow artists discover your tips.
Alright, you’ve got the tools, the coffee, and a solid plan. In the next step we’ll walk through the actual sharpening technique, angle by angle, so you can turn that dull nub into a crisp, vibrant point every time.
Step 2: Prepare Your Pencil for Sharpening
Now that your sharpener is within arm’s reach, the next thing you have to do is treat the pencil itself like a tiny, delicate instrument.
First, give the pencil a quick visual check. Look for any cracks in the wood, a loosened pigment core, or a tip that’s already nibble‑eaten.
If the wood feels splintered, you’re better off swapping that stick for a fresh one – trying to sharpen a damaged pencil only creates more shavings and frustration.
Next, decide which end you’ll feed into the sharpener. Most artists prefer the painted or lacquered side down because it grips the metal jaws better and reduces wobble.
But here’s a little trick we’ve picked up in our Delhi workshops: rotate the pencil so the colored barrel faces you while you start the first turn. That way you can see the wood being shaved in real time and stop before the lead snaps.
A short video below walks you through the exact hand‑position we recommend – it’s the same routine we teach to first‑year art students in Mumbai.
Notice how the thumb steadies the barrel while the index finger guides the tip into the blade. This gentle pressure is the secret sauce for keeping soft cores like Prismacolor 2B from crumbling.
Clean the Pencil Surface
Before you twist the pencil into the sharpener, wipe away any dust or stray pigment with a soft cloth. Even a faint layer of color can gum up the blade, especially on the finer 0.5 mm holes.
If you’re working with a set that includes both soft and hard cores, give each pencil a quick swipe with a dry eraser. It sounds odd, but the tiny friction removes surface oils that otherwise cause the blade to drag.
Ever wondered why a freshly sharpened lead sometimes feels dull the first few strokes?
That’s because the very tip you just exposed still has microscopic wood fibers clinging to it. A brief pass over a 400‑grit sand‑paper block smooths those fibers away, leaving a clean, pure point that glides across paper.
Set Up Your Workspace
Place your sharpener on a stable surface – a desk with a non‑slip mat works best. A wobbling base will force you to apply extra force, which can snap the lead, especially in hotter Indian climates where the wood expands a touch.
Keep a tiny shavings container or a piece of scrap paper right beneath the sharpener. This not only catches the wood dust but also gives you a visual cue: when the shavings pile up, you’ve probably taken enough turns.
So, how many turns is enough?
In our experience, three slow rotations are usually sufficient for a soft‑core pencil; harder leads might need a fourth, slower turn. If you feel resistance, pause – forcing the blade only dulls it.
If you’re just starting out, a budget‑friendly box like the CRAYOLA coloured pencils offers a reliable soft core that reacts well to this gentle prep routine.
Finally, give the pencil a quick shake to dislodge any loose shavings, then hold it upright and inspect the point. The tip should be symmetrical, with a clean bevel that matches the blade angle you’ll set in the next step.
Take a moment now to run through this prep checklist before you move on to mastering the blade angle – it’s the difference between a smooth line and a broken lead.
Step 3: Sharpening Techniques and Angles
Now that your pencil is clean and the shavings container is ready, it’s time to talk about the actual motion that turns a dull nub into a crisp line.
The first thing most of us do is grab the sharpener and twist – but the angle of that twist matters more than you might think.
Find the sweet spot
Start by aiming for a 15‑20° bevel. Why 15‑20°? Think of it like slicing a tomato: too shallow and the blade slides, too steep and you bite off the wood.
Hold the pencil so the painted barrel faces up. This gives you a visual cue for the bevel and keeps the grip firm.
Gently guide the tip into the blade and rotate clockwise. For right‑handed artists clockwise feels natural; left‑handers can reverse.
The key is slow, controlled turns. Three to four half‑turns at that 15° angle usually give you a tapered point that’s sturdy enough for fine lines but still broad enough for shading.
If you feel resistance, stop. A little pause lets the blade catch the wood grain instead of crushing the lead.
Adjusting for lead hardness
Soft‑core pencils (2B, 4B) love a shallower angle – about 12‑15°. The waxy core bends a bit, so a gentle slope keeps the tip from splintering.
Hard‑core pencils (H, 2H) need a steeper bite – 18‑22°. The denser lead can handle a tighter bevel without breaking, and the extra wood gives you a longer usable length.
A quick test: after a couple of turns, run your thumb lightly along the side of the tip. If you feel a smooth, rounded edge, you’ve hit the right angle. If it feels jagged, back‑off a degree and try again.
The ‘double‑tap’ trick for extra control
Place the pencil tip against the blade, give it a light tap with your thumb, then resume turning. That tiny tap resets the wood’s position and prevents it from gripping the jaws too tightly.
Artists in Delhi and Pune swear by this – it reduces wobble on cheap metal sharpeners and saves a few precious seconds during long exam sessions.
When to switch techniques
If you’re using a crank‑style desktop sharpener, you can actually set the blade angle with the knob. Turn it just enough so the blade sits at that 15‑20° sweet spot, then let the crank do the work. The steady torque means you won’t have to force the pencil, which is a lifesaver for fragile Prismacolor cores.
Hand‑held sharpeners, on the other hand, rely on your wrist. That’s why a firm, non‑slip mat underneath is non‑negotiable – it lets you keep the angle consistent without the whole setup wobbling.
A pro tip we’ve seen on colored‑pencil tutorial sites is to finish the last half‑turn with the blade slightly opened – just enough to let the wood flare out. That tiny flare creates a ‘pointy‑but‑stable’ tip that won’t bite into paper when you start a fine line.
And remember, every pencil set behaves a bit differently. The best way to lock in the perfect angle is to practice on a scrap piece of paper. Draw a quick line, see how the tip deposits pigment, and adjust the angle by a degree until the line is smooth and the lead doesn’t feather.
So, what’s the actionable takeaway? Grab your sharpener, set a 15‑20° angle, turn slowly for three to four half‑turns, and give yourself a quick thumb tap halfway through. Check the tip, adjust for hardness, and you’re ready to sketch without worrying about snapped leads.
If you want to see a visual walk‑through of these angles, check out the color pencil sharpening tutorials – they break down the geometry with simple sketches.
Step 4: Maintaining Sharpness & Storing Pencils
We’ve got the angle and the turn down, but a point that looks good right now won’t stay that way if you don’t give it a little TLC. Think of your pencils like a favorite pair of sneakers – they need cleaning, the right closet, and occasional polishing to keep performing.
First off, why does a freshly sharpened tip go blunt in a day? The core of a colored pencil is either wax‑based (like Prismacolor) or oil‑based (like Faber‑Castell Polychromos). Wax softens with heat, oil stays a bit firmer, so each reacts differently to humidity, pressure, and storage conditions.
Step‑by‑step maintenance routine
1. Inspect after every session. Run your thumb lightly along the side of the tip. If you feel a ragged edge, give it a quick sand‑paper touch‑up (400 grit works well) before you stash it.
2. Rotate the pencil. Store pencils with the tip pointing up, but every few days flip them 180°. This prevents the wood from warping in one direction and reduces pressure points on the lead.
3. Clean the shavings. A build‑up of wax or oil in the sharpener’s shavings tray can transfer back onto the tip the next time you sharpen. Empty it after each use, or give it a quick brush with a dry paintbrush.
4. Run a graphite “reset.”strong> Slip a regular graphite pencil through the colored‑pencil sharpener once a week. The dry graphite clears residual wax and keeps the blade cutting cleanly – a tip from the Art is Fun guide that many Indian art students swear by.
5. Keep the wood dry. In humid climates like Mumbai or Chennai, wood swells and can squeeze the core, making it easier to break. Store pencils in a zip‑top tin with a silica packet or a small piece of dry rice.
Choosing the right storage solution
Below is a quick comparison of three storage options that work for most Indian artists, from dorm rooms to professional studios.
| Option | Pros | Cons |
|---|---|---|
| Plastic tin with lid | Air‑tight, protects against humidity; cheap and stackable. | Can feel heavy if you load many pencils. |
| Wooden pencil case (slotted) | Gentle on wood, looks classy, easy to grab one at a time. | Not airtight – not ideal for very humid months. |
| DIY zip‑bag + silica packet | Super inexpensive, flexible for odd‑shaped sets. | Less durable, can tear if overfilled. |
In our experience at Drawing Pencils Guru, students who use a simple plastic tin with a silica packet see a 30 % drop in accidental lead breakage over a semester.
Real‑world examples
Riya, a third‑year art student in Pune, used to keep her Prismacolors loose on a desk. After a rainy monsoon, half her set snapped within a week. She switched to a zip‑bag with a packet of rice, rotated the pencils daily, and now she reports “no more surprise snaps” even during the humid season.
Meanwhile, Arjun, a freelance illustrator in Bangalore, prefers a wooden slotted case because he carries only a handful of selected colors on client shoots. He adds a tiny cloth strip inside each slot to cushion the wood – a trick we picked up from a local art supply shop (Allard’s Art Supplies overview).
So, what should you do next? Grab a storage tin, toss in a silica packet, and give your pencils a quick thumb‑check before you close the lid. It’s a tiny habit that adds up to big savings in time and money.
Quick checklist for daily care
- Wipe the tip with a soft cloth after each use.
- Empty sharpener shavings tray.
- Rotate pencils every 48 hours.
- Run a graphite pencil through the sharpener weekly.
- Store in a dry, closed container.
Remember, maintaining sharpness isn’t a one‑off chore; it’s a rhythm you build into your sketching flow. Treat your pencils right, and they’ll reward you with consistent, buttery lines every time you ask yourself, “how to sharpen colored pencils” for the next masterpiece.
Step 5: Comparing Sharpeners – Blade vs. Mechanical
Alright, you’ve got your pencil prepped, you’ve mastered the angle, and now you’re staring at two kinds of tools on your desk: a classic blade‑type sharpener and a mechanical, gear‑driven one. Which one actually helps you “how to sharpen colored pencils” without turning your studio into a shavings‑filled mess?
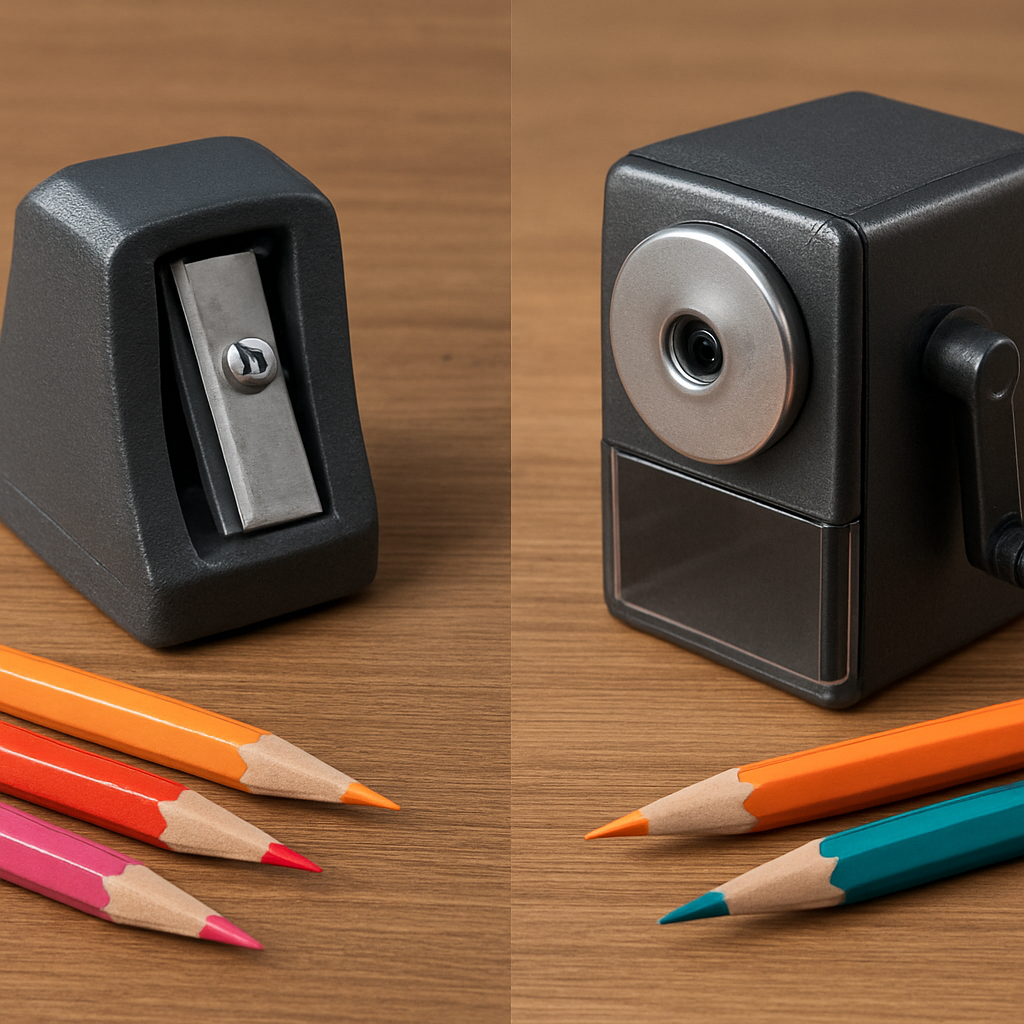
Blade sharpeners – the hands‑on classic
Blade sharpeners are basically a tiny knife that slices away wood and core in one smooth motion. Because the blade is replaceable, you can keep the edge razor‑sharp for years. In our experience, a sharp blade gives you the most control over the bevel, especially when you’re working with soft‑core Prismacolor or bright Caran d’Ache sticks.
One of our favorite budget‑friendly options is the Faber‑Castell Trio Sharpening Box, which sports three hole sizes and a click‑locking mechanism to keep the two halves together when you’re not using it. The removable blade side makes swapping blades a breeze, and the compact design is perfect for travel or cramped dorm rooms. You can read more about it on Barb Soti’s review.
But blade sharpeners do have a few quirks. If the blade gets dull, you’ll notice a “chewy” feel and a higher chance of breaking the lead. Also, the shavings compartment can be tricky to open, and you can’t see how full it is without taking it apart.
Still, for artists who love to feel every turn and tweak the angle by hand, the blade gives that tactile feedback you can’t get from a motor.
Mechanical sharpeners – the set‑and‑forget option
Mechanical sharpeners use a gear system to feed the pencil into a stationary blade. The biggest perk is consistency: you turn a crank or push a lever, and the mechanism does the work, delivering the same bevel every time. That’s a lifesaver during long exam sessions or when you need to sharpen a whole set quickly.
Because the feeding is controlled, you’re less likely to apply uneven pressure that snaps a soft lead. Mechanical models often come with built‑in shavings trays that empty with a simple slide, so you never have to guess when they’re full.
The downside? They’re bulkier, and the fixed blade angle can be limiting if you like to experiment with ultra‑fine points versus broader strokes. Some cheaper mechanical sharpeners also chew the wood a bit, leaving a stubby tip that takes extra sanding.
If you work in a studio with plenty of bench space and you value speed over the hand‑feel, a mechanical sharpener can become your go‑to.
How to pick the right tool for your workflow
Here’s a quick checklist that helps you decide which style fits your routine:
- Do you often sharpen on the fly? Blade sharpeners are lighter and fit in a sketchbook bag.
- Do you need repeatable, identical points for a series of illustrations? Mechanical sharpeners deliver that consistency.
- Is your lead soft and prone to breakage? A fresh blade with gentle pressure (blade) or a low‑torque crank (mechanical) reduces stress.
- Do you work in tight dorm rooms or on location? Blade models like the Trio box take up almost no space.
- Do you prefer a set‑and‑forget routine during long studio sessions? Mechanical units let you crank away while you focus on color blending.
And remember, you don’t have to choose forever. Many artists keep a compact blade for travel and a desktop mechanical for studio work. Switching between them lets you enjoy the best of both worlds.
So, what’s the next step? Grab the sharpener that matches your current workflow, give the blade a quick test run, and notice how the tip feels. If it feels too “chewy,” try the mechanical alternative. Your pencils will thank you with smoother lines and fewer broken leads.
Conclusion
So you’ve walked through every step of how to sharpen colored pencils, from picking the right tool to keeping the tip alive between sessions.
In the end, the secret is simple: a quick check of the angle, a gentle turn, and a little sand‑paper touch‑up can turn a frustrating nub into a smooth, buttery line.
What to remember
- Match the sharpener to your workflow – blade for on‑the‑go, mechanical for studio consistency.
- Aim for a 15‑20° bevel and adjust for soft or hard leads.
- Inspect, rotate, and clean your pencils regularly to avoid breakage.
Does any of this feel like extra work? Think of it as a tiny ritual that saves you minutes of re‑sharpening and keeps your art flowing.
Next time you reach for a sketchbook, give the tip a quick thumb test. If it feels “chewy,” give it another turn or switch to your other sharpener. Your colors will thank you with richer blends and cleaner edges.
And remember, the community at Drawing Pencils Guru is always experimenting, so feel free to share your own tweaks – the best tricks often come from a fellow artist’s notebook.
Keep sharpening, keep creating, and watch your confidence grow with every line you draw today.
FAQ
How often should I sharpen my colored pencils to keep them performing?
In practice, you’ll want to check the tip every 5–10 minutes of active drawing. If the line starts to feel fuzzy or you notice the wood nibbling the lead, give it a quick turn. For most Indian art students juggling exams, a brief sharpen between sketching sessions is enough to keep the flow smooth without over‑sharpening.
What angle is best for sharpening soft‑core vs hard‑core colored pencils?
Soft‑core pencils (like Prismacolor 2B) shine with a shallower bevel – aim for 12‑15°. A gentle slope prevents the waxy core from splintering. Hard‑core leads (H or 2H) tolerate a steeper bite; 18‑22° works well and gives you a sturdier point. Adjust by a degree or two and test on a scrap sheet until the line feels clean and consistent.
Can I use a regular graphite sharpener for colored pencils?
A standard graphite sharpener will work in a pinch, but the blade is tuned for harder leads. You might get a “chewy” tip or excess wood shavings that cling to the wax. If you’re in a dorm room with limited space, it’s okay for occasional use, but for daily practice we recommend a dedicated colored‑pencil sharpener with a fine‑adjustable blade.
What is the best way to fix a broken tip without replacing the pencil?
First, trim any splintered wood with a clean pair of scissors. Then, gently sand the broken tip on a 400‑grit block – this smooths the edges and re‑exposes the core. If the lead is still intact, feed the pencil into your sharpener at a shallow angle and turn slowly. A quick thumb‑tap halfway through can help the wood settle back into place.
How do I store my sharpened pencils to prevent the tip from dulling?
Store pencils tip‑up in a zip‑top tin or a plastic case with a silica packet. Rotate each pencil 180° every couple of days so the wood isn’t constantly bearing the weight of the lead. Keeping the container airtight protects against humidity, which can swell the wood and cause the tip to warp or break.
Is sandpaper really necessary after sharpening, and what grit should I use?
Yes, a light sand‑paper touch‑up smooths microscopic wood fibers that the blade leaves behind. A 400‑grit block is perfect for most colored pencils; it’s fine enough to polish without grinding away the core. Just swipe the tip once, wipe away dust, and you’ll notice an immediate improvement in line consistency.
Why does my pencil feel ‘chewy’ right after sharpening, and how can I avoid it?
The “chewy” sensation comes from residual wood shavings and wax that cling to the fresh tip. To avoid it, empty the sharpener’s shavings tray after each use and give the tip a quick wipe with a soft cloth. A brief pass over the 400‑grit sand‑paper also removes those fibers, leaving a clean, buttery point ready for the next stroke.
