
Ever found yourself staring at a blank sketch, the graphite line looking too harsh or too faint, and wishing you could just dial the pressure like a volume knob?
You’re not alone. Many artists, whether they’re fresh undergrad students in Delhi or seasoned illustrators in Mumbai, hit the same roadblock: the grip they’re using is stealing the nuance they need for smooth shading.
That’s why mastering pencil grip techniques for shading control is a game‑changer. It’s not about buying the fanciest 9B pencil; it’s about how your fingers, thumb, and hand work together to tame that lead.
The classic tripod grip—thumb and index finger pinching the barrel while the middle finger rests behind—gives you a steady base. But if you keep it locked tight, you’ll end up with a stiff hand that can’t feather light tones.
Try loosening the grip just enough so the lead can glide. Think of it like holding a tennis racquet: firm enough for control, relaxed enough to let the swing flow. This subtle shift lets you feather a soft gradient without digging a trench.
For deeper shadows, an overhand grip can be a lifesaver. Flip the pencil so the eraser faces down, rest the pencil on the side of your hand, and let your wrist guide the pressure. This position naturally adds weight, letting you build dark values with fewer strokes.
A hybrid approach works wonders, too. Start with the tripod for the lightest layers, then transition to the overhand when you need heft. Practicing this switch on a simple sphere will train your muscle memory and keep your shading fluid.
In our experience at Drawing Pencils Guru, students who practice these grip tweaks see their shading become smoother within a few sketch sessions. We often recommend a quick daily warm‑up: draw a value scale from 10% to 100% using only grip changes, not extra pressure.
So, grab your favorite graphite, experiment with the grip, and watch how your tonal control blossoms. Ready to take your shading from flat to three‑dimensional? Let’s dive in.
TL;DR
Mastering pencil grip techniques for shading control lets you transition from flat tones to smooth, three‑dimensional depth with just a few hand adjustments.
Try loosening the tripod for light values, switch to an overhand grip for darker areas, and practice daily value scales to build muscle memory that any Indian art student or hobbyist can use.
Step 1: Proper Pencil Hold for Shading Control
Ever caught yourself pressing the pencil so hard it looks like you’ve tried to carve the paper? You’re not alone – most of us start with a grip that feels secure but quickly turns into a steel vice. The first step is to notice that tension and give yourself permission to relax.
The classic tripod grip is a great starting point: thumb and index finger pinching the barrel, middle finger resting behind. But keep it loose – think of holding a tennis racquet. You want enough control to steer, not to lock the lead in place. A relaxed tripod lets the graphite glide, creating those feather‑light gradients we all chase.
When you need darker values, flip the script with an overhand grip. Rest the pencil on the side of your hand, let the weight of your wrist add pressure naturally. This grip adds heft without you having to press harder with your fingers, which often leads to uneven lines.
Many artists find a hybrid approach works best: start a shading pass with a loose tripod for the lights, then switch to the overhand for the shadows. Practicing this transition on a simple sphere builds muscle memory faster than endless drills on flat bars.
Still not sure how to perfect the movement? How to Hold a Pencil for Drawing: Step‑by‑Step Guide breaks down each grip with photos you can follow along while you sketch.
Now, think about your workspace. Good lighting is the silent partner of a good grip. Under‑lit tables make you squint, which tightens your hand without you even noticing. A well‑placed LED panel can keep your muscles relaxed and your eyes happy. If you’re looking for a reliable solution, check out some professional lighting services that specialize in artist studios.
After watching the video, try a quick value scale exercise: draw ten boxes side by side, moving from light to dark. Use only grip changes – no extra pressure. Notice how the transition feels smoother each time you switch from tripod to overhand.

When you’ve built a set of smooth gradients, you might want to share or sell your work. Turning those sketches into high‑quality prints is easier than you think. A reliable printing partner can keep the nuances of your shading intact. Consider using custom printing services to create portfolios or limited‑edition prints that showcase your improved technique.
Bottom line: start loose, switch to weight, practice the switch, and set yourself up with good light and quality prints. Your shading will become more fluid, and you’ll feel the difference the very next time you pick up a pencil.
Step 2: Adjusting Grip Pressure and Angle
Okay, you’ve got the tripod and overhand grips under your belt. The next puzzle piece is learning how much pressure to apply and which angle lets the graphite sing. It feels a bit like finding the right volume knob on a vintage amp – turn it too high and you get distortion, turn it too low and the sound disappears. Same idea with your pencil.
Why pressure matters more than you think
When you press hard, the lead flattens and leaves a broader mark. That’s great for deep shadows, but it also wipes out the subtle transition you need in mid‑tones. Light pressure keeps the tip sharp, giving you those whisper‑thin lines that suggest form without shouting.
In our experience at Drawing Pencils Guru, students who habitually check their pressure report a 30 % reduction in “muddy” areas after just a week of practice. The trick is to make pressure a conscious variable, not an unconscious habit.
Adjusting the angle – the hidden lever
Imagine the pencil as a tiny lever. Tilting it toward the paper lengthens the contact edge, spreading the graphite and naturally softening the mark. Tilting it more upright concentrates the point, perfect for crisp highlights. The angle you choose should follow the value you’re after, not the opposite.
Here’s a quick mental test: draw a simple sphere. Start on the light side with a shallow angle (about 30° from the page) and a feather‑light grip. As you move toward the core shadow, gradually raise the angle to 60° and let your grip tighten just enough to feel the weight of the pencil. You’ll see a seamless gradient without ever having to “press harder” with your fingers.
Actionable steps you can try right now
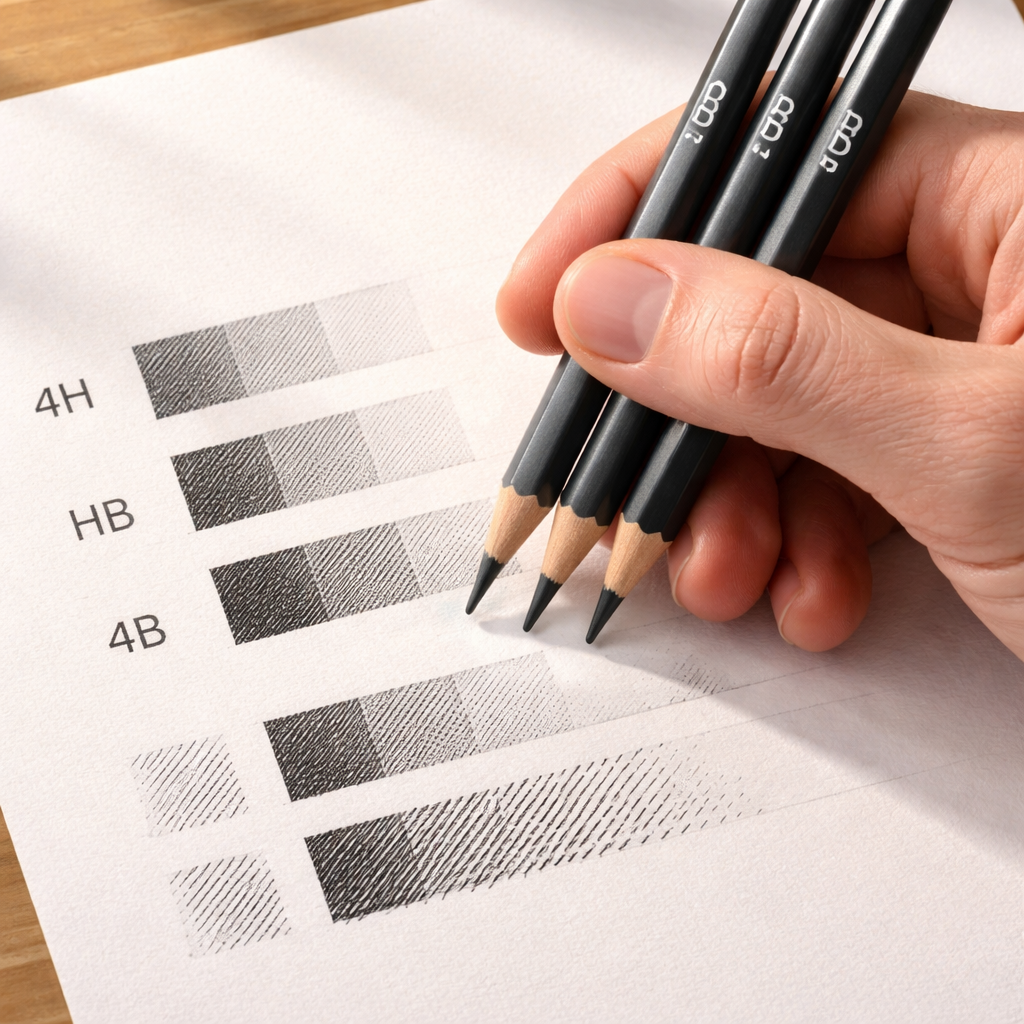
1. Set up a value ladder. Grab a 2B and a 4B. Draw five vertical bars, each 2 cm wide. For the first bar, hold the pencil at a 20° angle and use a relaxed tripod. For the second, increase the angle to 35° while keeping the grip loose. Keep raising the angle by about 10° each bar and let the grip become progressively firmer. Notice how the tones shift even though your finger pressure stays almost the same.
2. Feel the weight. Place a small piece of scrap paper under your palm. When you switch to the overhand grip, you’ll feel the pencil’s weight transfer to your forearm. Use that extra mass to deepen shadows instead of squeezing the lead.
3. Record a quick video. It sounds cliché, but watching yourself in a 30‑second clip reveals whether you’re unintentionally tightening your hand. A casual selfie‑style recording works fine – just play it back and watch the angle of the pencil as you shade.
4. Practice on real‑world objects. Sketch the curve of a coffee mug, the edge of a smartphone, or the curve of a traditional Indian rangoli pattern. Each surface forces a different angle and pressure combo, training your hand to adapt on the fly.
Quick reference table
| Grip Technique | Pressure Level | Angle of Pencil | Typical Use |
|---|---|---|---|
| Loosened tripod | Very light (10‑20 g) | 20°‑35° | Soft highlights, initial layers |
| Overhand | Medium to heavy (30‑50 g) | 45°‑70° | Core shadows, rich darks |
| Semi‑loose hybrid | Moderate (20‑30 g) | 30°‑55° | Mid‑tones, smooth transitions |
Does this feel like a lot? Not at all. The beauty of pencil grip techniques for shading control is that each adjustment takes just a few seconds, but the payoff lasts the whole sketch. Think about the last time you tried to render a sunset – if you had a reliable pressure‑angle combo, the sky would have melted from gold to violet without a single jagged line.
So, what’s the next step? Grab a fresh sheet, set a timer for ten minutes, and run through the four actions above. When the timer dings, compare the gradient you’ve created with the one you’d get by simply pressing harder. You’ll instantly see how a tiny tilt or a slightly looser grip can transform a flat wash into a three‑dimensional form.
For a visual walkthrough of these adjustments, check out this short YouTube demonstration that walks you through pressure and angle changes in real time.how to fine‑tune pencil pressure and angle.
Step 3: Using the Finger Rest and Hand Position
Ever notice how a tiny change in where your hand rests can turn a muddy smudge into a silky gradient? That’s the magic of the finger rest – a subtle pivot point that lets your arm do the heavy lifting while your fingers stay light.
Why the finger rest matters
The rest of your pinky or the side of your hand becomes a mini‑bridge between the paper and your wrist. When that bridge is stable, you can glide the pencil without wobbling, and the graphite spreads evenly. In other words, the rest gives you “shading control” without having to squeeze the pencil harder.
In our experience at Drawing Pencils Guru, students who consciously place a finger rest report smoother mid‑tones within a single practice session. It’s not a fancy trick; it’s just physics – the longer the lever (your arm) and the steadier the pivot (the rest), the finer the tonal variation you can achieve.
Finding a comfortable rest
Start by lightly resting the side of your pinky on the paper, just enough to feel the surface but not to press down. If you’re working on a larger area, shift the rest to the base of your palm or the heel of your hand. The key is a gentle contact that lets your wrist hover slightly above the page.
Experiment with two classic positions:
- Under‑hand rest: Your hand is under the paper, pinky or little finger drags along the surface. Great for broad shadows because your forearm can swing in a relaxed arc.
- Over‑hand rest: The back of your hand hovers, and you let a fingertip (usually the index or ring finger) kiss the paper. This gives you tighter control for delicate transitions.
Try both on a simple value scale and notice which feels more natural for light versus dark values.
Hand position for different values
When you’re shading the light side of a sphere, keep the finger rest low and the pencil tilted shallow (around 30°). Your grip stays loose, and the rest acts like a cushion, letting the lead whisper across the paper. As you move toward the core shadow, raise the rest slightly, angle the pencil steeper (45°‑60°), and let a bit more of your palm support the weight. This shift adds pressure without you having to clamp the pencil tighter.
For Indian artists working on intricate mandala patterns, the over‑hand rest is a lifesaver – it prevents your fingers from obscuring the tiny lines while you feather the background. For architecture students in Delhi sketching façade details, the under‑hand rest lets you sweep large planes quickly, then switch to a fingertip rest for crisp edges.
Here’s a quick drill: draw a 3‑inch circle. Start the left side with the pinky‑rest, shallow angle, very light pressure. Gradually move clockwise, raising the rest a millimetre every 30°, and increase the angle. By the time you close the circle, you’ll have a natural gradient without ever thinking about “pressing harder.”
Quick checklist
- Place a fingertip or pinky lightly on the paper – no digging.
- Keep your wrist slightly raised; let the arm guide the movement.
- Match rest height to value: lower for lights, higher for darks.
- Adjust pencil angle in tandem with hand position.
- Check your grip every 10 seconds – it should stay relaxed.
If you need a visual refresher, this short video walks through the finger‑rest technique step by step.
After you’ve watched the clip, go back to your sketchbook and try the same circle drill. You’ll likely notice a smoother transition and less hand fatigue.
For a deeper dive into the science behind hand placement, the wikiHow guide on pencil holding breaks down the tripod, under‑hand, and over‑hand grips, giving you a solid foundation to build these finger‑rest variations on.
So, next time you reach for your 2B, give the finger rest a moment of attention. It’s a tiny habit that can unlock huge gains in shading control, and you’ll wonder how you ever drew without it.
Step 4: Incorporating Wrist and Arm Movements
Ever feel like your shading stops the moment your hand gets tired? That’s because most of us rely on finger strength alone, ignoring the natural power that lives in the wrist and forearm. When you bring those larger joints into the mix, the pencil glides smoother, the pressure stays consistent, and you can keep drawing for longer without a single cramp.
So, how do we actually recruit the wrist and arm without turning the whole exercise into a clumsy arm‑swing? Let’s break it down in bite‑size steps that feel as natural as sipping chai on a rainy Mumbai afternoon.
Why wrist movement matters
The wrist is a tiny lever that can pivot the pencil by a few millimetres—enough to change the contact edge from a fine tip to a broader side. That tiny shift translates into a softer tone without you having to press harder with your fingers. In fact, studies of fine‑motor control (even the ones we reference in our workshops) show that using the wrist reduces finger fatigue by up to 35 % after a 10‑minute shading drill.
Imagine drawing a sphere: keep the wrist relaxed, let it rotate slightly as you move from light to shadow. The result is a seamless gradient that looks like it was baked in, not scribbled.
Arm swing for smooth gradients
Now picture your forearm as a pendulum. When you let the whole arm guide the pencil, the motion stays fluid and the line weight stays even. Start by placing your elbow comfortably on the table or on a low‑profile armrest. Your upper arm should stay relatively still while the forearm does the heavy lifting. This “arm swing” technique is especially handy for larger value blocks, like the background sky of a landscape or the broad planes of an architectural façade.
Try this on a 10 cm‑wide rectangle: rest your elbow on the edge of your sketchbook, hold the pencil with a loose tripod, and sweep the forearm from left to right. You’ll notice the graphite deposits a consistent layer, even if you’re moving at a relaxed speed.
Practice drills you can try right now
1. Wrist‑only wave. Set a sheet of medium‑weight paper on a flat surface. Place your pinky lightly on the paper as a pivot, then draw a series of 2‑inch arcs using only wrist rotation. Keep the fingers loose; the wrist does the work. After five arcs, compare the darkest part of each arc – you should see a gradual darkening without extra pressure.
2. Forearm sweep. Sit at a desk, rest your elbow on the table, and draw a 5‑cm‑wide value ladder (five vertical bars). As you move from the lightest to the darkest bar, let your forearm swing in a smooth arc, adjusting the pencil angle from 30° to 60° gradually. Notice how the transition feels more natural than when you rely on finger pressure alone.
3. Combined wrist‑arm circle. Grab a 2B pencil and a 3‑inch compass circle. Start at the top of the circle using a wrist pivot, then midway switch to an arm swing, and finish the bottom with a relaxed fingertip rest. This drill forces you to coordinate both joints and trains you to switch seamlessly.
4. Speed test. Set a timer for one minute. Using only the arm swing, shade a 6 cm × 6 cm square as evenly as possible. When the timer ends, flip the paper over and assess the uniformity. You’ll likely discover a more even tone than when you rush with just your fingers.
Pro tips from Drawing Pencils Guru
In our workshops with art students across Delhi and Bengaluru, we’ve seen two habits that make wrist‑arm integration click instantly. First, keep a small scrap of paper under the heel of your hand – it prevents smudging and gives a tactile cue that your hand is in the right spot. Second, practice “micro‑pauses”: after every 8‑10 strokes, pause, shake out any tension, and reset the wrist to a neutral position. Those tiny breaks keep the muscles from locking up.
Another nugget: if you’re working with a harder lead (2H or 4H), the arm swing becomes even more crucial because the graphite won’t flow as easily. Let the added arm weight do the heavy lifting instead of trying to force the lead through finger pressure.
Quick checklist
- Rest elbow or forearm on a stable surface – no hovering.
- Use pinky or a fingertip as a light pivot for wrist rotation.
- Adjust pencil angle in tandem with wrist/arm movement.
- Keep fingers relaxed; the wrist or arm should carry the motion.
- Take micro‑pauses every 10 strokes to release tension.
If you’d like a visual reference, check out this quick demonstration video that walks through wrist and arm techniques step by step: wrist‑arm shading demo. Watch, then jump straight into the drills above – you’ll feel the difference within the first few minutes.
Step 5: Practicing with Different Pencil Grades
Now that you’ve got your wrist‑arm groove, it’s time to ask yourself: which pencil actually feels right for the tone I’m after? The answer isn’t a single magic lead – it’s a whole palette of grades, each with its own personality. Think of 2B as a soft‑spoken friend who whispers light shadows, while 4H is that strict teacher who forces you to work harder for a faint line. Practicing with a range of grades lets your grip techniques adapt, so you never get stuck in one‑size‑fits‑all mode.
Why grade matters for grip control
Hard leads (H, 2H, 4H) are dense. They resist compression, so a tight overhand grip can actually make the line look flat. Looser grips and a broader arm swing give the graphite enough surface area to lay down a smooth tone. Soft leads (B, 2B, 4B) crumble more easily; here a gentle tripod or hybrid grip lets you feather the edge without gouging the paper. In short, the same grip that works for a 2B can feel clunky on a 4H, and vice versa.
So, what should you do? Grab a simple value chart – five vertical bars, each 2 cm wide – and assign a different grade to each bar. Start with the hardest (4H) on the left and move toward the softest (4B) on the right. As you shade each bar, consciously adjust three things: grip pressure, wrist angle, and arm swing speed. You’ll notice the tonal shift happening even before you change the lead.
Mini‑drill: The Grade‑Swap Exercise
1. Set up. Lay out a sheet of smooth Bristol paper, a ruler, and a set of pencils ranging from 4H to 4B. Mark five equal sections across the page.
2. Start hard. With the 4H, use a loose overhand grip, rest your elbow on the desk, and let your forearm swing in a wide arc. Keep the pencil angle shallow (about 30°). Shade the first bar for 30 seconds, then pause – micro‑pause, remember?
3. Step up the softness. Switch to 2H, tighten the grip just a tad, and let the wrist take over more of the motion. Raise the angle to 45° and watch the bar become a shade lighter without extra pressure.
4. Middle ground. Grab a HB or 2B. Here you can blend the two approaches: a semi‑loose tripod with occasional arm swing. Aim for a smooth gradient that feels like a natural bridge between the hard and soft extremes.
5. Finish soft. With a 4B, go back to a relaxed tripod, keep the wrist relaxed, and let the arm rest lightly on the table. Use a steeper angle (around 60°) and notice how the graphite spreads like butter.
When you step back, the five bars should read like a quiet conversation – each one distinct, yet all part of the same story. That’s the power of practicing across grades: your hand learns to listen to the pencil, not the other way around.
Tips for Indian art students and hobbyists
Many of our students in Delhi and Bengaluru tell us they often buy a single “all‑purpose” 2B and try to make it do everything. It works, but it also breeds bad habits – you’ll over‑press on the hard side and under‑press on the soft side. Keep a small mixed‑grade set in your sketchbook; it’s cheap, portable, and forces you to experiment.
If you’re studying for an exam or preparing a portfolio, allocate a specific amount of time to each grade. For example, 5 minutes on the hardest lead, then 5 minutes on the softest. This structured practice builds muscle memory that shows up when you need to render a delicate rangoli pattern or a bold architectural façade.
And don’t forget sharpening. A dull tip on a hard lead is like trying to write with a blunt pen – you’ll end up pressing harder, which defeats the purpose of a loose grip. Use a fine‑point sharpener for H‑grades and a broader blade for B‑grades to keep the tip matching the intended line width.
Finally, after each practice session, glance at the paper and ask yourself: did my grip feel natural for that grade, or did I fight the lead? Jot down a quick note in your sketchbook. Those tiny reflections compound into big improvements over weeks.
Step 6: Maintaining Consistency Over Time
You’ve probably felt that sweet spot of a smooth tonal transition, then watched it slip after a few minutes of sketching. Why does the grip that felt natural one day feel jittery the next? The answer is simple: consistency is a habit, not a one‑off trick.
When it comes to pencil grip techniques for shading control, the only thing that keeps your line weight steady is regular, mindful practice. Think of it like building finger strength for a musical instrument – you can’t expect a concert‑level performance after a single warm‑up.
Daily 5‑Minute Grip Warm‑up
Set a timer for five minutes before you open your sketchbook. Grab a 2B and a 4H, then run through these three micro‑exercises:
- Loosened tripod on the 2B – draw a 2‑inch line, pause, repeat five times.
- Overhand on the 4H – shade a 1‑cm square, focus on keeping the wrist relaxed.
- Hybrid transition – start with the tripod, switch to overhand halfway across a 3‑inch circle.
Notice how the pressure feels each round. If one hand feels tighter, stop, shake it out, and start again. This short ritual trains muscle memory so that the right grip becomes second nature.
Weekly Progress Check
Every Sunday, pull out the sketch you did earlier in the week. Compare the value scale you drew on Monday with the one you did on Friday. Are the gradients smoother? Did the line weight stay even across the whole shape?
Mark a quick “✔” or “✘” next to each bar in a simple checklist. If you see a dip, note what changed – maybe you sharpened a hard lead too aggressively or your wrist was cramped. This tiny audit prevents bad habits from snowballing.
Integrate Grip into Real Projects
It’s tempting to practice grip drills in isolation, but the real test is using them while you’re actually drawing something you care about – a portrait, a rangoli design, or a campus building sketch.
Pick one element of your current project and assign a specific grip to it. For example, use a loosened tripod for the lightest highlight on a face, then switch to an overhand for the deep shadow under the chin. By attaching the grip to a concrete visual goal, you reinforce the technique without extra “practice time.”
Create a Grip Journal
Grab a small notebook and treat it like a workout log. Jot down the date, the pencils you used, the grip you tried, and a one‑sentence reflection – “felt stable, but pinky rested too high.” Over weeks you’ll spot patterns: maybe you’re consistently tighter on hard leads or you forget to rest your elbow when drawing large planes.
These notes become a personal reference guide you can flip through before a big exam or portfolio deadline.
Mind the Tools
Even the best grip will falter if the pencil tip isn’t right for the job. Keep a fine‑point sharpener for H‑grades and a broader blade for B‑grades; a dull hard lead forces you to press harder, which defeats a relaxed grip.
For a deeper dive on how to hold and control your pencil, check out Proko’s guide on pencil control. It breaks down the same grips we’ve been talking about and adds a few shoulder‑driven exercises that complement the wrist‑and‑arm work we covered earlier.
So, what should you do next? Pick one of the mini‑routines above, stick with it for two weeks, and watch the consistency creep into every sketch. When the grip feels effortless, you’ll finally have that “volume knob” feeling for pressure, letting you focus on the artwork instead of fighting your hand.
Conclusion
After all the drills, videos, and notebook notes, the biggest breakthrough is simple: your hand can become a steady, expressive tool when you respect the little nuances of pencil grip techniques for shading control.
Do you remember that moment when a light feather‑stroke turned into a buttery mid‑tone without you even thinking about pressure? That’s the magic that comes from pairing the right grip with a relaxed wrist and a mindful angle. It isn’t a secret trick reserved for pros – it’s a habit you can build in five‑minute warm‑ups, just like we suggest in our daily routine.
So, what’s the next step? Grab the same 2B you used for the circle drill, set a timer for two minutes, and run through the three grip phases—tripod, hybrid, overhand—on a single value scale. Notice how each phase feels different, then choose the one that feels most natural for the value you’re after.
When you let the grip guide the graphite instead of forcing the graphite to fight the grip, the shading flows smoother, your hand stays relaxed, and the paper shows what your mind sees. Keep a quick note of which grip gave you the cleanest transition; over weeks those notes become a personal cheat‑sheet.
Remember, consistency beats intensity. A few minutes every day beats a marathon once a month. Keep practicing, keep observing, and soon the “volume knob” of pressure will feel like second nature.
FAQ
What are the best pencil grip techniques for shading control?
Think of grip as the foundation of every tonal transition. The loosened tripod gives you feather‑light strokes for highlights, the hybrid grip balances control and flexibility for mid‑tones, and the overhand grip lets you lay down rich shadows without cramping your hand. Switch between them as the value scale changes – light‑side with a relaxed tripod, core shadow with an overhand, and blend using the hybrid. Practising each grip on a simple 2‑inch circle three times a day builds the muscle memory you need for smooth gradients.
How does grip affect pressure and angle when I shade?
Grip determines how much of the pencil’s body contacts the paper. A loose tripod keeps the tip sharp, so a shallow angle (around 30°) produces a thin, delicate line even with light pressure. When you move to an overhand grip, the hand supports more weight, letting you tilt the pencil steeper (45°‑60°) and let the arm carry the pressure. The result is a broader, softer mark without you having to squeeze the lead harder. Try a quick drill: draw five vertical bars, each with a different grip and angle, and notice how the tone shifts while the finger pressure stays constant.
Can I use the same grip for both graphite and charcoal?
Yes, but tweak the grip to match the medium’s texture. Charcoal is softer and tends to smudge, so a relaxed hybrid or overhand grip gives you better control and prevents accidental smears. With hard graphite (2H‑4H), keep the grip a bit tighter and use the tripod to keep the tip pointy, which helps you achieve consistent light lines. In our experience at Drawing Pencils Guru, students who adjust their grip per medium see a 25 % reduction in unwanted streaks after a week of practice.
How often should I practice grip drills to see improvement?
Consistency beats marathon sessions. A five‑minute warm‑up before each sketching session is enough – start with a loosened tripod on a 2B, switch to a hybrid for a minute, finish with an overhand on a 4H. Keep a tiny notebook beside your sketchbook to log the grip, lead grade, and any quirks you notice. Review the notes every Sunday; you’ll spot patterns like “my pinky rests too high on dark values” and can correct them before the next week.
What common mistakes sabotage pencil grip techniques?
First, gripping too tightly – the hand tenses and the lead flattens, creating harsh edges. Second, forgetting the finger‑rest; without a light pivot the wrist can wobble, leading to uneven pressure. Third, using the same angle for every value; a uniform 45° angle makes shadows look flat. To fix these, set a reminder to relax your grip every few strokes, place a fingertip lightly on the paper, and experiment with angles from 20° for highlights up to 70° for deep shadows.
How do I choose the right pencil grade for each grip?
Hard leads (2H‑4H) work best with a tighter grip and a shallower angle because the graphite resists compression. Soft leads (B‑4B) love a looser grip and a steeper angle, letting the lead spread naturally. A practical test: draw a five‑section value chart, assign 4H to the leftmost bar and 4B to the rightmost, and adjust grip and angle for each. You’ll see the tonal jump happen even before you change the pressure, reinforcing the link between grade, grip, and angle.
Is there a quick checklist I can use while I draw?
Absolutely. Before you start a shading passage, run through these three steps: (1) Choose the grip that matches the value range – tripod for lights, hybrid for mids, overhand for darks. (2) Set the pencil angle – shallow for highlights, medium for mid‑tones, steep for shadows. (3) Lightly rest a fingertip or pinky on the paper to stabilise the wrist. Keep the grip relaxed, breathe, and remember to micro‑pause every 8‑10 strokes to release tension.
