
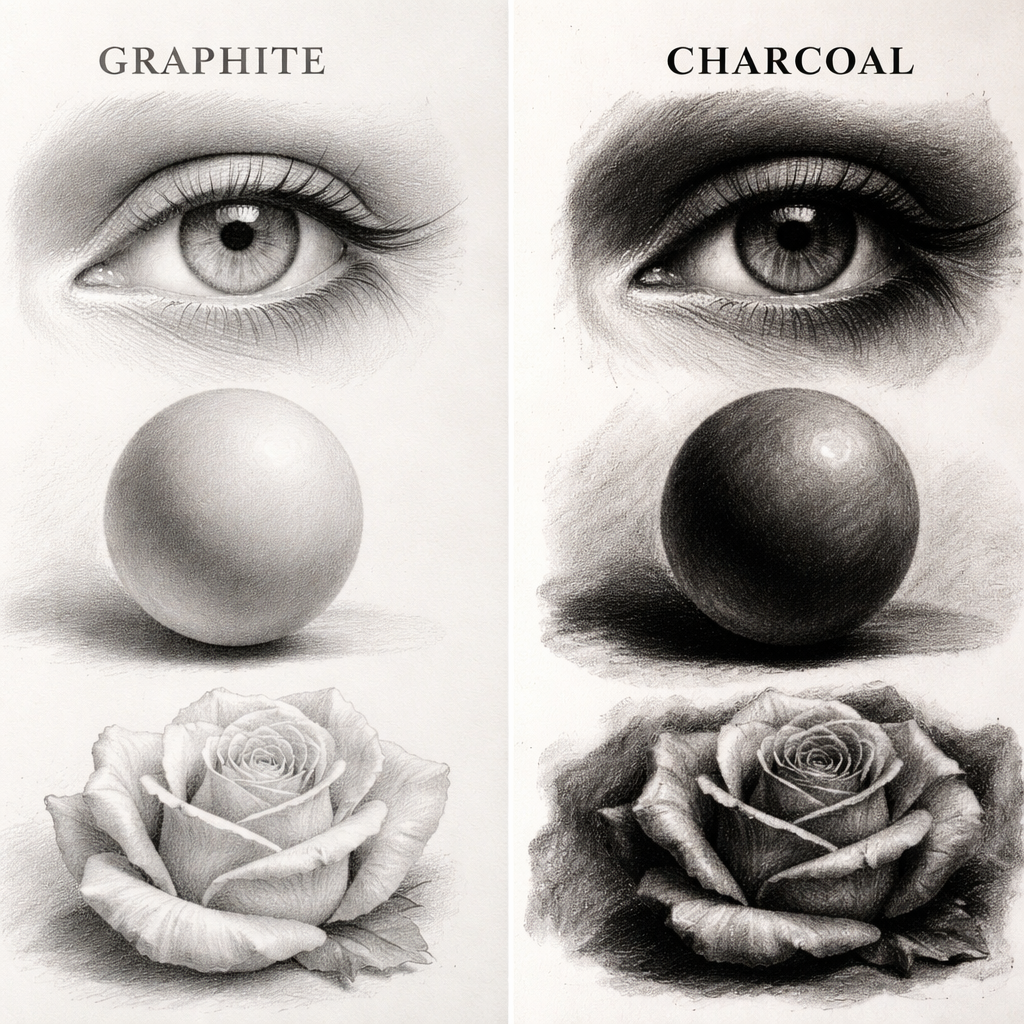
Imagine you sit at a desk with a fresh sketchpad. You pick up a soft gray pencil to shade a cheek. The line looks smooth, but the dark spot you add next looks flat, like a smudge. You wonder why the two pencils behave so different. That feeling is common for anyone who tries to shade with both graphite and charcoal. The key is knowing the difference between graphite and charcoal pencils for shading. In this guide we’ll walk through that gap step by step. You’ll see real tips, see how pros blend the media, and learn when each tool shines. By the end you’ll feel ready to pick the right lead for any mood on paper.
What Sets Graphite Pencils Apart
Graphite pencils are the workhorse of most art kits. They are made from powdered carbon mixed with clay. The more clay you add, the harder the lead. The more carbon, the softer and darker the mark. That simple recipe explains why a 2B feels smooth while an HB feels stiff.
One big win for graphite is control. You can press hard for a dark line, then lift to leave a lighter trace. The lead stays glued to the wood, so you can layer without the mark sliding off. This makes graphite great for fine detail, like the curl of a hair or the grain of a leaf.
Another perk is the range of tones. From the lightest 9H to the deep 9B, you have a full grayscale at your fingertips. You can build a smooth transition by switching grades as you go. That is why many portrait artists trust graphite for subtle skin tones.
Graphite also works well on many papers. A smooth Bristol will give a clean line, while a rough sketch paper will hold more graphite and let you blend with a tortillon.
How to choose the right grade
- Start with an HB for light sketches and a 2B for basic shading.
- Add a 4B or 6B when you need deep shadows or dramatic contrast.
- Keep a 4H or 6H on hand for crisp outlines and technical work.
Tips for better graphite shading
- Use a light hand first, then deepen dark areas with extra pressure.
- Blend with a soft cloth or a blending stump for smooth transitions.
- Erase gently with a kneaded eraser to lift lift‑off highlights.
Understanding the difference between graphite and charcoal pencils for shading starts with seeing how graphite behaves on paper. It stays where you put it, lets you layer, and offers precise control. That is why many beginners start with graphite before moving on to the messier charcoal.
For a deeper dive into how graphite compares to charcoal, check out Charcoal Pencils vs Graphite Pencils: A Detailed Guide for Artists. The article walks through grades, textures, and best practices in plain language.
And if you love lists, you might enjoy Buying a Pontoon Boat OK: 7 Essential Tips for Choosing the Right Vessel – it shows how a good checklist can make any decision easier, even picking pencils.
Why Artists Choose Charcoal Pencils for Shading
Charcoal pencils give a rich, velvety black that graphite can’t match. They are made from burnt wood or vine sticks, then packed into a wooden barrel. The result is a soft, powdery core that lays down heavy tone with little pressure.
One reason artists love charcoal is the depth of dark. A single stroke can look almost like ink, yet you can still smudge it for a soft haze. This is perfect for dramatic night scenes or bold portrait shadows.
Charcoal also works well on textured paper. The rough fibers catch the charcoal particles, holding them in place. This adds a natural grain to the drawing that many artists find appealing.
There are several grades of charcoal pencils, similar to graphite. Soft grades (B, 2B) lay down very dark marks. Harder grades (HB, H) give lighter, more controlled lines. The Nitram guide notes that higher numbers like 60 or 800 refer to harder, lighter sticks, while lower numbers are softer and darker.
Here’s a quick look at common grades:
- Soft (B, 2B, 4B) – deep black, easy to smudge.
- Medium (HB, H) – lighter tone, good for outlines.
- Hard (2H, 4H) – faint marks, useful for initial sketches.
Because charcoal is so soft, it can be messy. That is why many artists use a fixative spray after they finish. It locks the particles in place and prevents smearing.
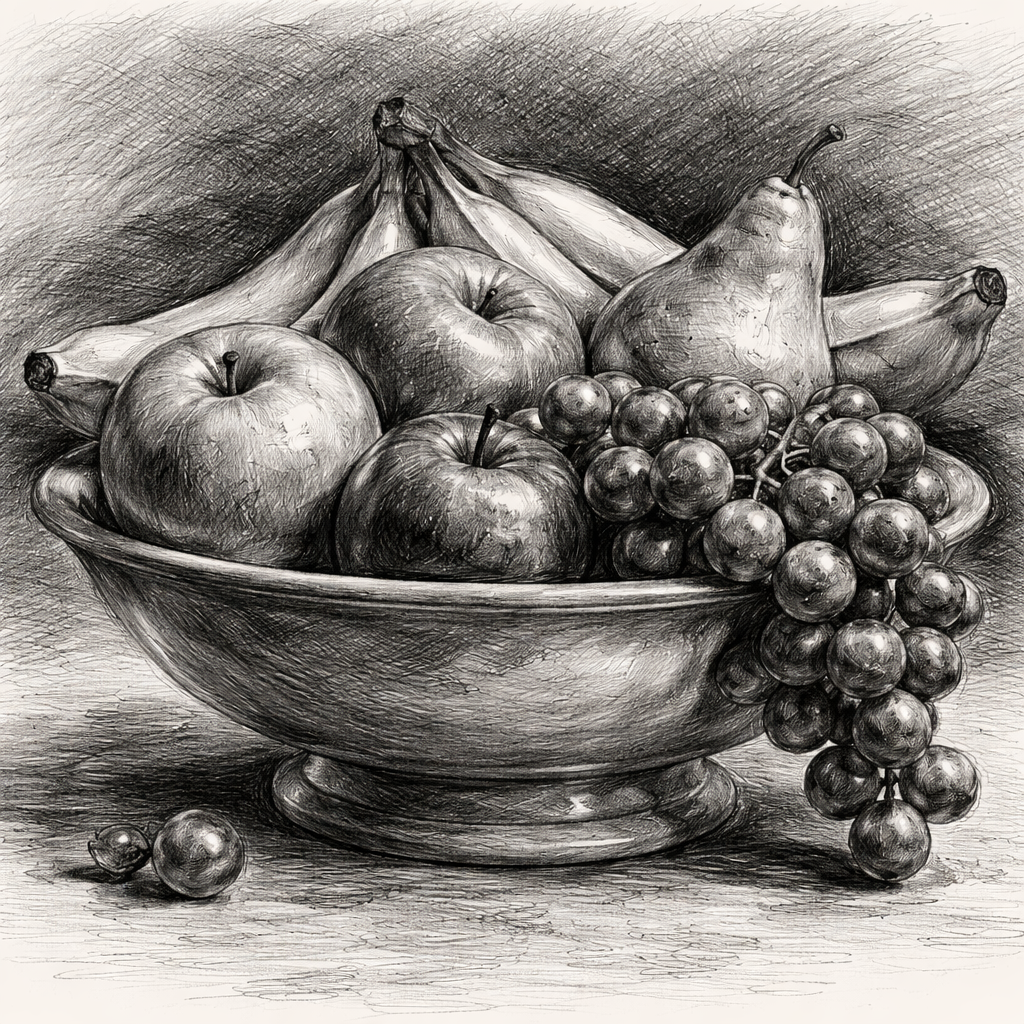
Now, let’s see how the difference between graphite and charcoal pencils for shading shows up in a real sketch. Imagine drawing a fruit bowl. You start the apple’s highlight with a light HB graphite, then switch to a soft charcoal pencil for the deep shadow under the fruit. The contrast makes the apple pop.
For more on charcoal grades, the Nitram blog explains the numbering system in detail: What is the difference between charcoal grades?.
Blending Tips: Combining Graphite and Charcoal
Many artists ask how to mix graphite and charcoal in one piece. The short answer: you can, but you need a plan. The two media have different textures. Graphite sticks to the paper, while charcoal is powdery.
If you put graphite down first, the surface becomes slick. Charcoal then slides off and won’t stick well. That’s why most pros start with charcoal for the darkest zones, then add graphite for fine highlights.
Here’s a simple workflow:
- Sketch the basic shapes with a hard graphite (HB or 2H).
- Lay down charcoal in the shadow areas. Use a soft B or 2B charcoal pencil.
- Blend the charcoal with a blending stump or soft cloth.
- Add light graphite details on top of the blended charcoal. Use a 2B or 4B for subtle tones.
- Finish with a kneaded eraser to lift highlights from the graphite layer.
One tip from the Lachri Q&A site says: “Don’t put the graphite down first in any area you will want the carbon pencil (or charcoal) because the graphite makes the paper too slick.” Follow that advice and you’ll see fewer slip‑ups.
Another trick: keep the two tools separate on the paper. Treat each as its own zone. This avoids over‑mixing, which can turn the dark into a muddy gray.
Below is a quick visual aid on how to keep the zones distinct.
When you practice this method, you’ll notice the difference between graphite and charcoal pencils for shading becomes a tool you can control, not a mystery.
For a deeper dive into the blending challenge, read the full Q&A at Mixing Charcoal and Graphite. It offers real artist comments and more tips.
And if you love event planning checklists, see How to Choose the Best Corporate Event Photo Booth Rental for Your Business for a clear step‑by‑step guide.
Side‑by‑Side Comparison: Graphite vs Charcoal
Seeing the difference between graphite and charcoal pencils for shading on paper helps you decide which to reach for. Below is a quick table that lines up the main traits.
| Feature | Graphite | Charcoal |
|---|---|---|
| Darkness | Moderate to dark (depends on grade) | Very dark, velvety black |
| Texture | Smooth, metallic feel | Powdery, soft |
| Control | High; fine lines easy | Lower; lines can spread |
| Blendability | Good with stump or cloth | Excellent; smudges easily |
| Paper Compatibility | Works on smooth & rough | Best on textured paper |
| Fixative Need | Rarely needed | Often needed to lock marks |
From this table you can tell when each tool shines. Use graphite for precise detail and when you need a clean line. Use charcoal for deep shadows and when you want a soft, atmospheric feel.
Here are three quick scenarios:
- Portraits: Start with graphite for the facial structure, then add charcoal for the darkest shadows under the chin.
- Landscapes: Use charcoal to block in sky and water tones, then finish with graphite for trees and rock texture.
- Technical sketches: Stick with graphite only for crisp, reproducible lines.
And remember, the difference between graphite and charcoal pencils for shading is not a rule that locks you in. Many artists mix both to get the best of each world.
For more ideas on creative setups, look at Your Complete Guide to Photo Booth Rental San Diego. It shows how lighting and backdrop choices can change a scene, much like picking the right pencil.
Conclusion and Next Steps
We’ve walked through the core difference between graphite and charcoal pencils for shading. Graphite gives control, clean lines, and easy blending on many papers. Charcoal offers deep black, soft texture, and a dramatic feel on textured paper. You now know when to start with one, when to finish with the other, and how to blend them without a mess.
Next, pick a simple sketch and try the workflow we listed: start with a hard graphite, add charcoal for shadows, blend, then return to graphite for highlights. Notice how the tones shift. Keep a kneaded eraser and a fixative spray handy.
If you want more detailed guides, explore the many articles on the Drawing Pencils Guru site. Keep practicing, and the choice between graphite and charcoal will become second nature.
FAQ
What is the main visual difference between graphite and charcoal pencils?
The biggest visual difference is the darkness and texture. Graphite gives a metallic gray that can be light or dark depending on the grade. Charcoal lays down a rich, velvety black that looks softer and can be smudged easily. Knowing this helps you pick the right tool for the mood you want to create in your shading.
Can I use the same paper for both graphite and charcoal?
You can, but results vary. Smooth paper works best for graphite because it lets you draw fine lines. Charcoal needs a bit of tooth, so a textured or rough paper holds the powder better. If you plan to mix both, a medium‑grade sketch paper gives a happy middle ground.
How do I prevent charcoal from smearing after I finish?
Use a fixative spray once the charcoal is dry. Hold the can about a foot away and spray a light, even coat. Let it dry fully before touching the drawing. This locks the particles and keeps the charcoal from moving when you add graphite highlights later.
Is it better to start with charcoal or graphite when I want to blend both?
Start with charcoal for the darkest zones, then add graphite on top for lighter highlights. This order avoids the slick surface that graphite can create, which would make charcoal slip off. The workflow we gave in the blending section works well for most artists.
Do I need special tools to sharpen charcoal pencils?
Charcoal pencils sharpen best with a metal hand‑held sharpener or a dedicated charcoal sharpener. Avoid a regular wood pencil sharpener; it can crush the soft lead. A small knife or sandpaper block also works if you prefer manual control.
How often should I erase charcoal when working on a piece?
Erase gently with a kneaded eraser. Press lightly to lift the charcoal without tearing the paper. Work in small sections and re‑shape the eraser as you go. This lets you bring back highlights without over‑working the paper surface.
Can I mix charcoal and graphite on colored paper?
Yes, but test a small area first. Colored paper may affect the tone of both media. Charcoal can look darker on a dark paper, while graphite may appear lighter. Using a fixative after you finish will keep the colors from bleeding.
What safety tips should I follow when using charcoal?
Charcoal dust can be messy, so work in a well‑ventilated area and consider a mask if you’re sensitive. Keep a damp cloth nearby to wipe off excess dust from your hands and tools. Clean your workspace regularly to avoid buildup.
