
Imagine you sit at a desk with a fresh sketchbook, a ruler, and a handful of graphite pencils. You want to draw a dimly lit alley, the shadows stretching like fingers. You start the first line, then you try to fill the dark space with crosshatching. The lines look uneven, the tones look flat, and the mood feels off. The problem? You didn’t know how to choose a pencil for crosshatching technique. The right pencil can give you smooth, even strokes that build depth without smudging. The wrong one can make your work look rough and unfinished. In the next few minutes, we’ll walk through every step you need to pick the perfect pencil, test it, and match it to your style. You’ll learn the grades, the lead texture, how to try a pencil before you buy, and which brands actually deliver on paper. By the end, you’ll feel confident that your next crosshatching will look clean, realistic, and full of life.
Step 1: Understand Pencil Grades and Their Impact on Crosshatching
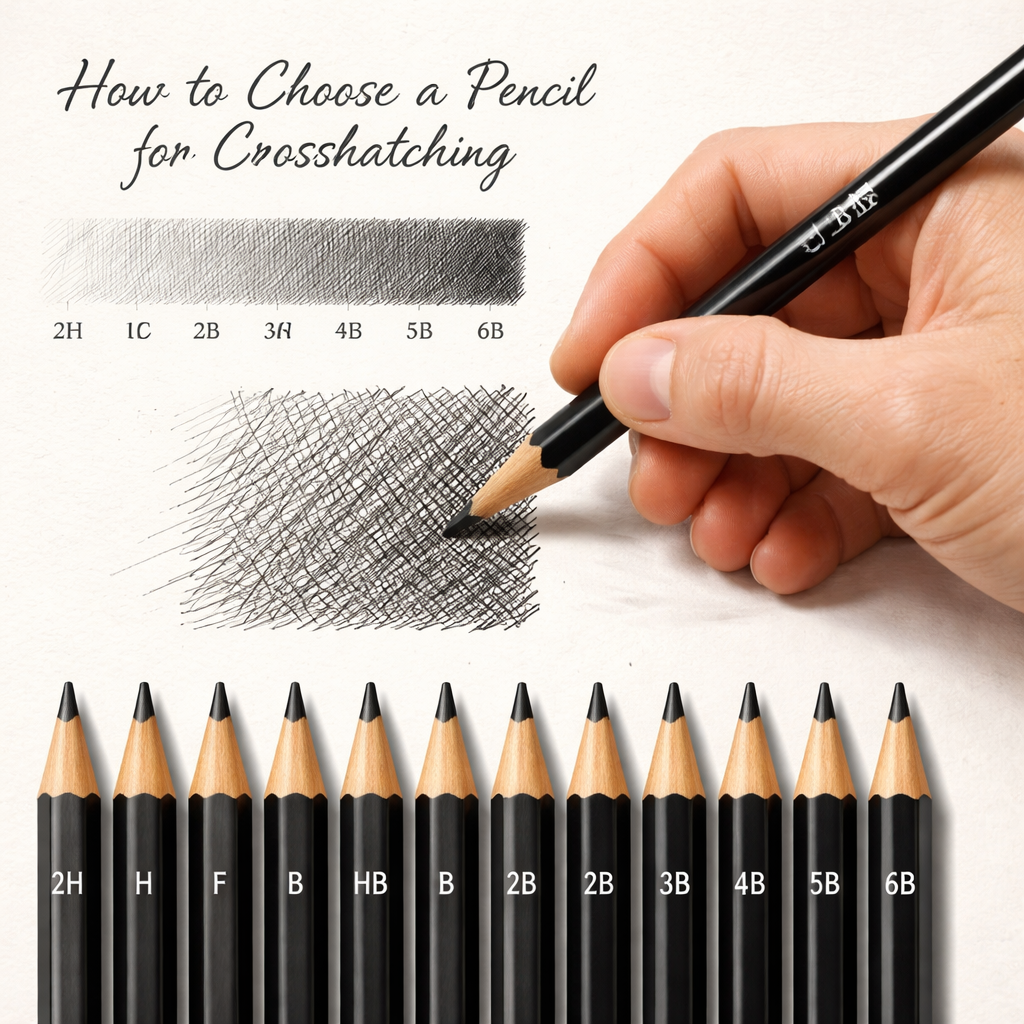
Knowing how to choose a pencil for crosshatching technique starts with the grade. Pencil grades run from hard (H) to soft (B). Hard leads (9H‑HB) leave light, fine lines. Soft leads (B‑9B) leave dark, thick lines. The grade you pick will shape the value you can get from each stroke.
Hard grades are great for light texture. They let you lay down many thin lines without digging into the paper. That makes them perfect for subtle shadows or for building tone slowly. Soft grades give you rich darks quickly. They are ideal when you need deep shadows in a short space.
Here’s why it matters for crosshatching:
- Control: Hard leads let you control line spacing easier.
- Layering: Soft leads let you stack fewer lines for the same darkness.
- Paper wear: Hard leads keep the paper surface smooth, while soft leads can tear thin paper.
Most artists use a range. A common combo is 2H, HB, 2B, and 4B. This set covers light, mid, and dark values without buying a whole box.
Imagine you’re drawing a metal cylinder. Start with 2H for the light reflected spot, switch to HB for the mid‑tone, then use 2B for the shadow, and finish with 4B for the deepest part. The transition feels natural because each grade gives a predictable darkness.
When you pick a pencil, also think about the “lead strength.” Some soft pencils feel brittle and break easily. Others have a “sticky” feel that clings to the paper. Test the lead by drawing a quick line. If it snaps, look for a brand that uses stronger binders.
For a deeper dive into how grades affect hatching, you can read the detailed guide at Mastering the Art of Pencil: Exploring the Techniques of Hatching. Another helpful page from the same site explains how to blend grades for realistic shading.
Actionable tips:
- Start with a small set: 2H, HB, 2B, 4B.
- Label each pencil with its grade for quick swaps.
- Keep a scrap paper pad nearby to test line darkness before you commit to the drawing.
By grasping how each grade behaves, you’ve taken the first step in how to choose a pencil for crosshatching technique. The next step is to look at the lead material itself.
Step 2: Choose the Right Lead Material and Texture
The lead isn’t just “hard” or “soft.” It’s made from graphite mixed with clay, wax, or oil. The mix decides how smooth the stroke feels and how much it smudges.
Pure graphite gives a shiny, metallic look. It’s great for bright highlights but can be too slick for heavy crosshatching. Adding clay makes the lead harder and smoother. Wax or oil adds a bit of “slip,” letting the lead glide and lay down dark tones without digging.
Here’s a quick way to feel the difference:
- Take a fresh pencil and draw a line on a piece of newsprint.
- Feel the tip with your thumb. If it feels gritty, it’s high‑clay (harder). If it feels buttery, it’s wax‑rich (softer).
- Shade a small square with the same pressure. Notice if the line looks shiny (graphite‑rich) or matte (clay‑rich).
Why does this matter? A buttery lead can blend easily, which is handy when you want smooth gradients. But it can also smear, making clean crosshatching tricky. A gritty lead holds its line better, perfect for crisp, defined hatch marks.
Let’s say you’re drawing a rainy window. You’ll need smooth, blended tones for the water drops. A wax‑based soft lead like 4B will work well. For the window frame’s fine wood grain, a gritty 2H will keep each line sharp.
Some brands label their pencils with “premium” or “artist grade.” Those often use higher‑quality binders that resist breakage. If you’re on a budget, a student‑grade pencil can still work, just test it before you buy a whole set.
Actionable tips for choosing lead material:
- Pick a wax‑rich soft lead for smooth gradients (e.g., 4B, 6B).
- Choose a clay‑rich hard lead for crisp hatch lines (e.g., 2H, HB).
- Buy a single pencil from each category and test on the paper you’ll use.
To see more about lead composition, you can explore the artist‑grade reviews on Graphite Pencils for Drawing: Choosing the Right Tools and Techniques. That link is the one internal reference we’ll use in this guide.
Now that you know how lead texture works, it’s time to see how to test a pencil before you buy it.
Step 3: Watch How to Test Pencil Performance
Testing a pencil is like a quick audition. You don’t need a lab; a few simple steps will tell you if the pencil fits your crosshatching style.
First, grab a piece of the paper you plan to draw on. Different papers react differently to lead. Rough paper grabs more lead, making lines darker. Smooth paper lets the lead glide, which can be too light for hard grades.
Next, do three quick tests:
- Line Test: Draw a straight line with medium pressure. Look at the line’s width and darkness. Is it even?
- Smudge Test: Lightly rub the line with a fingertip or a blending stump. Does it blend smoothly or create a harsh edge?
- Break Test: Press a little harder to see if the tip breaks or if the lead compresses.
While you’re testing, keep a notebook of your observations. Write down the grade, brand, and how each test felt. This habit helps you compare later.
Here’s a short video that walks you through the exact steps. Watch it, then try the test yourself:
After the video, you’ll notice a pattern. Soft pencils may smudge quickly but give rich darks. Hard pencils stay clean but need more passes to get dark tone.
To make the most of your test, try it on two paper types: a smooth Bristol board and a textured sketch paper. Compare the results. If a pencil looks great on Bristol but leaves streaks on textured paper, you may need a different lead texture for that paper.
Actionable testing checklist:
- Use a single, consistent pressure for the line test.
- Mark the smudge test with a small circle to see blend radius.
- Record break test notes: “no break,” “crumbly,” or “hard snap.”
- Repeat with at least three grades to see the range.
By following these steps, you’ll know exactly how to choose a pencil for crosshatching technique based on real performance, not just brand hype.
Step 4: Compare Popular Pencil Brands and Their Features
Now that you’ve tested a few leads, it’s time to see how the big brands stack up. Different makers use unique binders, wood grades, and packaging that affect price and durability.
| Brand | Popular Grades | Lead Texture | Typical Price (India) | Best For |
|---|---|---|---|---|
| Faber‑Castell | 2H, HB, 2B, 4B | Balanced clay‑graphite | ₹250 per 12‑pack | Consistent line quality |
| Derwent | 2H, 2B, 6B, 8B | Wax‑rich soft leads | ₹300 per 12‑pack | Deep darks, smooth blend |
| Staedtler | HB, 2B, 4B, 6B | High‑clay hard leads | ₹220 per 12‑pack | Sharp hatch marks |
| Prismacolor | 2H, HB, 2B, 6B | Very soft, oily | ₹350 per 12‑pack | Professional shading |
| Camlin | HB, 2B, 4B | Standard student grade | ₹180 per 12‑pack | Budget friendly |
Notice the pattern: brands that market “artist” lines (Derwent, Prismacolor) lean soft and waxy, while “technical” lines (Staedtler) stay harder. If your crosshatching needs crisp, repeatable lines, a brand like Staedtler or Faber‑Castell will feel steadier. If you want deep shadows with fewer strokes, Derwent or Prismacolor can be worth the extra cost.
Here’s a quick comparison:
- Durability: Faber‑Castell’s wood holds the lead well, so you won’t break tips often.
- Cost vs. Quality: Camlin offers decent performance for beginners at a low price, but the lead may feel grainy.
- Blendability: Prismacolor’s oily lead blends like butter, great for soft gradients but can be messy.
Real‑world example: An art student in Mumbai tried Derwent 6B on smooth Bristol for a portrait. The shadows looked rich, but the lead smeared when she tried to add fine hatch marks. She switched to Staedtler 2B for the same piece and got cleaner lines without losing depth.
Actionable brand tips:
- Start with a mixed set: 2H (Faber‑Castell), HB (Camlin), 2B (Staedtler), 4B (Derwent).
- Buy a single pencil from each brand to test before buying a full box.
- Keep a small sharpening stone handy; softer leads need a gentle point.
With this table in hand, you can see exactly how each brand helps you figure out how to choose a pencil for crosshatching technique based on your budget and style.
Step 5: Select the Perfect Pencil Based on Your Style and Project
All the testing and comparing leads you to one final decision: which pencil fits the art you want to make? The answer depends on three things – the look you want, the paper you’ll use, and how much time you can spend.
If you love crisp, geometric patterns (think architectural sketches), you’ll want a hard lead that stays thin. A 2H or HB from Staedtler will give you sharp lines that don’t smudge. Pair it with a fine‑grain paper so the texture doesn’t interfere.
If you draw moody portraits with deep shadows, a soft lead like 4B or 6B from Derwent or Prismacolor will let you build dark values quickly. Use a smooth Bristol board to keep the paper from tearing under the soft lead.
For mixed media works (ink plus graphite), you’ll need a versatile pencil that can both blend and stay clean. An HB from Faber‑Castell works well because it offers moderate darkness and good control.
Here’s a short decision flow you can follow:
- Ask yourself: Do I need light texture or deep dark?
- Pick a grade range that covers that need.
- Check the lead texture – waxy for smooth blend, gritty for crisp hatch.
- Test on the exact paper you’ll use.
- Choose the brand that gives the best feel at your price point.
Example project: You’re creating a comic book page with a night‑time chase scene. You need both sharp building outlines and gritty street shadows. You might pick a 2H for the building edges, an HB for mid‑tone street surfaces, and a 4B for the night sky. This combo gives you full control over each element.
Actionable style tips:
- Keep a small “style kit” – one hard, one medium, one soft pencil – for quick swaps.
- Match pencil choice to paper texture; test on a scrap before you start.
- Label each pencil with its intended use (e.g., “dark shadows”) to avoid confusion.
And remember, the best way to master how to choose a pencil for crosshatching technique is to keep experimenting. As your hand gets steadier, you’ll find the exact grades and brands that feel like an extension of your own wrist.
Conclusion
Choosing the right pencil for crosshatching is not a guess. It starts with understanding grades, then feeling the lead texture, testing on your own paper, comparing brands, and finally matching the tool to your style. By following these steps, you’ll know exactly how to choose a pencil for crosshatching technique that gives you clean lines, rich shadows, and the confidence to finish any drawing. Keep a small testing notebook, try a mixed set of grades, and don’t be shy about swapping pencils mid‑drawing. Your next piece will show the difference – crisp, realistic shading that brings your vision to life. If you want more tips on picking the right tools for portraits, check out our guide on how to choose the right graphite pencil for portrait shading. Happy drawing!
FAQ
What grade should I start with for beginner crosshatching?
Start with a simple set: 2H, HB, 2B, and 4B. This range lets you make light lines, medium tones, and dark shadows without buying a full box. Test each on the paper you’ll use, and you’ll quickly see which grades give the values you need for how to choose a pencil for crosshatching technique.
How does paper texture affect my pencil choice?
Rough paper grabs more lead, making lines darker and easier to see. Smooth paper lets the lead glide, which is better for hard grades that need fine lines. When you know how to choose a pencil for crosshatching technique, match a hard lead like 2H with rough paper for crisp hatches, and a soft lead like 4B with smooth paper for smooth shadows.
Can I use charcoal instead of graphite for crosshatching?
Charcoal works, but it’s messier and darker than graphite. If you want clean, controllable lines, stick with graphite. Charcoal can be great for very dark areas, but you’ll need a fixative to stop smudging. For most crosshatching, learning how to choose a pencil for crosshatching technique with graphite will give you more precision.
Do I need a special sharpener for soft pencils?
Yes. Soft leads break easily, so a high‑quality metal or rotary sharpener works best. A simple wooden sharpener can crush the lead. Keep the tip pointy, but not too thin, so you can lay down smooth strokes when you figure out how to choose a pencil for crosshatching technique.
How often should I replace my pencils?
Replace a pencil when the lead snaps often or the wood starts to split. For hard leads, you may get many pages out of one pencil. Soft leads wear faster, especially if you use heavy pressure. Keep a spare of each grade so you never run out while learning how to choose a pencil for crosshatching technique.
Is there a difference between American and Indian pencil brands?
Both make quality pencils, but some Indian brands focus on budget-friendly options, while American brands often market artist‑grade lines with premium binders. Test a few from each region; you might find a Camlin HB works just as well as a Faber‑Castell HB for how to choose a pencil for crosshatching technique on local paper.
Should I blend crosshatching lines with a blending stump?
Blending can smooth out harsh edges, but it can also erase the crispness you worked for. Use a blending stump sparingly on soft grades like 4B when you need a soft transition. Keep the lines sharp on hard grades like 2H for texture. Knowing how to choose a pencil for crosshatching technique helps you decide when blending adds value.
Where can I find more detailed brand comparisons?
You can explore the full brand breakdown on the Drawing Pencils Guru site. It lists specs, prices, and user feedback for each major brand. This helps you decide how to choose a pencil for crosshatching technique based on real‑world performance.
For more on related topics, check out AI Video Editing Tutorial: A Simple Guide for Business Owners. For photo‑booth ideas, see Your Complete Guide to Photo Booth Rental Temecula for Unforgettable Events. You can also learn about 360 video booths at Everything You Need to Know About 360 Video Booth Rental. For birthday party tips, read Birthday Party Photo Booth Rental Guide for 2026. If you need a mirror booth, see Mirror Photo Booth Rental: 7 Must‑Know Tips for an Unforgettable Event. For corporate events, explore How to Choose the Best Corporate Event Photo Booth Rental for Your Business. For prom ideas, read How to Choose the Perfect Prom Photo Booth Rental for an Unforgettable Night. For graduation parties, see Photo Booth Rental for Graduation Party: A Step‑by‑Step Guide. For Murrieta events, check Photo Booth Rental Murrieta: A Complete Guide for 2026 Events. For San Diego events, explore Your Complete Guide to Photo Booth Rental San Diego. For wedding ideas, read How to Choose the Perfect Wedding Photo Booth Rental: A Step‑by‑Step Guide. And for a boat purchase, see Buying a Pontoon Boat OK: 7 Essential Tips for Choosing the Right Vessel.
