
Choosing the right graphite pencils can make or break a landscape sketch. Most beginners grab the first pencil they see and end up with muddy tones or broken lines. In this guide you’ll learn how to choose pencils for landscape drawing step by step, from spotting your style to building a kit that works for any scene. Follow each step and you’ll see clear, realistic shading without endless trial and error.
Step 1: Assess Your Landscape Drawing Style
The first thing you need to do when learning how to choose pencils for landscape drawing is to look at how you like to work. Do you prefer quick, loose sketches or detailed, layered studies? Your answer will tell you which grades and textures will feel natural.
Start by making tiny drawings. A small piece of paper forces you to stay loose and avoid getting stuck on tiny details. This trick is recommended by many teachers because it keeps the mind fresh and the hand relaxed.
When you sketch a cloud, use light, round strokes. When you outline a hill, a slightly firmer hand helps keep the line steady. The key is to match the pressure you use with the right pencil hardness. Bonny Snowdon’s free tips for artists stress that tiny sketches “help you loosen up, avoid getting bogged down, and finish in one sitting.” That same idea works for any landscape.
Ask yourself these three questions:
- Do I like soft, blended tones or crisp, defined edges?
- Do I work mainly on smooth paper or textured stock?
- Do I use a lot of layering or keep it simple?
Answering them narrows the pencil range you’ll need. For example, if you love soft clouds, a B‑grade pencil (soft) will give you the dark, velvety tone without pressing hard. If you prefer sharp tree trunks, an H‑grade (hard) keeps lines light and precise.
Here’s a quick test you can run: draw a simple hill, a tree, and a sky using a 2B, 4B, and HB pencil. Notice which one feels right for each part. That experiment is a fast way to see how different grades react to your hand.
Why does this matter? Because using the wrong grade forces you to over‑press, which can damage the paper and make erasing a nightmare. By aligning your style with the right grades early, you save time, money, and frustration.
Tip: Keep a small notebook of your favorite grade combos for each element. Actionable tip: Write down “2B = clouds, 4H = distant trees” and refer back whenever you start a new piece.
For more ideas on finding your style, see How to Master AI Video Editing for Social Media – the article talks about stepping back and seeing the big picture, which works the same for drawing.
Now that you know how to assess your style, you’re ready to learn the grades that will match it.
Step 2: Understand Pencil Grades and Hardness
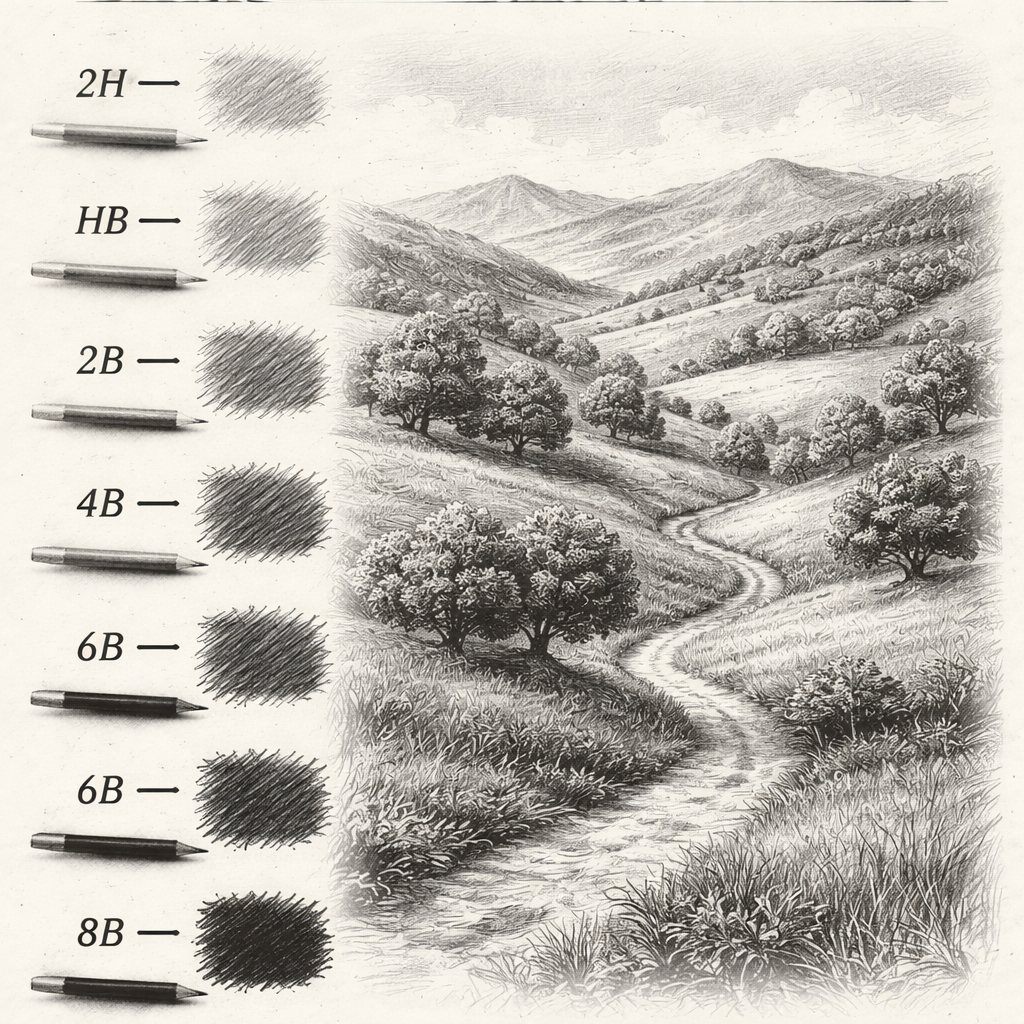
Knowing how to choose pencils for landscape drawing means knowing what the letters and numbers really mean. Pencil grades run from hard (H) to soft (B). The higher the number, the more extreme the property.
| Grade | Hardness | Typical Use in Landscapes |
|---|---|---|
| 9H | Very hard | Fine lines, distant details |
| 4H | Hard | Sketching outlines, light texture |
| HB | Neutral | General purpose, writing |
| 2B | Soft | Mid‑tone shading, foliage |
| 4B | Soft | Dark shadows, deep water |
| 6B | Very soft | Heavy black areas, night sky |
Hard pencils (H range) keep a sharp point longer and make lighter marks. That’s great for distant hills where you want a faint line. Soft pencils (B range) make dark, rich marks that blend easily—perfect for clouds or ground textures.
Here’s a simple rule of thumb: use a hard grade for anything you want to keep light, and a soft grade for anything you want to make dark.
Example: Imagine you’re drawing a sunrise over a lake. You’d start with a 2H for the far horizon line, then switch to a 4B to darken the water reflections. The contrast creates depth without extra effort.
Why does the ratio of graphite to clay matter? More clay makes the lead harder, so the pencil leaves less graphite on the paper. More graphite makes it softer, so the lead deposits more material and looks darker. This is why a 2B feels “black” while a 2H feels “light.”
Now, let’s add two more external references for credibility. The Dick Blick guide on drawing pencils explains the same hardness scale in detail, and it also notes that “hard leads hold a point longer but make lighter marks.” Another trusted source, the same Dick Blick page, confirms that soft leads need more frequent sharpening.
Actionable tip: Keep a small chart of your favorite grades next to your sketchbook. Write down “4H = distant trees, 2B = foliage” and refer to it each session.
With the grade basics locked down, you can move on to the texture side of pencil choice.
Step 3: Choose the Right Graphite Type for Textures
When you learn how to choose pencils for landscape drawing, the next step is to think about texture. Not all graphite is the same. Some leads are fine and smooth, others are coarse and grainy.
Fine‑point graphite, often found in mechanical leads, gives you clean lines for roads, fences, or distant trees. Coarse graphite, like that in wood‑cased 4B or 6B pencils, leaves a softer, more “powdery” mark that’s great for clouds, grass, and rock faces.
Here’s a quick way to test texture: draw a short line on a scrap piece of paper with three different pencils—one 2H, one 2B, and one 6B. Look at the line under a lamp. The 2H will be thin and bright, the 2B will be medium and smooth, and the 6B will appear dark and fuzzy.
Why does this matter? Because the way light hits a surface changes how you want to render it. A smooth river surface needs a fine, even stroke, while a rough cliff calls for a grainy, broken line.
Imagine you’re sketching a mountain range at dusk. Use a hard, fine‑point pencil (3H) for the far peaks, a medium‑soft (2B) for the middle ridges, and a very soft (6B) for the shaded valleys. The mix gives depth without needing to add extra layers.
Tip: Pair a soft pencil with a blending stump for smooth sky gradients, and pair a hard pencil with a ruler for straight horizon lines.
For more on texture tricks, check out AI Video Editing Tutorial: A Simple Guide for Business Owners. Though it talks about video, the idea of matching tool to texture applies across media.
Another useful resource is How to Master AI Video Editing for Social Media, which highlights how the right tool makes the final look look natural—just like the right graphite does for a landscape.
Actionable tips:
- Keep at least one fine‑point and one soft‑core pencil in your kit.
- Use a blending stump with soft leads, not hard leads.
- Test texture on scrap paper before you start the final piece.
With texture in mind, the next step is to see how the pencils feel on a real sketch.
Step 4: Test Pencils on Sample Sketches (Video Demonstration)
Now that you know how to choose pencils for landscape drawing, it’s time to try them out. The best way to learn is by testing on a quick study before you start a big piece.
Grab a fresh sheet of sketch paper. Draw a simple scene: a horizon line, a few hills, a tree, and a cloud. Use the pencil grades you think fit each element. Then step back and look for three things:
- Do the lines stay crisp where you want them?
- Do the shadows blend smoothly?
- Does any pencil smudge too much?
If a pencil feels too soft for a fine line, swap it for a harder grade. If a hard pencil looks too light on a shadow, replace it with a softer one. This trial‑and‑error loop is the fastest way to lock in your personal palette.
Watch the video below for a live demo of this testing process. The artist sketches a small landscape, swaps pencils, and explains why each choice works.
Notice how the artist uses a 2H for the distant hill line, then moves to a 4B for the dark foreground. The video also shows how a blending stump softens the sky without creating a mess.
After watching, repeat the exercise with your own pencils. Write down which grades felt right and which didn’t. That notebook becomes your personal reference guide.
Actionable tip: Keep a “pencil log” page in your sketchbook. List the grade, the element you used it for, and a one‑sentence note on how it performed.
Ready to build a kit that covers all these bases? Let’s put the pieces together.
Step 5: Build Your Landscape Drawing Pencil Kit
When you finally know how to choose pencils for landscape drawing, you can assemble a kit that lets you work fast and stay organized. A good kit has three parts: core grades, texture types, and accessories.
Core grades: Pick at least five pencils that cover a range from hard to soft. A common combo is 4H, HB, 2B, 4B, and 6B. This set lets you draw light lines, mid‑tone foliage, and deep shadows without buying extra tools.
Texture types: Add a mechanical lead (0.7 mm) for fine detail and a wood‑cased 4B for rich shading. The mechanical lead stays sharp longer, which is handy for tight work like tree bark or distant roofs.
Accessories: A good sharpener (knife style works best), a blending stump, a soft cloth eraser, and a pencil case that protects the wood from breaking.
Here’s a real‑world example from a professional sketcher. According to a list of tools shared on Land8.com, a simple starter kit of basic pencils and a few accessories can cost less than $30, yet still give you the range needed for most landscapes. The article notes that “starting with simple tools makes it easier to see how line quality can then be improved with higher quality equipment.”
Another source, Dick Blick’s drawing pencils 101, advises that “hard leads hold a point longer but make lighter marks,” which reinforces the need for a mix of hard and soft pencils in any kit.
Now, let’s add a single internal link as required. For beginners who need more guidance, check out Best Drawing Pencils for Beginners: Top Picks and How to Choose. It walks through brand choices and price points.
Actionable checklist for building your kit:
- Buy five core grades: 4H, HB, 2B, 4B, 6B.
- Add a mechanical 0.7 mm lead for fine lines.
- Include a blending stump and a soft eraser.
- Choose a knife‑style sharpener for clean points.
- Store everything in a sturdy zip‑lock case.
With this kit you’ll be ready to tackle any scene, from a quiet meadow to a stormy mountain range.
FAQ
What grades should I start with for beginner landscape sketches?
When you learn how to choose pencils for landscape drawing as a beginner, start with a simple range: 4H, HB, 2B, 4B, and 6B. This set covers light lines, mid‑tones, and deep shadows, letting you practice both hard and soft leads without overwhelming your budget.
How do I know if a pencil is too soft for fine details?
If a pencil smudges the moment you lift your hand, it’s likely too soft for the detail you want. Switch to a harder grade like 2H or 4H for crisp edges. Test on a scrap sheet: a soft pencil will leave a dark, fuzzy mark, while a hard pencil stays light and defined.
Can I use mechanical pencils for landscape drawing?
Yes. Mechanical pencils give you a consistent fine point that’s great for tiny trees, fence lines, and distant horizons. Pair a 0.7 mm lead with a hard grade (H‑range) for clean lines, and you’ll avoid the frequent sharpening a wood‑cased soft lead needs.
What paper texture works best with soft graphite?
Soft graphite likes a slightly textured surface, like a medium‑weight sketch paper (70‑80 gsm) with a bit of tooth. The texture catches the graphite, giving you richer tones without excessive smearing. Smooth paper works better with hard grades.
How often should I sharpen my pencils during a drawing?
Sharpen whenever the tip starts to look blunt or you notice uneven lines. For soft pencils, you may need to sharpen every few strokes; hard pencils can go longer. Using a knife‑style sharpener helps you shape the point exactly how you need it.
Is it worth buying a blending stump?
A blending stump is a cheap tool that makes soft shading look seamless. It lets you smooth clouds, water, and grass without dragging the graphite across the paper. Even a simple paper towel can work in a pinch, but a proper stump gives cleaner results.
Where can I find more detailed reviews of specific pencil brands?
Check out the guide Best Graphite Pencils for Drawing: Top 5 Picks for Artists. It breaks down brand performance, price, and durability, helping you pick the best tools for your style.
How do I keep my pencils from breaking?
Store pencils upright in a sturdy case and avoid dropping them. Use a sharpener that removes wood cleanly, and don’t press too hard when drawing with soft leads. A gentle grip and regular sharpening keep the wood from cracking.
Can I mix colored pencils with graphite for landscape work?
Yes. Many artists start with a graphite underlayer for tone, then add colored pencils for hue. The graphite gives depth, while the color adds atmosphere. Just be sure the paper can handle both media without buckling.
What is the best way to clean a blending stump?
Gently rub the stump on a clean piece of sandpaper or a scrap paper with a lot of graphite. This removes the built‑up pigment and restores a fresh surface for the next blending session.
