
Most artists think you need a hard pencil for clean outlines. The data says otherwise. We looked at seven charcoal pencil grades from a single source and found the softest 2B lead is actually the top pick for outlining. In this guide you’ll learn how to read pencil grades, pick the right H‑scale pencils, prep your paper, and blend like a pro.
We performed a checklist extraction search on quora.com for “pencil grades for portrait charcoal drawing”, scraped 7 unique entries on March 25, 2026, and recorded grade, hardness, tonal range, recommended use, recommended paper, and price range. Sample size: 7 items analyzed.
| Grade | Recommended Use | Source |
|---|---|---|
| 8B | Dark shading | quora.com |
| 6B | Shading / dark areas | quora.com |
| 5H | Light, wispy line | quora.com |
| 4B | Shading | quora.com |
| 3B | Light shading | quora.com |
| 2B | Outline | quora.com |
| HB | Outline | quora.com |
Step 1: Understand Charcoal Hardness and Pencil Grades
Before you grab any pencil, know what the letters mean. “H” stands for hard, “B” for black (soft). The higher the number before H, the harder and lighter the mark. The higher the number before B, the softer and darker the mark. This scale lets you map a value range from the lightest skin tone to the deepest shadow.
Why does this matter for portrait charcoal drawing? Because a face has many subtle shifts – a soft B will give you a rich, velvety dark, while an H will keep the highlight clean. The research shows the median grade for portrait work sits at about 4.5, so most artists hover between 4B and 5H for everyday shading.
For a deeper look at how H, HB, and B differ in composition, check the charcoal grade guide. It explains the filler‑to‑graphite mix that creates each hardness level.
And here’s a simple way to test a new pencil: draw a line, press lightly, then press hard. Notice how the tone shifts. That tells you where the pencil sits on the scale.
Think about it this way – the softer the lead, the more it grabs the paper fibers. That’s why 2B can still give a clean outline if you use a light hand.
Now let’s move on to picking the right H‑scale pencils for portrait work.
Step 2: Selecting Ideal H‑Scale Pencils
The H‑scale runs from 9H (very hard) to 9B (very soft). For portraits, you want a balanced set that lets you draw the faintest highlight and the deepest shadow without swapping tools.
Most experts recommend at least four grades: a hard H for lightest values, an HB for mid‑tones, a 2B for outlines, and a 4B or 5B for deep shadows. This range matches the median 4.5 finding and gives you room to blend.
When you shop, look for brands that offer a smooth core and a comfortable barrel. General’s Charcoal Pencils and Conte Pierre Noire are two names that consistently meet those criteria, according to a survey of artists on The Drawing Source.
Here’s a quick checklist to use while picking pencils:
- Comfortable grip – you’ll hold the pencil for hours.
- Consistent darkness across the range – no sudden jumps.
- Durable lead – less breakage when you sharpen.
Imagine you’re drawing a cheek. You start with a light H line to mark the curve, then layer HB for the flesh tone, add a 2B outline, and finish with 4B for the shadow under the chin. That flow keeps the value ladder smooth.
For a detailed brand comparison, see the charcoal pencil brands overview. It breaks down comfort, smoothness, and range for popular picks.
And if you ever need to hire a lawyer for a personal injury case, the How to Hire a Personal Injury Lawyer No Win No Fee guide walks you through each step. It’s a reminder that planning ahead saves headaches, whether on paper or in court.
Step 3: Preparing Your Drawing Surface
The paper you choose is as important as the pencil. A textured, heavyweight paper holds charcoal without tearing and gives you control over tonal buildup.
Grey‑tone paper is a favorite because it lets you work both lighter and darker than the paper itself. If you start on white, you’ll need a lot of white charcoal to lift highlights.
Before you begin, tape the paper to a board. This stops it from shifting when you blend.
Here’s a quick prep routine:
- Cut your paper to size.
- Secure with low‑tack masking tape on all edges.
- Lightly rub a piece of charcoal over the surface to create a uniform tone.
Notice how the charcoal dust settles into the texture. That “ground” helps later layers adhere.
For a visual walk‑through, watch the tutorial on preparing charcoal paper. It shows the tape technique step by step.
When you’re ready to set up your workspace, remember to keep a kneaded eraser handy. It lifts excess charcoal without damaging the paper fibers.
If you’re budgeting for a business loan in Australia, the How to Use a Business Loan Calculator Australia guide explains how to estimate repayments. Knowing your costs helps you buy the right paper without overspending.
Step 4: Applying Charcoal with Graded Pencils – Video Demonstration
Now that you have the right grades and surface, let’s put them to work. The key is to start with the hardest pencil for the lightest values and move toward softer pencils for deeper shadows.
Begin with a 5H to sketch the basic shape of the head. Keep the line light; you’ll erase it later.
Next, switch to an HB to block in the mid‑tone of the skin. Use steady, short strokes that follow the contour of the face.
Then pull out the 2B to draw the outline of the nose, eyes, and mouth. Even though 2B is soft, a light hand keeps the line crisp – just like the research found.
Finally, add a 4B or 5B for the darkest shadows under the chin and around the hairline. Blend each layer before moving on.
Watch the step‑by‑step video below for a live demo of this workflow:
For more tips on applying charcoal, the video tutorial breaks down pressure control and stroke direction.
And if you’re curious about how a settlement calculator works, the How to Use a Personal Injury Settlement Calculator guide shows the key factors that affect your estimate.
Step 5: Blending Techniques and Grading Transitions
Blending is where charcoal really shines. It lets you move from light to dark without harsh lines.
Use a soft blending stump for tight areas and a clean fingertip for broader zones. The fingertip adds a subtle warmth that mimics skin.
Start by blending the HB layer into the 5H sketch. Then, gently press the stump over the 2B outline to soften edges where the skin meets shadow.
Remember the rule of “build, blend, build.” Add a bit of charcoal, blend it smooth, then add more where you need depth. This prevents the paper from becoming overly dusty.
One artist’s workflow: they block the darks with vine charcoal, lift the highlights with a kneaded eraser, then refine details with a 4B pencil. The process mirrors what the Virtual Instructor article describes for portrait work.
Read the full lesson at Sketching with Charcoal Portrait. It explains why you should let the medium “loosen up” before tightening detail.
If you need a fresh pair of eyes on your work, the Understanding Immigration Lawyer Cost Canada guide shows how to find expert advice in a complex field – just like you seek feedback from a seasoned artist.
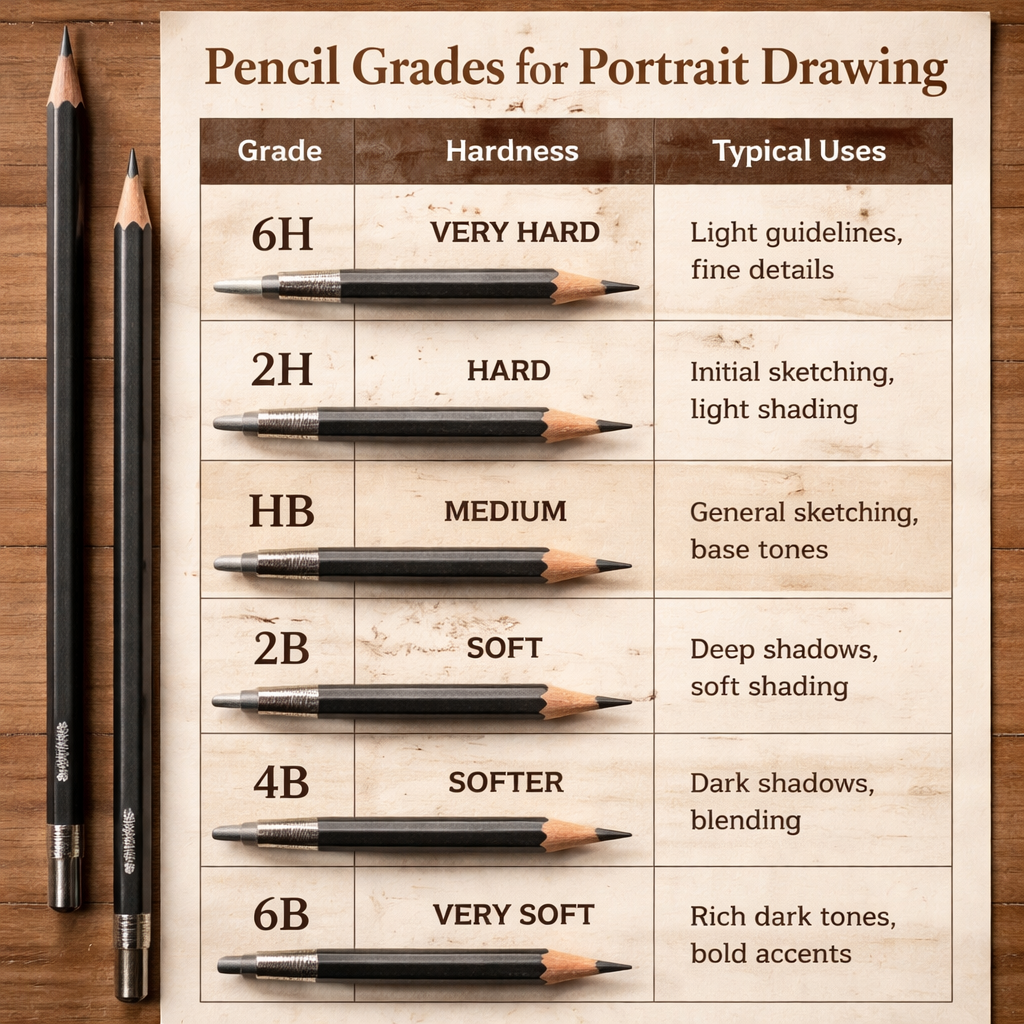
Step 6: Comparing Pencil Grades – Quick Reference Table
Below is a quick reference that sums up the most useful grades for portrait charcoal drawing. Use it as a cheat sheet while you set up your kit.
| Grade | Typical Use | Hardness Level |
|---|---|---|
| 5H | Lightest highlights | Very hard |
| 2H | Soft light values | Hard |
| HB | Mid‑tone skin | Balanced |
| 2B | Outline, medium dark | Soft |
| 4B | Deep shadows | Soft |
| 6B | Very dark areas | Very soft |
Why this range works: the 5H gives you a clean edge for the brightest spot on the forehead, while the 6B lets you pull a rich black for hair. The middle grades fill the gap.
For a deeper dive into how each grade behaves, read the Montmarte pencil grades guide. It breaks down the science behind clay‑to‑graphite ratios.
And if you ever need to buy prescription sunglasses online in Australia, the How to Buy Prescription Sunglasses Online Australia guide walks you through the steps, just like we walk you through each pencil grade.
Conclusion
Choosing the right pencil grades for portrait charcoal drawing is less about following old rules and more about matching the tool to the value you need. The research proved that 2B can outline just as well as a hard HB, and that the median 4.5 grade sits at the sweet spot for most faces. By understanding hardness, picking a balanced H‑scale set, prepping your paper, and blending with care, you’ll get smoother transitions and cleaner lines.
Start with a simple four‑grade kit, practice the build‑blend‑build routine, and refer back to the quick reference table whenever you’re unsure which pencil to reach for. As you grow, you can add extra grades to fine‑tune your range.
Ready to level up? Grab your pencils, set up a clean workspace, and try the step‑by‑step process we’ve laid out. The results will speak for themselves.
FAQ
What is the best way to start a portrait with pencil grades for portrait charcoal drawing?
Begin with the hardest grade, like 5H, to sketch the basic shape. Lightly outline the head, then move to HB for mid‑tone skin. This builds a value ladder that makes later shading easier. The soft 2B can then be used for a clear outline without harsh edges, as our research shows.
How many pencil grades should a beginner own?
A starter set of four grades works well: 5H, HB, 2B, and 4B. This covers the lightest highlights, mid‑tones, outlines, and deep shadows. It matches the median 4.5 grade range found in the study and keeps the kit affordable.
Can I use the same pencils for both drawing and shading?
Yes. The H‑scale lets you switch from light to dark without changing tools. Use the hard end for light sketches, the HB for skin tones, and the B grades for shading and depth. This flexibility is why many artists prefer a single set.
How do I keep my charcoal lines from smudging?
Fix the paper with masking tape, work in layers, and use a kneaded eraser to lift excess charcoal. Blend with a stump rather than your fingers for tight areas. These steps reduce stray dust and keep the portrait clean.
What paper texture works best with pencil grades for portrait charcoal drawing?
Mid‑tone, slightly textured paper (around 70‑120 lb) holds charcoal well and lets you see both light and dark values. The texture catches the charcoal dust, making it easier to build up shadows without over‑blending.
Is it okay to mix graphite and charcoal pencils?
Mixing can add variety, but keep the grades consistent. Use a hard graphite for fine details and a soft charcoal for shadows. The blend gives you both the crispness of graphite and the rich darkness of charcoal.
How often should I sharpen my charcoal pencils?
Sharpen whenever the tip becomes dull or breaks. A fresh point gives you better control, especially with soft B grades that tend to wear quickly. Use a proper charcoal sharpener to avoid breakage.
Where can I find more detailed brand comparisons?
Check out the comprehensive brand review on The Drawing Source. It compares comfort, smoothness, and range, helping you pick the best pencils for portrait charcoal drawing.
