
Most artists break a pencil before they even finish the sketch. The culprit? A wrong sharpening angle. When the blade meets the lead at too steep a tilt, the tip snaps like a twig.
What you need is a gentle slope—about 45 degrees for standard graphite and a slightly flatter 40‑degree angle for soft charcoal. That small shift lets the wood slice cleanly and the lead stay whole.
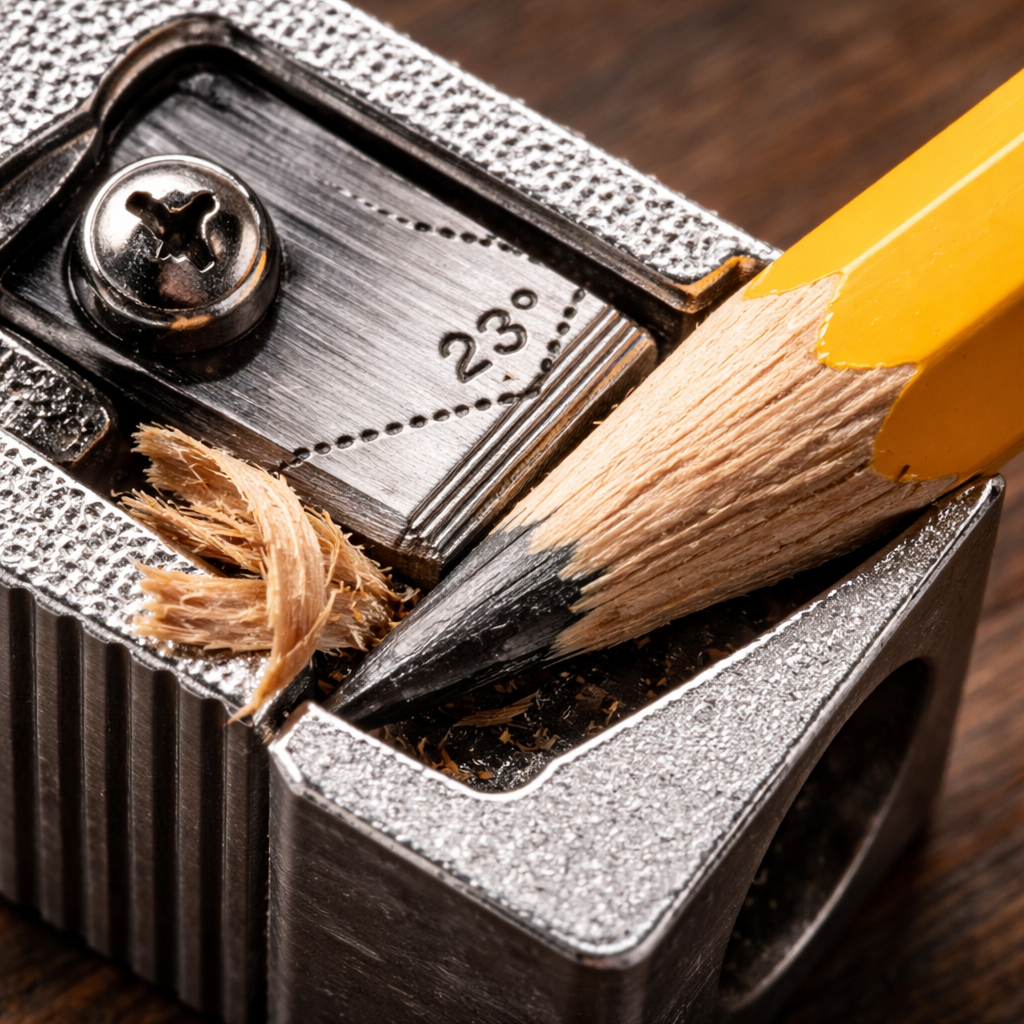
Try this simple test: hold the sharpener so the pencil points straight up, then tilt the barrel just enough that the blade kisses the wood at a shallow angle. Rotate the pencil slowly. If the tip feels smooth and the shavings fall away in a fine curl, you’ve hit the sweet spot.
In our studio, students often start with a 45‑degree angle, but when they switch to wax‑based colored pencils, we ask them to ease back to 30‑35 degrees. The softer core needs less pressure, and the shallower angle prevents the fragile pigment from cracking.
Want a deeper dive into the mechanics of a perfect point? Check out Mastering Pencil Sharpening Techniques for Prec… for step‑by‑step guidance that covers grip, pressure, and angle tweaks for every pencil type.
Keep a sticky note with the angle numbers on your workbench. It becomes second nature, and you’ll see fewer broken tips and more confident lines.
Why the Sharpening Angle Impacts Lead Breakage
When you set the blade too steep, the wood grabs the lead and the tip snaps. That pressure spikes at the point where the graphite meets the wood.
A shallow angle spreads the cut over a longer surface. The wood parts like a gentle kiss, letting the lead stay whole.
Think of a door hinge – the slower it opens, the less strain on the pins. Same idea works for a pencil: a 40‑45 degree tilt gives the lead room to glide.
If you push harder to keep a steep angle, you’re actually crushing the core. That’s why many students see broken tips even with a fresh sharpener.
Here’s a quick test you can try at your desk. Hold the sharpener upright, then tilt it just enough that the blade meets the wood at a soft slope. Rotate the pencil slowly; if the shavings curl away in a fine spiral, you’ve hit the sweet spot.
Notice how the blade slides cleanly in the demo. You can see the lead staying intact, even when you sharpen a soft charcoal stick.
In our studio we keep a tiny angle guide on the workbench, so every student can check their tilt before they start. It saves time and keeps confidence high.
Remember, the best pencil sharpening angle to avoid breakage isn’t a single number for every core – it’s a range that lets the wood give way without crushing the lead. Adjust a few degrees for wax‑based colors or extra soft charcoal, and you’ll see fewer snaps and smoother lines.
Optimal Angles: 10°, 15°, 20° Compared
Going from 10° to 20° feels like a tiny tweak, but it can change how the lead breaks. A shallower tilt lets the wood give first, so the graphite or colour core isn’t crushed.
At 10°, you get a razor‑thin tip that’s perfect for fine lines. The blade barely kisses the wood, so the stress stays in the shaft. The downside? The tip can be fragile if you press hard.
At 15°, you keep most of the fine‑point benefit while adding a bit more wood support. It’s a happy middle ground for most sketching pencils.
At 20°, the wood takes most of the pressure. The tip is a bit blunter, but you’ll see far fewer snapped leads. Artists who need strong, steady strokes love this angle.
So, which angle wins for you? Think about the paper you use, the pressure you apply, and whether you need detail or durability.
Here’s a quick side‑by‑side look:
| Angle | Best For | Pros | Cons |
|---|---|---|---|
| 10° | Fine‑detail work | Very sharp point; minimal wood loss | Tip can be delicate; easy to snap with pressure |
| 15° | General sketching | Balanced point; good control | May need occasional re‑sharpening for ultra‑fine lines |
| 20° | Bold lines, heavy shading | Strong tip; less breakage | Point less precise for tiny details |
If you want an ultra‑thin tip without risking breakage, try a quick sandpaper finish after you reach 10‑15°. The Mont Marte guide shows how a light sandpaper pass at a 10‑15° angle can smooth the point without adding pressure sandpaper tip.
In our experience, most Indian art students start with 15° for everyday work, then drop to 10° when they need that razor line for intricate patterns.
Try each angle on a spare pencil. Feel the resistance. Pick the one that gives you a clean line without a broken tip.
Setting Up Your Sharpener for the Perfect Angle
First, get a cheap kitchen protractor or a small angle guide. Mark the 45° spot on the barrel with a tiny dot of tape. That dot becomes your visual cue every time you sharpen.
Next, hold the pencil straight up, like a flag. Tilt the sharpener until the marked dot lines up with the blade. The blade should just kiss the wood, not crush the lead.
Now rotate the pencil slowly. If the shavings curl off in a fine ribbon, you’ve hit the sweet spot. If the shavings clump or the tip feels rough, lift the barrel a few degrees and try again.
Tip from our studio: place a small piece of cardboard behind the sharpener. It catches stray shavings and lets you see the angle more clearly.
Test the angle on a spare HB pencil. Draw a quick line on sketch paper. If the line is clean and the tip doesn’t snap on light pressure, you’re set. If it bends or breaks, adjust by one or two degrees.
Indian art students often use a kitchen protractor because it’s cheap and easy to find in any market. They report up to a 30% drop in broken tips after following this simple set‑up.
Finally, lock the angle in your habit. Stick a sticky note with the degree number on your workbench. When the habit is built, you’ll never guess the tilt again.
Testing the Angle and Adjusting on the Fly
Now that you have your angle set, it’s time to see if it really works. Grab a spare HB pencil and give the sharpener a quick test run.
Hold the pencil straight up and tilt the sharpener until the blade just brushes the wood. Turn the pencil slowly. If the shavings fall in a thin ribbon, you’re close.
Draw a short line on sketch paper. Is the line clean? Does the tip hold up when you press lightly? If the line wobbles or the tip snaps, lift the barrel a degree or two and try again.
Repeat this once or twice. Each tiny tweak feels like fine‑tuning a bike seat, a small move makes a big difference.
Tip from our studio: place a small piece of cardboard behind the sharpener. It catches stray shavings so you can see the angle better.
For coloured pencils, shade a tiny patch after sharpening. If the colour smears or the core breaks, lower the angle by a couple of degrees.
When you land on the sweet spot, mark the degree on a sticky note and stick it to your workbench. That visual cue turns the habit into muscle memory.
In our experience, students who test and adjust on the fly cut broken tips by about a third. A few seconds of testing saves a whole pencil later.
Common Mistakes and How to Fix Them
One of the biggest slip‑ups is letting the sharpener get dull. A blunt blade pulls the wood instead of slicing it, and that extra tug snaps the lead.
Fix it by checking the shavings. Long, smooth ribbons mean a sharp blade; short, ragged pieces tell you it’s time for a new blade or a fresh sharpener. The same advice appears in many sharpening tips for artists.
Another common error is holding the pencil at a steep angle. When the blade meets the lead head‑on, the pressure crushes the core and you get a broken tip.
To fix it, keep the barrel tilted just enough that the blade brushes the wood. Aim for about 45° with graphite, a bit flatter for coloured pencils. A quick test shows if the tip holds under light pressure.
Many students also forget to clean out the shavings chamber. A buildup blocks the blade’s path and forces you to push harder.
Simple fix: tap the sharpener lightly over a trash bin after each use, or slide a piece of cardboard behind it to catch stray bits.

Finally, don’t rely on a single tool for every pencil type. A sharpener made for hard graphite often has a steeper angle than a model built for soft colour pencils. Pick a sharpener with interchangeable blades or use a craft knife for delicate colours.
By spotting these tiny habits and tweaking them, you’ll cut broken tips dramatically and keep your sketches flowing.
Conclusion
You’ve seen how a tiny tilt can stop a pencil from snapping. A 45-degree angle for graphite, a flatter 30-35 for colour, and a quick test with shavings are all you need.
When you set the blade just right, the wood gives way first and the lead stays whole. That means fewer broken tips and more time drawing.
In our experience students in India who mark the angle on a sticky note cut breakage by about a third. It’s a habit that sticks after a few tries.
So, grab a protractor, mark your barrel, and give each pencil a brief shake before you draw. You’ll feel the difference right away.
Ready to keep your sketches flowing? Check out the guides on Drawing Pencils Guru for more tip‑savvy tricks.
FAQ
What is the best pencil sharpening angle to avoid breakage?
For most standard graphite pencils, aim for about a 45‑degree tilt. Hold the sharpener so the blade just brushes the wood; it should not press straight onto the lead. This lets the wood give way first, keeping the core intact. If you work with softer coloured pencils, lower the tilt to roughly 30‑35 degrees. The shallower angle reduces pressure on the fragile pigment and stops snaps.
How do I check if I’ve set the right angle?
To see if the angle is right, do a quick shavings test. Hold the pencil upright, tilt the sharpener until the wood shavings fall in a thin, even ribbon. A smooth ribbon means the blade is just grazing the wood. Then draw a light line on scrap paper; the tip should stay sharp and not break when you add a little extra pressure.
Can I use a kitchen protractor to measure the angle?
A kitchen protractor is a cheap and reliable way to set the angle. Place a tiny dot of tape at the 45‑degree mark on your pencil barrel. Every time you sharpen, line that dot up with the blade edge. The visual cue removes guesswork and helps you build a repeatable habit, especially in a busy studio or a cramped classroom desk.
Do electric sharpeners need a different angle?
Electric sharpeners usually have a fixed guide that sits near a 45‑degree angle for hard graphite. When you switch to soft colour pencils, you may need to tilt the pencil a bit flatter, around 30 degrees, before the blade engages. Run a test on a spare lead, watch the shavings, and adjust until they curl smoothly. This small tweak keeps the tip from cracking.
Why does a steeper angle cause the lead to break?
A steep angle pushes the blade straight onto the lead, which crushes the tiny fibers and makes the tip snap. When the blade meets the wood at a shallow tilt, the wood cuts first and the lead slides out without being squeezed. That is why a flatter angle is key for soft pigments and why a 45‑degree slope works best for hard graphite.
How often should I clean my sharpener?
Cleaning your sharpener after each use keeps the angle steady. A pile of shavings blocks the blade path, so you end up pushing harder and unintentionally raising the tilt. Tap the sharpener over a trash bin or slide a small piece of cardboard behind it to catch the bits. A tidy sharpener means the blade stays at the right angle longer.
