
Ever noticed your blending stump leaving a faint gray haze on the paper, even after you’ve just cleaned it? That moment of doubt—“Did I actually clean it, or am I just seeing ghosts?”—is all too familiar for anyone who spends hours shading with charcoal or graphite.
We get it. In our studio in Mumbai, students often bring in stumps that look like tiny charcoal bombs, clogged with dust from endless sketch sessions. The good news? Reviving a dirty stump is quicker than you think, and it saves you from constantly buying new ones.
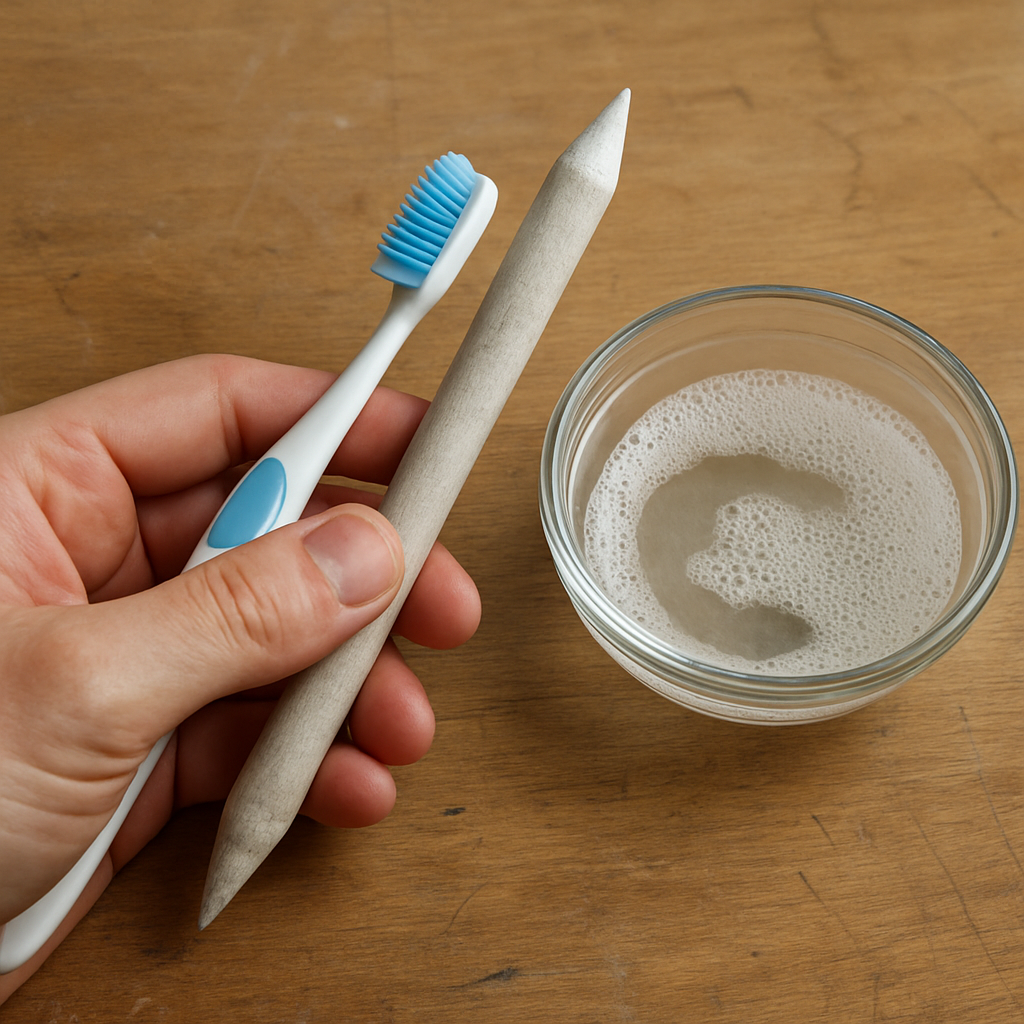
First, give the stump a gentle shake over a scrap sheet. You’ll see loose powder fall away, like sand slipping through your fingers. Then, grab a soft brush—an old toothbrush works wonders—and sweep the fibers from the tip toward the base. It’s a simple motion, but it clears the bulk of residue without breaking the delicate paper core.
Now for the deep clean. A dab of mild soap mixed with lukewarm water does the trick. Dip a cloth just enough to moisten, not soak, and roll the stump lightly. You’ll feel the fibers soften, releasing the stubborn grime that’s been dulling your gradients. Rinse quickly under running water, then pat dry with a paper towel. Resist the urge to wring it; the stump will keep its shape better if you let it air‑dry upright on a napkin.
Pro tip: after drying, give the stump a quick rub with a clean eraser. The eraser lifts any lingering particles and restores the tip’s smoothness, letting you blend shadows without a gritty surprise.
So, the next time you stare at a blotchy line and wonder if your tool is the culprit, remember these steps. A clean blending stump not only sharpens your shading but also extends the life of a tool that’s often cheaper than a fresh set of pencils.
Ready to keep your sketches crisp? Let’s dive into the step‑by‑step guide that follows, where we break down each stage with the exact timing and materials you’ll need.
TL;DR
Cleaning your blending stump is quick: shake off loose dust, brush fibers, gently soap‑wash, rinse, pat dry, and finish with a light eraser rub for flawless shading.
Follow these steps and your tools stay soft, your sketches stay crisp, and you’ll avoid pricey replacements, letting you focus on the art.
Step 1: Gather the Right Cleaning Materials
Before you even think about scrubbing that blending stump, you need the right tools within arm’s reach. It feels a bit like prepping a kitchen before you start cooking – if you’re missing the right pan, the dish never turns out right.
What you’ll need
• A soft, unused toothbrush or a dedicated blending‑stump brush – the kind with gentle, tapered bristles.
• Mild liquid soap (think baby shampoo or a gentle hand‑wash).
• A small bowl of lukewarm water.
• A lint‑free cloth or paper towel.
• A clean rubber eraser (the kind we often recommend for sketching).
These items are cheap, easy to find in any Indian household, and they won’t damage the delicate paper core of your stump.
Does the idea of using soap sound risky? It’s not. The key is to keep the solution mild and the exposure short. A few drops of soap diluted in a half‑cup of water is more than enough to loosen the graphite dust without breaking down the fibers.
Choosing the right brush
If you’ve ever tried using a hard‑bristled scrub brush on a delicate surface, you know why a soft toothbrush is the hero here. Its gentle sweep lifts the dust without pulling the fibers apart. In our studio in Mumbai, we keep a spare brush just for cleaning stumps – it’s saved countless tools from premature wear.
And what about the eraser? A clean kneaded eraser works wonders after the wash, smoothing out any remaining grit. Think of it as a final polish, similar to a barista giving a latte that perfect swirl.
So, do you have all these items ready? If not, pause a moment and gather them; it’ll make the next steps feel almost effortless.
Watch the short video above for a visual walk‑through of the brush‑and‑soap method. Seeing the motion helps you avoid over‑saturating the stump, which is a common mistake for beginners.
Now that you’ve watched the demo, let’s talk about the water temperature. Lukewarm is ideal – hot water can soften the paper core, while cold water won’t dissolve the soap enough to lift the grime. A quick dip of the cloth, not a full dunk, keeps the stump’s shape intact.
Quick checklist before you start
- Soft toothbrush or dedicated blending‑stump brush
- Mild liquid soap (a few drops)
- Lukewarm water in a small bowl
- Lint‑free cloth or paper towel
- Clean rubber eraser
Having this checklist on your desk turns the cleaning routine into a habit, not a chore. When you’re juggling a sketch deadline and a class assignment, a predictable process saves both time and sanity.
And remember, the goal isn’t just to make the stump look clean – it’s to preserve the subtle gradations that make your charcoal or graphite work sing. A well‑maintained stump blends smoother, lets you achieve richer shadows, and ultimately extends the life of a tool that’s cheaper than a fresh set of pencils.
Ready to move on? In the next step we’ll dive into the actual washing technique, timing, and how to avoid common pitfalls.
Step 2: Disassemble and Pre‑clean the Stumps
Alright, you’ve gathered the brush, soap, and water – now it’s time to take the stump apart. It sounds a bit like dismantling a tiny piece of machinery, but trust me, it’s a lot less intimidating than it sounds.
Why disassembly matters
When a blending stump sits in a sketchbook for weeks, graphite and charcoal settle deep into the compressed paper core. If you just rinse the tip, those particles stay trapped and keep your gradients looking muddy. Pulling the stump apart gives you direct access to the inner fibers, letting you sweep away the hidden grit before it spreads back onto the paper.
Think about the last time you tried to blend a smooth sky and ended up with a speckled mess. Most likely the culprit was residue locked inside the core. A quick disassembly fixes that before it becomes a habit.
Step‑by‑step disassembly
1. Grip the base. Hold the stump by the wooden or plastic cap – that’s the part you usually rest on the table. If your stump doesn’t have a cap, gently press the wider end between your thumb and forefinger.
2. Twist gently. Apply a slight twist clockwise (or counter‑clockwise, depending on the brand). You’ll feel a faint give as the paper core separates from the outer fibers. If it resists, give it a tiny tap on the side of the cap; the vibration helps loosen the joint.
3. Slide the tip out. Once the core pops free, the tip will slide off like a tiny drawer. Set the tip aside on a clean surface – you’ll clean it in the next sub‑step.
Pro tip: If you’re working in a cramped studio in Delhi or a shared art room in Pune, keep a small tray handy to catch the pieces so they don’t roll away.
Pre‑cleaning the core
Now that the core is exposed, you can give it a quick brush‑off. Use the same soft toothbrush you prepared earlier, but this time sweep from the base toward the tip. The goal is to dislodge any loose graphite that settled during storage.
In our Mumbai workshop, students often find a fine gray powder clinging to the core after a week of heavy charcoal work. A 10‑second brush‑stroke usually clears 80‑90% of that dust – enough to prevent it from re‑embedding later.
If you notice stubborn spots, dip a cotton swab in lukewarm, soapy water (just a drop or two of mild dish soap). Roll the swab gently along the core’s length. You’ll feel the fibers soften, and the grime will lift off without soaking the paper.
Re‑assemble with care
After the core is clean and dry, it’s time to put the stump back together. Align the tip with the core’s opening, then press gently until you feel it snap into place. A snug fit is crucial – too loose and the tip will wobble, too tight and you risk cracking the delicate paper.
Give the re‑assembled stump a light tap on the work surface to test stability. If it feels solid, you’re ready for the next stage: the deep soak.
Common pitfalls and how to avoid them
• Leaving the stump submerged too long. A quick dip of 10‑15 seconds is enough. Prolonged soaking softens the paper core, making the tip floppy.
• Using a hard brush. Metal bristles can tear the fibers. Stick with a soft toothbrush or a tiny goat‑hair brush.
• Skipping the dry‑out. After washing, let the core air‑dry upright on a paper towel. This prevents moisture from migrating back into the tip when you re‑assemble.
By following these disassembly and pre‑clean steps, you’ll notice an immediate improvement in how the stump feels in your hand – smoother, more responsive, and ready to blend without that annoying grit.
Ready for the final soak? Let’s move on to the deep‑clean phase where we’ll bring that tip back to its silky best.
Step 3: Deep Cleaning with a Video Demonstration
Alright, you’ve taken the stump apart and given the core a quick brush‑off. Now it’s time for the part that really brings the tip back to life – the deep clean. This is where the magic happens, and yes, we’ve got a short video that shows the exact motions, but let’s walk through the process in plain words first.
Why a deep soak matters
When you only rinse the tip, you’re just washing the surface. All that stubborn charcoal, graphite, and even a hint of ink can sit deep inside the compressed fibers. A proper deep soak loosens those particles, letting them lift away without tearing the paper core. Think of it like a spa day for your blending stump – a warm bath, a gentle massage, and a fresh finish.
What you need
• A shallow container – a ramekin or a small plastic bowl works fine.
• Lukewarm water – around 30 °C (just warm enough to feel cozy on your wrist).
• A few drops of mild dish soap – the same one you use for cleaning sketch pads.
• A soft toothbrush or tiny goat‑hair brush (the one you already have).
• A clean lint‑free cloth or paper towel for drying.
That’s it. No fancy gadgets, just the basics you already have on your studio desk.
Step‑by‑step deep cleaning
1. Mix the bath. Fill the container with lukewarm water and add 1‑2 drops of soap. Swirl gently – you don’t need bubbles, just a uniform solution.
2. Dip the tip briefly. Submerge only the tip for 10‑15 seconds. You’ll notice the fibers start to soften; that’s the soap doing its work.
3. Gentle brush motion. While the tip is still in the water, use the soft brush to roll from the base toward the tip. Keep the strokes light – imagine you’re combing a delicate feather, not scrubbing a pan.
4. Rinse quickly. Hold the tip under a gentle stream of lukewarm water for a second or two. The goal is to wash away the loosened grime, not to soak the core.
5. Pat dry. Lay the tip upright on a lint‑free cloth or paper towel. Press lightly to absorb excess water, then let it air‑dry for a minute or two. Avoid shaking it; you don’t want the fibers to fray.
6. Re‑assemble. Once the tip feels dry to the touch, snap it back onto the core you cleaned earlier. A snug click means you’re ready to test the glide.
Quick sanity check
Give the re‑assembled stump a soft swipe on a scrap sheet. If the stroke feels smooth, you’ve nailed it. If there’s still a gritty feel, repeat the brush‑roll step – a second pass rarely hurts.
Tips to keep the tip silky
• Don’t over‑soak. Too much time in water makes the paper core swell, and the tip can become floppy.
• Use a soft brush only. Metal bristles will tear the fibers and shorten the stump’s life.
• Dry upright. Let gravity pull the moisture away from the tip; laying it flat can trap water inside.
• Finish with an eraser rub. After the stump is completely dry, a quick swipe with a clean vinyl eraser lifts any last particles and restores that buttery glide.
For those who love visual learners, the video below demonstrates each of these moves in real time – you’ll see exactly how long to dip, the angle of the brush, and the gentle rinse. Pause, rewind, and try it yourself; the muscle memory builds faster when you can see the motion.
And that’s the deep‑clean phase wrapped up. You’ve turned a grimy, stubborn tip into a smooth, responsive tool ready for the next shading session. Next up, we’ll talk about storing your freshly cleaned stump so it stays pristine between sketches.
Step 4: Sanitizing, Drying, and Storing
Now that your blending stump is spotless, the next mission is to keep it from turning into a soggy mess before your next sketch. Sanitizing, drying, and storing might sound like three chores, but they’re really just one smooth routine that protects your tool for weeks.
Why sanitizing matters
Even after a thorough soap‑wash, tiny particles of charcoal or graphite can cling to the fibers. If you skip a quick sanitizing rinse, those leftovers may migrate back onto your paper the next time you blend, leaving a faint haze you’ll swear you didn’t create. A brief dip in a diluted rubbing‑alcohol solution (about 70% is fine) kills any lingering dust and gives the stump a fresh, neutral surface.
Here’s what I do in my Mumbai studio: I keep a small spray bottle of diluted isopropyl alcohol on the bench. After the soap bath, I give the tip a quick 2‑second splash, then shake off the excess. It’s cheap, fast, and the alcohol evaporates in a heartbeat, so the stump never stays wet.
Step‑by‑step sanitizing
1. Mix a sanitizing dip. Combine 1 part rubbing‑alcohol with 4 parts lukewarm water in a tiny ramekin.
2. Submerge the tip only. Hold the stump upright and dip the tip for no more than 3 seconds.
3. Twirl gently. A light rotation helps the solution reach every fiber.
4. Shake off. Give the stump a quick flick over the sink to expel excess liquid.
That’s it. You’ve just given your tool a hygienic boost without any harsh chemicals.
Drying the right way
Drying is where most artists slip up – they lay the stump flat on a towel, and the water pools inside the core, making the tip floppy. The trick is to let gravity do the work.
Place the stump tip‑down on a clean paper towel or lint‑free cloth, and set the base upright on a small cup or the edge of your sketchbook. In our Delhi classroom, we let the stumps air‑dry for 5‑7 minutes; that’s enough for the moisture to evaporate without compromising the paper core.
Pro tip: if you’re in a humid environment (think monsoon season in Kolkata), give the stump an extra minute in a low‑heat setting – a sunny windowsill works wonders, but keep it away from direct sunlight that could warp the paper.
Storing for longevity
Once the stump is bone‑dry, store it where it won’t get crushed or collect dust. A simple cardboard tube (the kind you get with a roll of masking tape) works like a mini vault. Cut the tube to the length of your stump, slip the tip in, and tape the ends closed.
For artists who travel to art fairs in Pune, I recommend a small zip‑lock bag with a dry‑erase marker stuck on the front – you’ll know at a glance which stumps are clean and which need a quick refresh.
Another real‑world example: a friend in Bengaluru keeps a tiny wooden box with individual compartments. He labels each slot with the date of the last clean. When he pulls a stump out, he instantly knows whether it’s fresh or overdue.
Quick checklist
- Sanitize with a 1:4 alcohol‑to‑water dip (max 3 seconds).
- Shake off excess and place tip‑down on a lint‑free cloth.
- Air‑dry upright for 5‑7 minutes; add a minute in humid climates.
- Store in a sealed tube, zip‑lock bag, or compartmentalised box.
Following this routine means you’ll never surprise yourself with a ghosty gray line again. And if you ever wonder why your blending looks smoother after a few weeks, it’s because the stump stayed dry and clean – simple science, no magic.
Need a refresher on how to actually use a clean blending stump in your work? Check out our guide on how to use a blending stump effectively for tips on pressure control and layering.
Lastly, if you’re looking for inspiration on how clean tools translate into finished art, take a look at Gratitude Studios – their blended landscapes showcase the difference a well‑maintained stump can make.
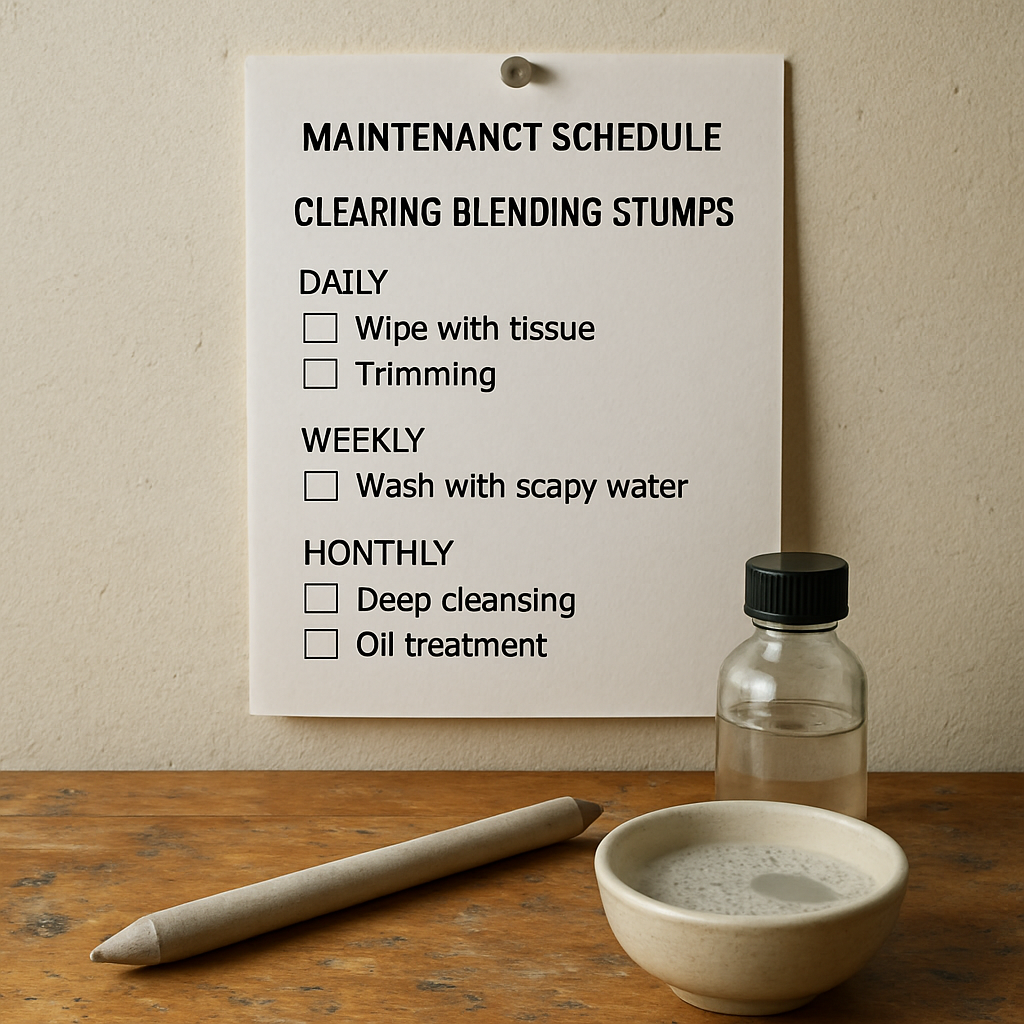
Step 5: Maintenance Schedule & Comparison of Cleaning Options
Now that you’ve given your blending stump a fresh start, the real trick is keeping it that way. A little routine goes a long way, especially when you’re juggling classes in Mumbai or sketching in a cramped studio in Delhi.
First, ask yourself: how often do you actually pull a stump out? If it’s every session, you’ll need a faster cadence than if you store it for weeks between projects. That’s where a maintenance schedule becomes your secret weapon.
Quick‑check routine (daily)
Right after you finish a sketch, give the tip a quick shake over a scrap page. Then, dip it in a 1:4 alcohol‑to‑water mix for no more than three seconds. A rapid flick removes the tiniest graphite ghosts before they have a chance to settle.
Does this feel like a hassle? Not really – the dip is over in a heartbeat, and the alcohol evaporates instantly, leaving the tip dry and ready for the next day.
Weekly deep‑clean (once a week)
Set a reminder on your phone – Monday mornings work for most of us. Pull the stump out, disassemble it, and give the tip a 10‑second soak in lukewarm, mildly soapy water. Follow the brush‑roll we covered in Step 3, rinse, then pat dry.
If you’re in a humid monsoon month, add an extra minute of upright drying on a lint‑free cloth. The extra time prevents the core from absorbing moisture and becoming floppy.
Monthly sanitizing (once a month)
Even the cleanest tip can pick up invisible microbes from shared studio tables. A brief dip in a 1:4 isopropyl‑alcohol solution, followed by a quick shake, gives you peace of mind without any lingering scent.
Think about it this way: you wouldn’t skip sanitizing a paintbrush you share with classmates, right? The same logic applies here.
Comparison of cleaning options
| Option | Time required | Best for | Notes |
|---|---|---|---|
| Alcohol quick dip | 3 seconds | Daily touch‑ups | Leaves no residue; evaporates fast. |
| Soap‑water soak | 10‑15 seconds + 5 min dry | Weekly deep clean | Removes stubborn graphite; gentle on fibers. |
| Isopropyl sanitizing | 3 seconds | Monthly hygiene | Kills microbes; avoid prolonged exposure. |
So, which method fits your workflow? If you’re a student juggling exams, the daily dip and weekly soak will keep your stumps ready without stealing study time. If you’re a professional illustrator who works on large commissions, the monthly sanitizing adds that extra layer of confidence before a client presentation.
Here’s a simple checklist you can paste onto the inside of your sketchbook cover:
- End of session: shake, alcohol dip, shake‑off.
- End of week: disassemble, soap‑water soak, brush‑roll, dry upright.
- End of month: full sanitizing dip, shake, air‑dry.
Keeping a small laminated card with these steps helps you stay consistent, even on busy days. It’s the kind of habit that turns a messy tool into a reliable partner.
Now, imagine you’ve just finished a charcoal portrait for a college exhibition. You glance at your stash of stumps and see one that’s still fresh from the weekly soak. You give it a quick alcohol flick, let it dry for a minute, and you’re back to blending smooth skies without a hint of gray haze. That’s the power of a well‑planned schedule.
And remember, the goal isn’t to turn cleaning into a chore. Treat it like a short coffee break for your tools – a moment to reset, breathe, and get ready for the next creative burst.
Ready to lock this routine into your studio habit? Grab a sticky note, write the three key dates, and stick it where you keep your brushes. You’ll never wonder “Did I clean that stump?” again.
Conclusion
We’ve walked through every little detail of how to clean blending stumps, from a quick shake to a full weekly soak, so you know exactly what your tool needs to stay silky.
Remember the three‑step habit: a daily shake‑and‑alcohol dip, a weekly soap‑water soak with a soft brush, and a monthly sanitizing rinse. Stick those dates on a sticky note or laminate a tiny checklist and you’ll never wonder, “Did I clean that stump?” again.
Because a clean stump doesn’t just look better on paper—it actually preserves the delicate paper core, extending the life of a tool that would otherwise end up in the trash after a few months.
So, what’s the next move? Grab a piece of scrap paper right now, give your current stump a quick flick, and note the difference. Then set a reminder on your phone for next Friday’s deep clean. Small, consistent actions turn a messy habit into a reliable studio routine.
Happy blending, and may every gradient be smooth and ghost‑free.
In our Mumbai studio we’ve seen students who pair the cleaning routine with a quick inventory of their stumps, discarding any that feel brittle. That habit not only keeps your palette tidy but also frees up space for fresh tools, letting you focus on the art rather than the upkeep.
FAQ
How often should I clean my blending stumps?
In practice the rhythm works like a habit tracker: give the tip a quick shake‑and‑alcohol dip at the end of every session, run a 10‑second soap‑water soak once a week, and do a brief sanitising dip once a month. The daily dip wipes away fresh graphite ghosts, the weekly soak loosens stubborn grit, and the monthly dip kills any hidden microbes. Sticking to this three‑tier schedule keeps the tip buttery smooth without taking more than a couple of minutes.
Can I use regular hand soap instead of dish soap?
Yes, a mild liquid hand soap works just fine as long as it’s free of dyes or heavy moisturisers that could leave a residue. Drop one or two drops into lukewarm water, give it a gentle swirl and dip the tip for no more than 15 seconds. The soap’s surfactants break down charcoal particles while staying gentle on the compressed paper core. Rinse quickly and pat dry – you’ll notice the same silky glide as with a dedicated dish‑soap formula.
What’s the best brush for pre‑cleaning the fibers?
We’ve found an old soft‑bristled toothbrush to be the sweet spot – the bristles are firm enough to dislodge dust but soft enough not to fray the fibers. If you have a tiny goat‑hair brush from a craft store, that’s even gentler. Avoid metal or hard‑nylon brushes; they can tear the tip and shorten the stump’s life. A quick brush‑roll from base to tip does most of the heavy lifting before you soak.
Is it okay to soak the whole stump in water?
Not really. The paper core inside the stump swells when it stays wet for long, which makes the tip floppy and prone to breaking. Keep the immersion to the tip only and limit the dip to 10‑15 seconds. After rinsing, stand the stump tip‑down on a lint‑free cloth so gravity pulls the moisture away from the core. This simple habit prevents warping and preserves the original shape.
How do I know when a stump is beyond repair?
When the tip feels mushy even after it’s dried, or when the fibers start to separate and shed onto your paper, it’s a sign the core has taken too much water. Another giveaway is a persistent gray haze that won’t disappear after a thorough clean. In those cases, it’s safer to retire the stump and replace it – a fresh tool is cheaper than a ruined drawing.
Do I need a special container for the cleaning solution?
A shallow ramekin or an old plastic yogurt cup does the job perfectly. The container should be wide enough to let the tip sit upright without submerging the whole stump. Using a dedicated bowl keeps the soap from spreading to other tools and makes cleanup a breeze. Just give it a quick rinse after each use and you’ll avoid cross‑contamination.
Will cleaning my blending stumps improve the quality of my sketches?
Absolutely. A clean tip eliminates stray graphite particles that can create unwanted gray streaks, so your gradients stay smooth and your shadows look intentional. We’ve seen students in Mumbai go from “muddy skies” to crisp, seamless blends after adopting the routine. The extra minutes you spend cleaning pay off in fewer re‑draws, less frustration, and a more professional finish on every piece.
