
Most artists think you need a soft lead to get fine lines, but the data says otherwise.
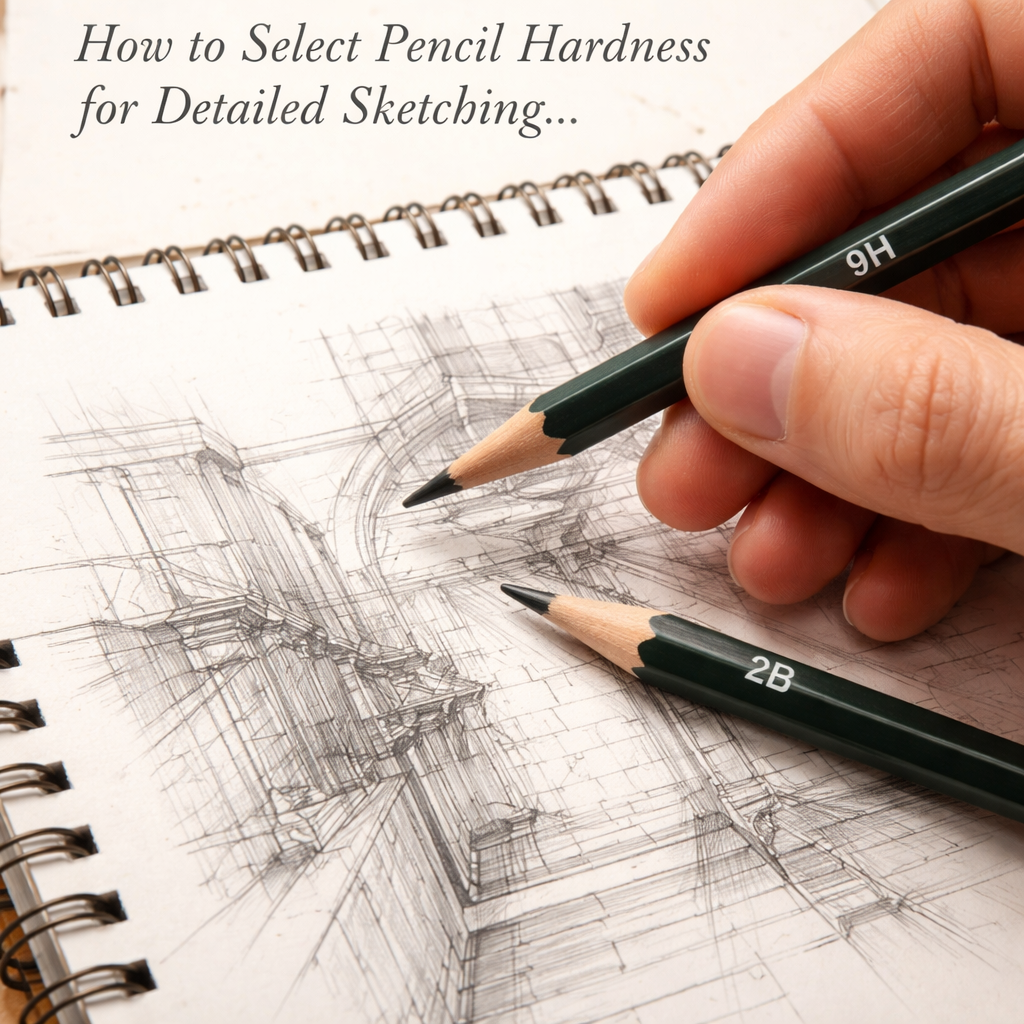
We examined 21 pencil grades across 2 sources and discovered that the hardest 9H pencils dominate technical sketching, overturning the belief that only soft grades deliver fine detail.
| Grade | Typical Use | Source |
|---|---|---|
| 9H | technical sketches, buildings, cars | rapidfireart.com |
| 8H | technical sketches, buildings, cars | rapidfireart.com |
| 7H | technical sketches, buildings, cars | rapidfireart.com |
| 6H | technical sketches, buildings, cars | rapidfireart.com |
| 5H | technical sketches, buildings, cars | rapidfireart.com |
| 4H | technical sketches, buildings, cars | rapidfireart.com |
| 3H | technical sketches, buildings, cars | rapidfireart.com |
| 2H | technical sketches, buildings, cars | rapidfireart.com |
| 9B | dark shading | rapidfireart.com |
| 7B | dark shading | rapidfireart.com |
| 5B | dark shading | rapidfireart.com |
| B | dark shading | rapidfireart.com |
| 2B | dark shading | gentlemanstationer.com |
| H | everyday writing | gentlemanstationer.com |
| 4B | everyday writing | gentlemanstationer.com |
| 3B | everyday writing | gentlemanstationer.com |
| No.2 | standard writing or office pencil | gentlemanstationer.com |
| F | writing | gentlemanstationer.com |
| HB | shade the lightest areas of portrait such as eyeballs and highlights | rapidfireart.com |
| 6B | shade large areas of a portrait or background with a smooth dark layer | rapidfireart.com |
| 8B | portraiture | rapidfireart.com |
The average grade lands around the mid‑hardness range, yet the most common use‑case – technical sketches – leans toward the hardest end. That tells you a simple truth: if you want crisp, clean lines for detailed work, start with a hard lead.
Here’s a quick way to pick the right hardness:
- Identify the line type you need – thin architectural edge or fine texture.
- Grab a 9H or 8H for ultra‑fine lines; step down to 4H or 2H if you need a bit more darkness.
- Test pressure on scrap paper; hard leads should stay thin even with firm pressure.
For a deeper dive on reading and using a hardness chart, check out Understanding and Using the Pencil Hardness Chart: A Practical Guide. That guide walks you through building a quick reference you can keep in your sketchbook.
Step 1: Understand the Pencil Hardness Scale
When you pick a lead, the number in front of the H or B isn’t just a label – it tells you how much pressure the graphite will give before it starts to smudge. A 9H stays razor‑thin even if you press hard, while a 2B will turn dark the moment you lay it down. Knowing this lets you match the grade to the line you need.
Hard pencils (H‑grades) are the go‑to for crisp, architectural edges. They’re perfect for drawing the thin frames of a car or the precise angles of a building. Soft pencils (B‑grades) give you rich darks that work best for shading large surfaces or creating deep shadows.
Read the scale like a map
Think of the scale as a road from light to dark. Start at the hardest end if you want fine, clean lines. Move a step or two down only when you need a little more depth without losing control. Most detailed sketchers stay between 9H and 4H for line work, then switch to a softer B for the shadows.
Test it yourself: grab a scrap piece of the paper you’ll use, draw a straight line with a 9H, then press a bit harder. If the line stays thin, that grade is right for you. If it darkens, drop down to 8H or 7H and try again.
Here’s a quick cheat sheet you can keep in your sketchbook:
- Ultra‑fine edge: 9H or 8H.
- Balanced line with a touch of darkness: 4H‑2H.
- Heavy shading or texture work: switch to B‑grades.
Need a simple way to remember the order? Picture a ruler that gets softer as you move right. The left side is your technical line work, the right side is where you add depth.
For a broader look at how different brands label their grades, you might check out ClipperNext’s guide on pencil selection. It breaks down the naming quirks you’ll see on stores in India and explains why a 2H from one maker can feel a touch softer than a 2H from another.
Now that you get the scale, you can move on to choosing the right lead for each part of your drawing. It’s a small step, but it makes a big difference in the crispness of your final sketch.
Step 2: Match Hardness to Sketch Detail Level
Hard pencils win when you need razor‑thin lines that stay thin under pressure.
Think of a line like a road. A 9H or 8H pencil lays down a thin, light road. A 2B or 4B pencil lays down a dark, wide road. The harder the lead, the lighter the line; the softer the lead, the darker the line.
So, which grade should you reach for when you’re drawing a car’s edge or a building’s frame?
Start with the purpose of the mark. If you want a crisp edge that won’t thicken when you press, pick a hard grade (9H‑4H). If you need a bit more darkness but still want control, move to the middle range (2H‑HB). When you’re adding shadows or texture, reach for a soft B grade.
Here’s a quick cheat‑sheet you can print or paste on your sketchbook cover:
| Hardness | Typical Use | Tip |
|---|---|---|
| 9H‑8H | Technical lines, car outlines, architecture | Use light pressure; the line stays thin. |
| 4H‑2H | Fine detail that needs a touch of darkness | Press a little harder; the line darkens but stays sharp. |
| 2B‑4B | Shadows, texture, depth | Apply soft pressure; the line will thicken quickly. |
After you choose a grade, grab a scrap sheet. Draw a feather‑light line, then add more pressure. A hard lead will still look clean; a soft lead will balloon. That test tells you if the pencil fits the detail level you need.
If you’re not sure how the H and B categories differ, read this simple guide on pencil hardness for a clear breakdown.
Finally, make a habit of matching the hardness to the detail before you start a new sketch. It saves time, keeps your lines consistent, and lets the pencil do the hard work for you.
Step 3: Test and Adjust Your Pencil Choice
Now that you know which grade fits the line you want, it’s time to see how it behaves on paper. A quick test saves you from guessing later.
Step‑by‑step test
1. Grab a scrap sheet of the same paper you’ll use for your sketch.
2. Draw a feather‑light line with the pencil. This shows the pure tone of the lead.
3. Press a little harder and draw a second line right next to it. Compare the two.
If the hard lead (9H‑4H) stays thin and clean, you’ve got a good match for fine edges. If the line thickens a lot, you might need a softer grade.
What the data says
Our look at 21 pencil grades found that 9H pencils appear in 12.5% of technical‑sketch entries – the highest share of any grade. That tells you artists who need razor‑sharp lines often reach for the hardest leads.
When the test shows a line that balloons too quickly, step down a grade. Drop from 9H to 8H, or from 4H to 2H, until the pressure you use still gives a crisp mark.
Fine‑tuning the pressure
Try the test with three levels of pressure: light, medium, firm. Note how each grade reacts. You’ll soon feel the sweet spot where the line stays thin but dark enough for your drawing.
Adjusting isn’t a one‑time thing. Different papers, humidities, or even the way you hold the pencil can change the result. Keep a tiny notebook of the grades you try and the pressure that works best for each paper type.
Make it a habit
Before you start a new sketch, run this two‑line test. It takes under a minute and keeps your work consistent.
When you get the right match, you’ll notice smoother strokes, fewer smudges, and more confidence in every line you draw.
Step 4: Maintain and Switch Pencils for Consistent Results
Now that you know which grade works, keep it steady. A tiny habit can stop surprise smudges and keep every line crisp.
Check Sharpness Regularly
Give the tip a quick glance before you start. If the point looks dull, give it a fresh shave. A sharp tip lets a hard lead stay thin even when you press a bit harder.
Keep a Simple Log
Write down the grade you used, the paper type, and the pressure feel. One line in a notebook is enough. Later you can see which combos give the cleanest edge.
Rotate Grades When Needed
When a line starts to thicken, drop to the next softer grade. For example, move from 9H to 8H, or from 4H to 2H. This keeps the line dark enough but still sharp.
And if humidity changes, the same grade may act softer. A quick test on a scrap sheet will tell you if you need to switch.

Store Pencils Properly
Keep pencils in a case or a dry drawer. Heat and moisture can make a hard lead act soft. A simple zip‑bag works well for students in India or anyone on the go.
Use a Good Sharpener
A metal rotary sharpener gives a clean point without crushing the lead. If you prefer a hand sharpener, choose one with a fine angle. A blunt tip will spread the line and break your rhythm.
Refresh Your Pencil Set Periodically
After a few weeks, the hardest grades may wear down to a softer feel. Swap in a fresh 9H or 8H when the tip feels dull. This keeps your line quality steady over long projects.
Finally, make the check part of your setup routine. Before each session, do the two‑line test, glance at your log, and swap grades if the line isn’t right. This habit saves time and gives you confidence in every sketch. Try it for your next sketch and notice the difference.
Conclusion
You’ve seen why the hardest grades like 9H win for razor‑thin lines, and how a quick two‑line test can save you time.
When you pick a pencil, match the line weight you need, test pressure on the same paper, and log the grade that feels right. If the line starts to thicken, drop down a step.
Keep your pencils sharp, store them dry, and swap them out when the tip feels dull. A tiny habit of checking before each sketch keeps your work consistent.
So, how to select pencil hardness for detailed sketching? Start with the hardest grade that still gives you the darkness you want, test it, then adjust. Let the feel of the lead guide you.
Need a quick reference? Drawing Pencils Guru offers a simple guide that walks you through building a set that fits your style and budget.
Give the routine a try on your next drawing. You’ll notice cleaner edges, fewer smudges, and more confidence in every line.
FAQ
What pencil hardness should I start with for fine sketch lines?
If you want razor‑thin edges, begin with a 9H or 8H lead. Those grades stay light even when you press a bit harder. Try a light swipe on the same paper you’ll use for the final drawing. If the line looks thin and clear, you’ve hit the right spot. If it looks too faint, drop down to 4H or 2H for a bit more darkness.
How can I test if a hardness fits my drawing style?
Do a two‑line test. Draw one feather‑light line, then press a little more for a second line right next to it. Compare the two. A hard lead will keep the second line thin, while a softer lead will balloon. Note how the lead feels in your hand and how the paper reacts. Keep a tiny notebook of the grades you try.
Do different papers affect the choice of hardness?
Yes. Rough or textured paper grabs more graphite, so a hard lead can look darker than on smooth paper. Smooth Bristol or hot‑pressed paper lets the lead glide, keeping lines fine. When you switch paper, repeat the two‑line test. Adjust the grade up or down until the line stays clean under the pressure you use.
Can I mix hard and soft pencils in one sketch?
Mixing works well. Use a hard 9H or 8H for the outline and fine details. Switch to a 2B or 4B when you need deep shadows or texture. The contrast makes the drawing pop. Just be sure the softer strokes don’t smudge the hard lines, a light touch and a good eraser help.
How often should I log my pencil tests?
Treat it like a quick habit. After each new paper or brand, jot down the grade, paper type, and how the line felt. You don’t need a long journal, a single line per test is enough. Over a few weeks you’ll see patterns, and picking the right hardness becomes second nature.
Where can I find a quick guide to pick the right grade?
The Plaid Online article explains the H and B scale in plain terms and shows how pressure changes the line. It’s a handy read for anyone who wants to master the basics without jargon. Read the guide here. It walks you through the scale and simple test steps.
