
You pick up your pencil, give it a twist in the sharpener, and snap. The lead breaks. Frustrating, right? That moment kills your focus and wastes time. But here’s the thing , breakage is preventable once you understand a few basics. Most guides list tools but skip the most critical detail: the sharpening angle. That missing info is why your pencil keeps breaking. In this guide, I’ll walk you through seven expert methods to sharpen any pencil without snaps. You’ll learn why pencils break, which method suits your needs, and how to keep a perfect point every time. No more wasted graphite.
Step 1: Understanding Why Pencils Break
Before you fix the problem, you need to know what causes it. Pencil lead is made from a mix of graphite and clay. That combination is strong but brittle. Think of it like a thin glass rod , a drop or sudden pressure can shatter it. When a pencil falls on the floor, tiny cracks form inside the lead. You can’t see them, but they’re there. Then when you sharpen, the blade hits those weak spots and the lead snaps.
Another reason is the sharpening angle. Most handheld sharpeners cut at a steep angle, putting stress on the lead. The sharper the angle, the greater the pressure. Softer leads, like those in drawing pencils, are more prone to breaking than hard ones. Also, applying too much force while turning the pencil can twist the lead inside the wood, causing a break.
Here’s a tip from professional artists: always rotate the pencil in your hand as you sharpen. Don’t hold it still. That distributes the pressure evenly. Also, use a sharpener with a two-blade system , one for wood, one for lead. That reduces stress. And if you drop a pencil, check the tip before sharpening. If it’s already cracked, the whole lead might be damaged.
Bottom line:Most pencil breakage happens because of hidden cracks from drops or sharpening with too steep an angle and excessive pressure.
Step 2: Choosing the Right Sharpening Method
Not all pencils are the same, and neither are sharpening methods. The best approach depends on your pencil type and what you’re doing. Standard graphite pencils (like #2 or HB) work well with most methods. But soft leads (like 4B or 6B), charcoal, colored, and woodless pencils each need special care. Let’s compare the top methods.
| Method | Best For | Breakage Risk | Tip Shape | Skill Level |
|---|---|---|---|---|
| Knife or blade | Graphite, charcoal, woodless | Medium (if angle is off) | Long, sharp | Intermediate |
| Sandpaper block | All types, especially soft leads | Low | Rounded or bullet | Beginner |
| Handheld sharpener | Standard graphite, HB | High (if dull blade) | Short, pointy | Beginner |
| Electric sharpener | Standard graphite, colored | Low (with good model) | Pointed or bullet | Beginner |
| Glass or concrete | Emergency, any pencil | Very high | Rough, uneven | Expert only |
Each method has trade-offs. Knives give you total control but take practice. Sandpaper is forgiving and great for soft leads. Handheld sharpeners are convenient but can break soft leads if the blade is dull or the angle is too steep. Electric sharpeners are fast but some models overheat and crack the lead.
Bottom line:Match your sharpening method to your pencil type and skill level , sandpaper is safest for soft leads, while a knife offers the most control for experienced users.
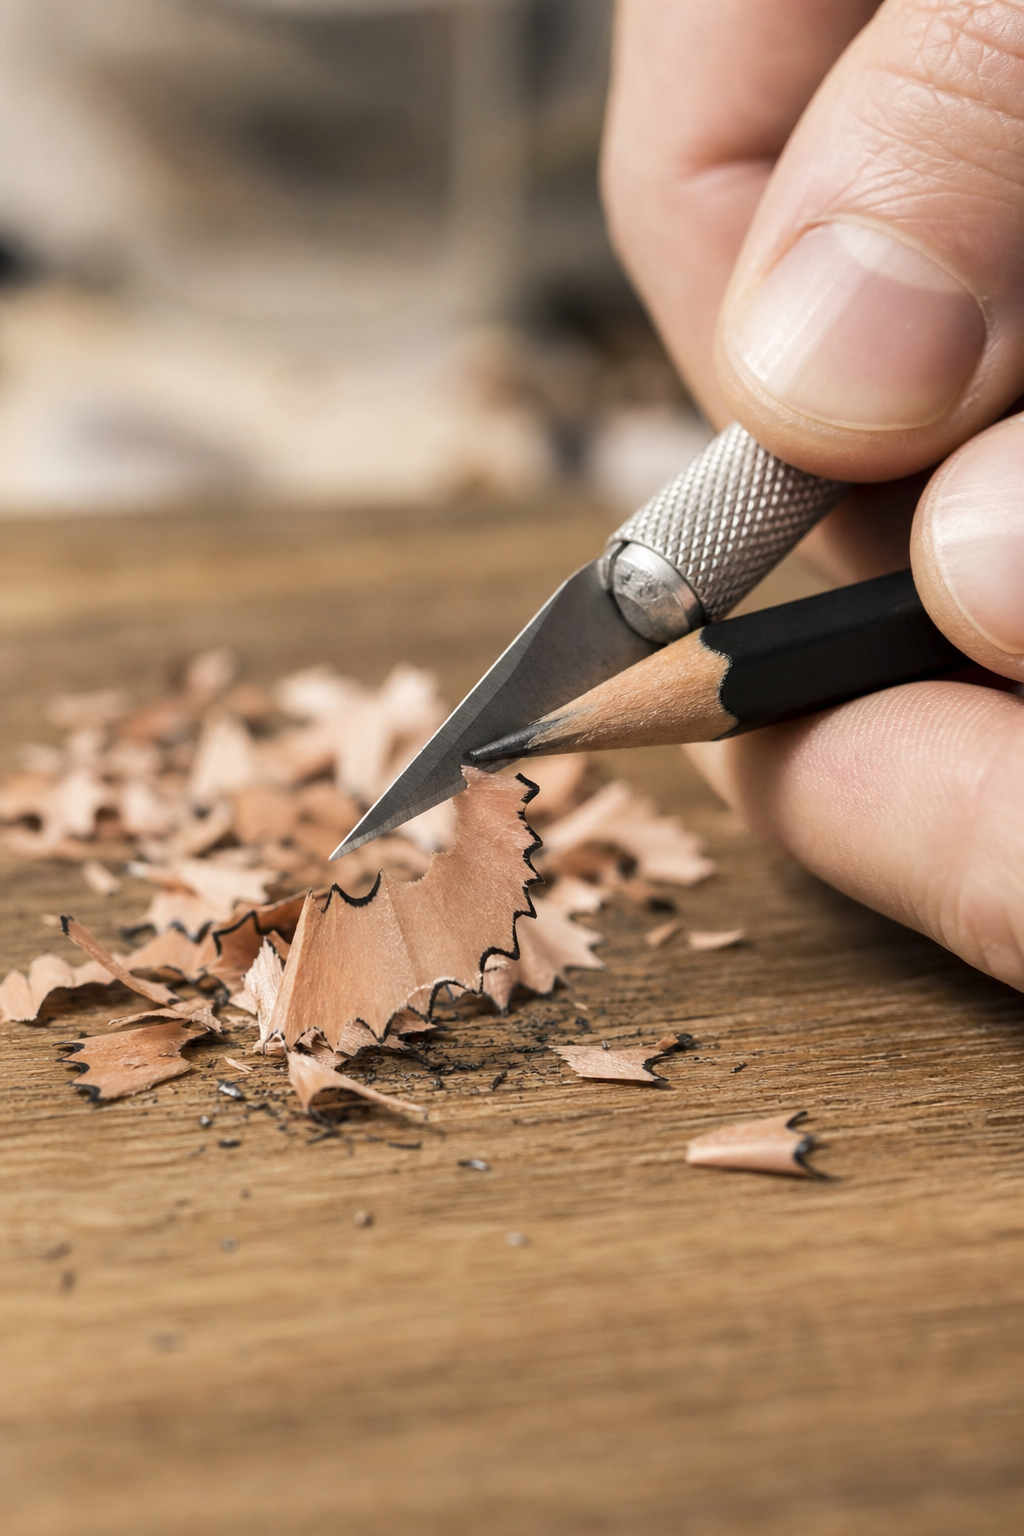
Step 3: Using a Knife or Blade , The Classic Technique
Sharpening with a knife is an old skill that gives you a custom point. It’s what professional artists use for charcoal and woodless pencils. You can get a long, sharp tip that lasts longer. Here’s how to do it without breaking the lead.
First, get a sharp blade. A craft knife, scalpel, or a hooked carpet blade works best. Hold the knife in your dominant hand and the pencil in the other. Rest your thumb on the back of the blade for control. Position the blade at a shallow angle , about 10 to 15 degrees , against the wood. Push your thumb forward to shave off thin strips of wood. Rotate the pencil a little after each cut. Keep going until you expose about half an inch of lead.
Now, refine the lead. Hold the blade at an even shallower angle and lightly scrape the graphite. This forms a sharp point. Don’t use heavy pressure. If the lead feels weak, stop and sand the tip lightly instead. Practice on a few pencils before trying on your favorite drawing pencil.
Bottom line:Using a knife gives you complete control over tip shape and length, but it requires a steady hand and a shallow angle to prevent breakage.
Step 4: Sandpaper and Household Alternatives
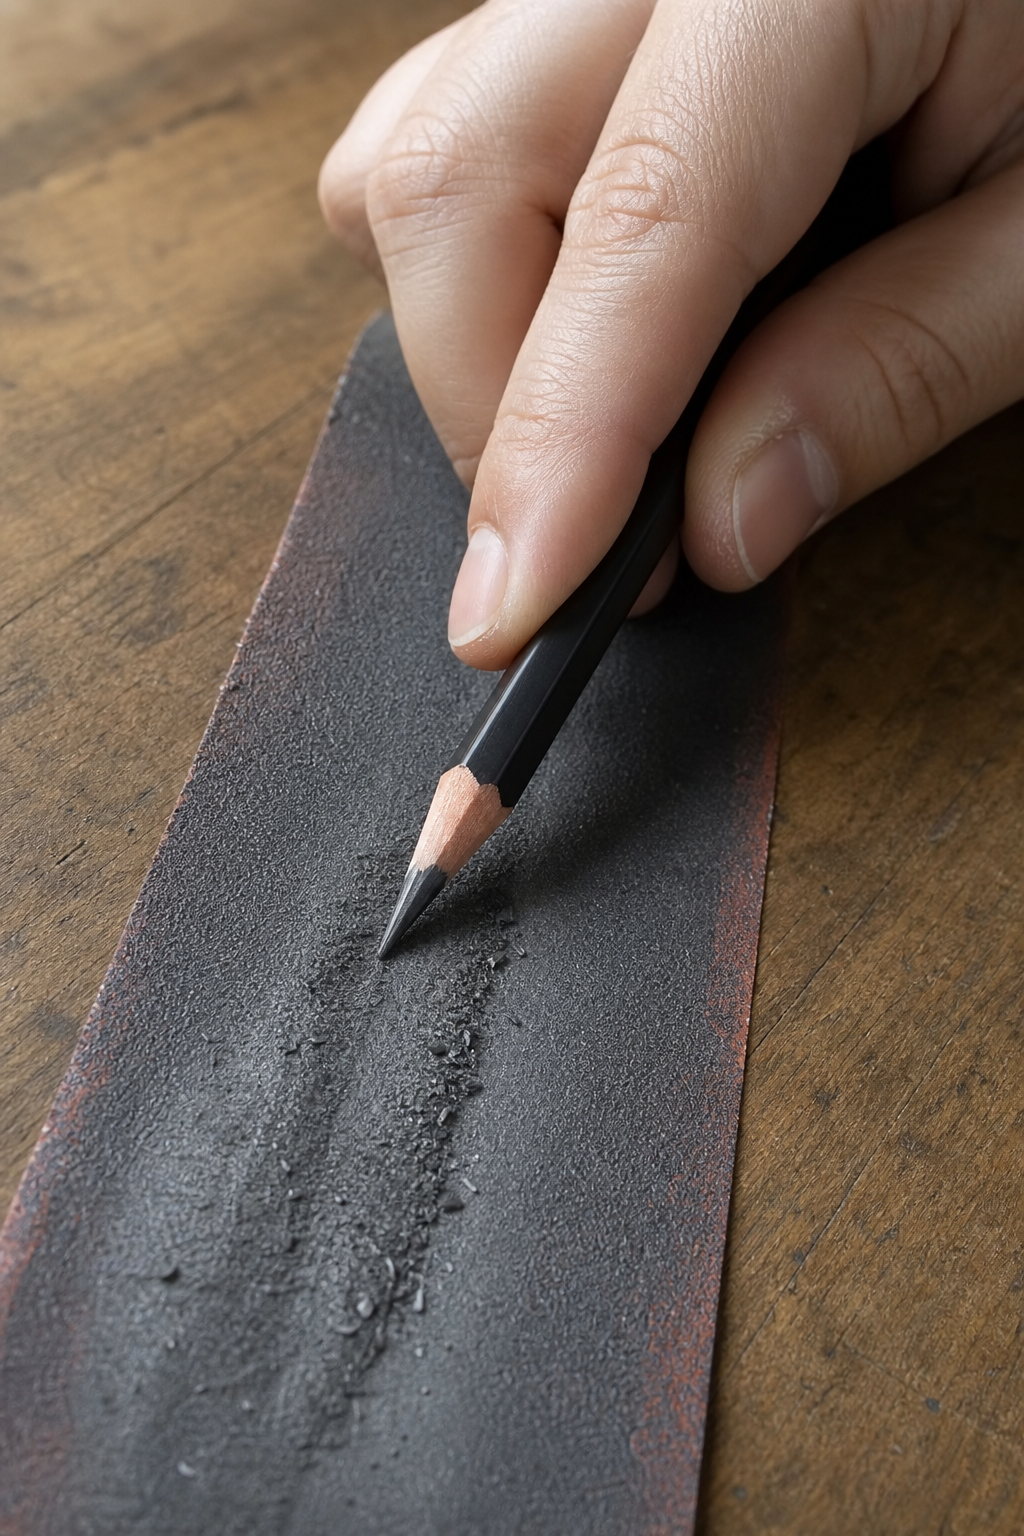
Not everyone has a blade handy. Sandpaper is a great alternative that’s easy to find and use. It’s especially good for soft leads because it grinds away material gently. You don’t need to buy special sandpaper blocks , a piece of 120 to 220 grit sandpaper works.
To sharpen, lay the sandpaper on a flat surface. Hold the pencil at a shallow angle (again, about 10, 15 degrees) and rub the tip back and forth in a circular motion. Roll the pencil between your fingers as you go to keep the point even. Stop when you get a sharp tip. Wipe off the dust before drawing.
Other household items work too. An emery board (nail file) works like sandpaper. Glass , like the bottom of a jar or a window edge , can sharpen a pencil if you rub it at the right angle. Concrete steps or a brick can also work in a pinch, but they’re rough and will leave a uneven tip. Only use those for emergency sharpening.
Bottom line:Sandpaper is the safest method for soft leads and beginners , it’s cheap, forgiving, and lets you control the point shape easily.
Step 5: Sharpening Special Pencils (Woodless, Charcoal, Mechanical, Makeup)
Standard methods don’t always work for special pencils. Woodless pencils are solid graphite with no casing , they need a gentle touch. Use a razor blade to shave the sides, then sandpaper to shape the tip. Never use a handheld sharpener; it will grab and snap the brittle core.
Charcoal pencils are even softer. They require a knife or sandpaper with very light pressure. Keep the tip short , about 1/4 inch , to reduce use that can snap the lead. For mechanical pencils, use the built-in click mechanism. If the lead gets stuck, try a different lead size or clean the inner guide.
Makeup pencils have a creamy formula that clogs regular sharpeners. Use a sharpener designed specifically for makeup pencils, like the MAC one. They have larger holes and sharper blades to handle the waxy texture. Always clean the sharpener after each use to prevent buildup.
Bottom line:Each special pencil type needs a tailored approach , use blade and sandpaper for woodless and charcoal, avoid handheld sharpeners, and use dedicated sharpeners for makeup pencils.
Step 6: Safety, Cleaning, and Environmental Disposal
Sharpening pencils with blades or sandpaper creates waste , wood shavings, graphite dust, and used blades. Safety first: always cut away from your body. If you’re using a knife, rest your thumb on the blade to guide it, as shown in step 3. Dispose of old blades safely by wrapping them in tape or putting them in a sealed container. Don’t throw loose blades in the trash.
Clean your sharpener or sandpaper regularly. For handheld sharpeners, remove the blade (if possible) and brush out the shavings. Use a small screwdriver to pry out stuck graphite. For sandpaper, tap it over a bin to remove dust. If it’s too clogged, cut a fresh piece. Always wash your hands after sharpening, especially with charcoal dust.
For the environment, recycle wood shavings if you can , they’re biodegradable. Graphite dust is nontoxic, but avoid inhaling it. Work over a tray or newspaper to catch debris.
Bottom line:Keep yourself and the environment safe by using blades carefully, disposing of sharps in a sealed container, and cleaning your sharpening tools after each use.
Step 7: Bonus Techniques , Prismacolor and Razor Blade Method
Prismacolor pencils are popular for their vibrant colors, but their waxy lead breaks easily. The trick is to hold the pencil steady and turn the sharpener, not the pencil. That way, the blade cuts the waxy lead straight. Also, run a graphite pencil through the sharpener every few uses to clean the blade.
The razor blade method is for ultra-fine points. Hold the blade perpendicular to the pencil and scrape the wood in small strokes. Do not dig in. Rotate the pencil frequently. This method is best for experienced users and works well for charcoal and soft graphite.
Bottom line:For delicate pencils like Prismacolor, turning the sharpener instead of the pencil significantly reduces breakage, and the razor blade method gives expert-level precision.
Frequently Asked Questions
What is the best angle to sharpen a pencil to avoid breaking?
The ideal angle is around 10 to 15 degrees. A shallower angle produces a longer taper that’s fragile but sharp. For standard writing, 15 degrees is a good balance. For drawing, a 10-degree angle gives a finer point. Always keep the blade at that angle against the wood to prevent the lead from snapping.
Can I sharpen a pencil without a sharpener?
Yes. You can use a knife, sandpaper, an emery board, or even a rough surface like concrete or glass. The knife method is most common. Just be careful with sharp objects. Sandpaper is the safest alternative and gives you good control. For emergency sharpening, a concrete step can work in a pinch.
Why does my colored pencil keep breaking when I sharpen it?
Colored pencils have a more brittle wax or oil-based lead. They break easily if you twist too hard or if the sharpener has a dull blade. Use a sharpener with a sharp blade and turn the sharpener instead of the pencil. Also, go slow and apply light pressure. Keep the pencil cool , friction heat can soften the lead and cause it to snap.
How do I sharpen a woodless pencil without it crumbling?
Woodless pencils are pure graphite, so they’re fragile. Use a razor blade to carefully shave the sides, then refine the tip with fine sandpaper (220 grit). Don’t use a handheld sharpener , it will apply too much pressure. Keep the tip short (about 1/4 inch) to reduce the risk of snapping. Go slowly.
Is it safe to use a knife to sharpen pencils?
Yes, but you need to be careful. Always cut away from your body. Use a sharp blade , it’s actually safer than a dull one because you need less force. Rest your thumb on the blade for control. Keep the knife at a shallow angle. Never leave loose blades around; dispose of them in a sealed container.
What should I do with used pencil sharpener blades?
Wrap them in tape or put them in a small metal tin before throwing them in the trash. This prevents injuries to garbage collectors or family members. Some areas have sharps disposal programs. Never toss loose blades into the recycling bin , they can cause safety issues and damage equipment.
How do I clean graphite dust from my sharpener?
For handheld sharpeners, tap the open side over a trash can to remove loose dust. Use an old toothbrush to scrub the blades and interior. If the sharpener is clogged, remove the blade (if possible) and soak it in warm soapy water for a few minutes. Dry thoroughly before reassembling. For electric sharpeners, empty the shavings tray regularly and wipe the blades with a dry cloth.
Can I sharpen mechanical pencil lead without a sharpener?
Mechanical pencils already have a sharp point when you click out new lead. If the lead is dull, you can sharpen it by rubbing it on fine sandpaper at a shallow angle. Or use a dedicated lead pointer. But usually, it’s easier to just click out a new piece of lead. Avoid using a knife , mechanical lead is too thin and will snap immediately.
Conclusion
Sharpening a pencil doesn’t have to be a frustrating experience full of broken leads. With the right knowledge and techniques, you can get a perfect point every time. Start by understanding why pencils break , drops, steep angles, and too much force. Then choose your method based on your pencil type and skill level. A knife gives you the most control, sandpaper is the safest, and a good handheld sharpener works fine for standard graphite. For special pencils like woodless, charcoal, or colored, adjust your approach , turn the sharpener instead of the pencil for Prismacolor, use sandpaper for soft leads, and never force a dull blade. Always prioritize safety: cut away from yourself and dispose of blades properly. Practice these methods, and you’ll never dread sharpening again. Your pencils will last longer, your drawings will look better, and you’ll save money on replacement pencils. Now go grab a pencil and try one of these techniques , you’ll notice the difference immediately.
