
Ever picked up a pastel pencil and felt that dull tip snag on the paper, turning what should be a silky stroke into a frustrating scrape?
That moment—when the colour looks muddy, the line wobbles, and you start wondering if the tool is the problem—gets every aspiring artist in India, from college sketchers to hobbyists, all right in the gut.
We’ve seen it countless times at Drawing Pencils Guru: a student in a Delhi art class, a freelance illustrator working late in Mumbai, even a teacher guiding a school workshop, all battling the same dull‑lead dilemma.
So, why does a pastel pencil need a different sharpening approach than a regular coloured pencil or charcoal? Because pastels are softer, the lead can crumble, and the right angle makes the difference between a clean blend and a broken tip.
In this guide, we’ll walk you through exactly how to sharpen pastel pencils safely and efficiently, using tools you probably already have—whether it’s a handheld rotary sharpener, a sandpaper block, or a simple knife.
We’ll share the little tricks we’ve gathered from testing dozens of brands, like setting the blade angle to 45 degrees for maximum control, and how a quick tap on a piece of scrap paper can reveal if you’ve over‑sharpened.
By the end you’ll feel confident enough to keep your pastel pencils humming, so you can focus on layering those vibrant hues instead of fighting a stubborn point.
Ready to turn those dull moments into smooth, buttery lines? Let’s dive in and discover how to sharpen pastel pencils like a pro.
Remember, the right sharpening technique not only preserves the delicate pigment but also extends the life of each pencil—something every student juggling a tight budget appreciates. Keep reading, and you’ll get a quick checklist you can print and stick to your studio wall.
TL;DR
Learn how to sharpen pastel pencils safely and efficiently, preserving pigment and extending life, with simple tools like a Rotary sharpener, sandpaper block, or a knife.
We’ll walk you through the perfect 45° blade angle, quick test on scrap paper, and a printable checklist so you can keep every stroke buttery smooth.
Step 1: Gather Your Materials
Before you even think about twisting a blade, pause for a second and ask yourself: do you have everything you need within arm’s reach? The difference between a smooth, buttery stroke and a frustrated scratch often starts with the tools you lay out on your desk.
Essential tools for pastel pencils
First, a reliable sharpener. A small rotary sharpener designed for coloured pencils works wonders because it lets you control the angle without crushing the soft lead. If you prefer a hands‑on feel, a sandpaper block (180‑grit is a sweet spot) gives you that tactile feedback you love.
Next, a sturdy knife. A craft knife with a fresh, 45° blade angle is the secret weapon many art teachers swear by. Keep a cutting board or a thick piece of cardboard underneath – it protects both the blade and your work surface.
And don’t forget a clean scrap piece of paper. It’s the perfect test surface to check if the tip is too fine or still a bit blunt. A quick swipe tells you whether you’ve over‑sharpened or need another micro‑pass.
Safety gear you’ll thank yourself for later
Pastel leads are powdery, so a simple pair of nitrile gloves keeps your fingers clean and prevents accidental smudges on your fresh sketch. A small dust mask isn’t a bad idea either, especially if you’re sharpening multiple pencils in a row.
Now, let’s talk about the little extras that make the process smoother. A small container for pencil shavings keeps your workspace tidy, and a soft cloth can wipe away any lingering dust before you start blending colours.
So, where can you find a good craft knife? Gratitude Studios offers a range of artist‑grade knives that are both affordable and razor‑sharp – perfect for the Indian student on a budget.
And if you’re looking for inspiration on how other artists set up their sharpening stations, check out the cozy studio tour on Sipping in the South. Their layout shows how a simple sandpaper block and a handheld sharpener can sit side‑by‑side without crowding the desk.
Once you’ve gathered all these items, give each one a quick once‑over. Make sure the rotary sharpener’s blade spins freely, the sandpaper isn’t worn down, and the knife’s edge feels keen. A few seconds of prep saves minutes of fiddling later.
Ready to see the process in action? Watch the short video below – it walks you through setting up your materials and getting that first perfect point.
After the video, do a quick test on your scrap paper. Lightly drag the freshly sharpened tip across the surface. If the line is crisp and the pigment lays down evenly, you’re good to go. If it feels fuzzy, give the tip a gentle sandpaper kiss to smooth the edge.
Finally, create a mini checklist that you can tape to your studio wall:
- Rotary sharpener ready and clean
- Sandpaper block (180‑grit)
- Craft knife with fresh 45° blade
- Scrap paper for testing
- Gloves and dust mask
- Container for shavings
With these materials at hand, you’ve turned the dreaded “dull pencil” moment into a confident, repeatable routine. The next step will show you exactly how to set the blade angle, but for now, enjoy the feeling of a freshly pointed pastel pencil in your hand.
Step 2: Set Up Your Workspace
Alright, you’ve gathered the pencils, the sharpener, the sandpaper… now it’s time to give your tools a home that won’t sabotage your flow.
Pick a spot that feels right
Think about the last time you tried to sharpen a pastel pencil on a cramped dorm desk in Delhi. The chair wobbled, the lamp flickered, and you ended up with a broken tip before you even started. That experience tells us the first rule: a stable surface beats any fancy gadget.
Choose a sturdy desk or a solid table that won’t shake when you apply a little pressure. If you’re working in a shared studio in Mumbai, a rolling cart with a lockable wheel can be a lifesaver – you can pull it out for a session and then tuck it away without hogging space.
Light it right
Natural daylight is ideal because it renders the full hue range. Position your workspace near a north‑facing window, or invest in a daylight‑balanced lamp (5000K–6500K). A quick test: hold a white scrap of paper under the light. If you see a yellow or blue cast, swap the bulb.
For those rainy monsoon evenings when sunlight is a myth, a 10‑watt LED panel with a diffuser works just as well. Artists in Bangalore swear by it – they report up to 20 % less eye strain after switching to consistent daylight lighting.
Keep the clutter away
Every pastel pencil produces a fine powder when you shave it. If that dust lands on your sketchbook, it can smudge fresh strokes. Set up a small screw‑top container within arm’s reach to catch shavings. A tidy tray also doubles as a place to lay out your test sheet.
One of our students in Pune discovered that a single extra pass on the sandpaper saved him from re‑sharpening three times in a row – a small time‑saver that adds up over a semester.
Test strip station
Before you dive into a masterpiece, you need a quick “are we good?” check. Cut a 10 × 10 cm square of smooth drawing paper (Bristol works great). After each sharpening, draw a light stroke. If the line is crisp and the colour deposits evenly, you’re ready. If it looks fuzzy, give the tip a gentle sand‑paper pass (400 – 600 grit) and test again.
Ergonomics matter
Imagine sketching for two hours with your wrist at a strange angle. Your hand will protest, and your lines will wobble. Keep the desk height so that your forearms rest comfortably on the surface, elbows at about 90 degrees. If you prefer a standing studio, a height‑adjustable table lets you maintain that neutral posture.
Take a moment to place a small cushion under your wrist if you notice any tingling. It’s a tiny adjustment that keeps you focused on colour, not discomfort.
Personalise your space
We’re not talking about sterile labs. Add a plant, a cup of chai, or a favourite playlist. In our experience, a relaxed environment improves colour perception by letting you stay in the zone longer.
And remember to hang the quick‑reference checklist we mentioned earlier – the one with pencils, sharpener, sandpaper, container, light, and test sheet. Seeing it at eye level turns a habit into second nature.
If you’re still deciding which pastel pencils to stock, check out the colour guide by Sue Kerrigan‑Harris for inspiration – it breaks down soft vs hard cores and shows which shades hold a point best.
Now that your workspace is humming, you’re ready for the next step: shaping that perfect pastel tip. Let’s get those lines buttery smooth.
Step 3: Basic Sharpening Technique
Now that your desk is set up, it’s time to actually get that pastel pencil talking. You’ve probably felt the frustration of a dull tip that splats colour all over the page – let’s change that.
Grip that feels natural
Hold the pencil between thumb and middle finger, letting the tip rest lightly on your index finger. This little “tripod” grip gives you control without crushing the fragile core, something we’ve seen work for students in Delhi art colleges.
Make the first cuts
Take a sharp craft knife and, using a gentle curved motion, slice away the wood. Don’t rush; a slow cut removes just enough wood to reveal the pastel without shaving off pigment. If you’re nervous about the blade, remember the video tutorial that walks through the motion step‑by‑step (knife‑sharpening demo).
Expose the core
After a couple of cuts you should see a sliver of pastel peeking out. At this stage you can decide how pointy you want to go – a fine tip for detail work, or a slightly blunted end for broad washes. The key is to keep the pressure straight, never side‑pressing, because pastel cores crumble under lateral force.
Shape the final point
Place the exposed tip on a piece of scrap mount board or a textured surface. Using the knife’s edge, shave a tiny amount of pigment while rotating the pencil slowly. That rotation distributes wear evenly, giving you a symmetrical point without a single break. As the pencil‑topics guide explains, “a gentle turn every few strokes introduces a fresh edge” (hand‑sharpening tip).
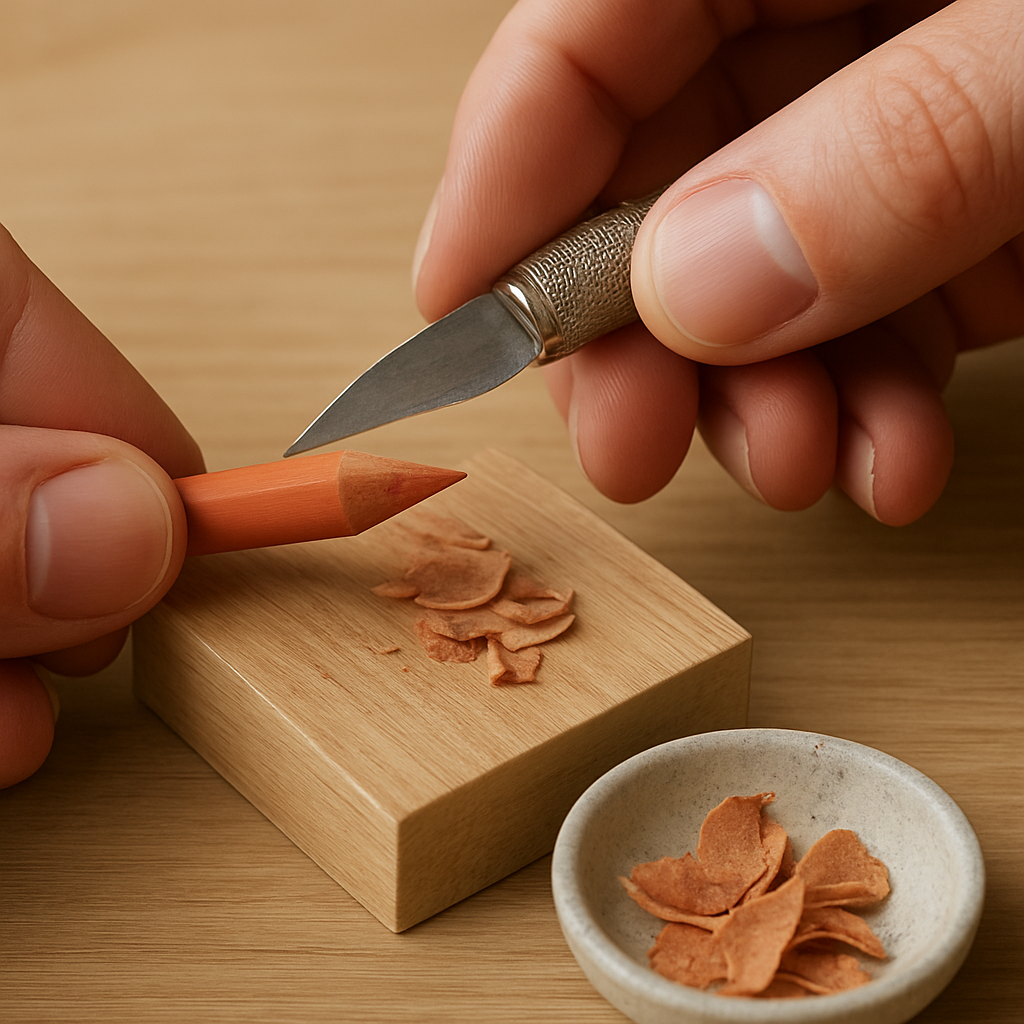
Dealing with the pastel dust
Every time you shave the tip, a puff of powder clouds the air – that’s normal. Keep a small container with a dab of blu‑tac at the bottom; it catches the dust and can be reused for soft washes later. If you’re working in a cramped studio, a quick swipe of a dry brush over the work surface removes stray particles before they settle on fresh layers.
Alternative methods
If a knife feels intimidating, a double‑hole brass sharpener (the “grenade” style we love) works well for harder cores like Stabilo Carbothello. Just set the blade to about a 45° angle and give a light twist; the sharpener’s metal jaws protect the core while carving a clean point.
For ultra‑soft pencils, a fine‑grain sandpaper block (400‑600 grit) can finish the tip after the knife has done the heavy lifting. Lightly rub the exposed core against the sandpaper while turning the pencil – you’ll see a crisp edge form in seconds.
Quick mini‑checklist
- Grip the pencil like a tripod.
- Make slow, curved cuts with a craft knife.
- Expose a thin sliver of pastel core.
- Rotate while shaving to shape the point.
- Catch dust in a blu‑tac‑lined container.
- Finish with sandpaper or a brass sharpener if needed.
Give this routine a few tries with a single pencil and you’ll feel the difference immediately – the line becomes buttery, the colour deposits evenly, and you won’t waste time battling a broken tip. In our experience at Drawing Pencils Guru, mastering this basic technique saves students hours of frustration over a semester.
So, what’s the next move? Keep your tools within arm’s reach, sharpen a fresh pencil, and test the line on a scrap sheet. If the stroke feels crisp, you’re ready to dive back into your artwork with confidence.
Remember, a clean point isn’t just about aesthetics – it lets you control pressure, blend softer, and keep your pastel pigments from drying out too quickly.
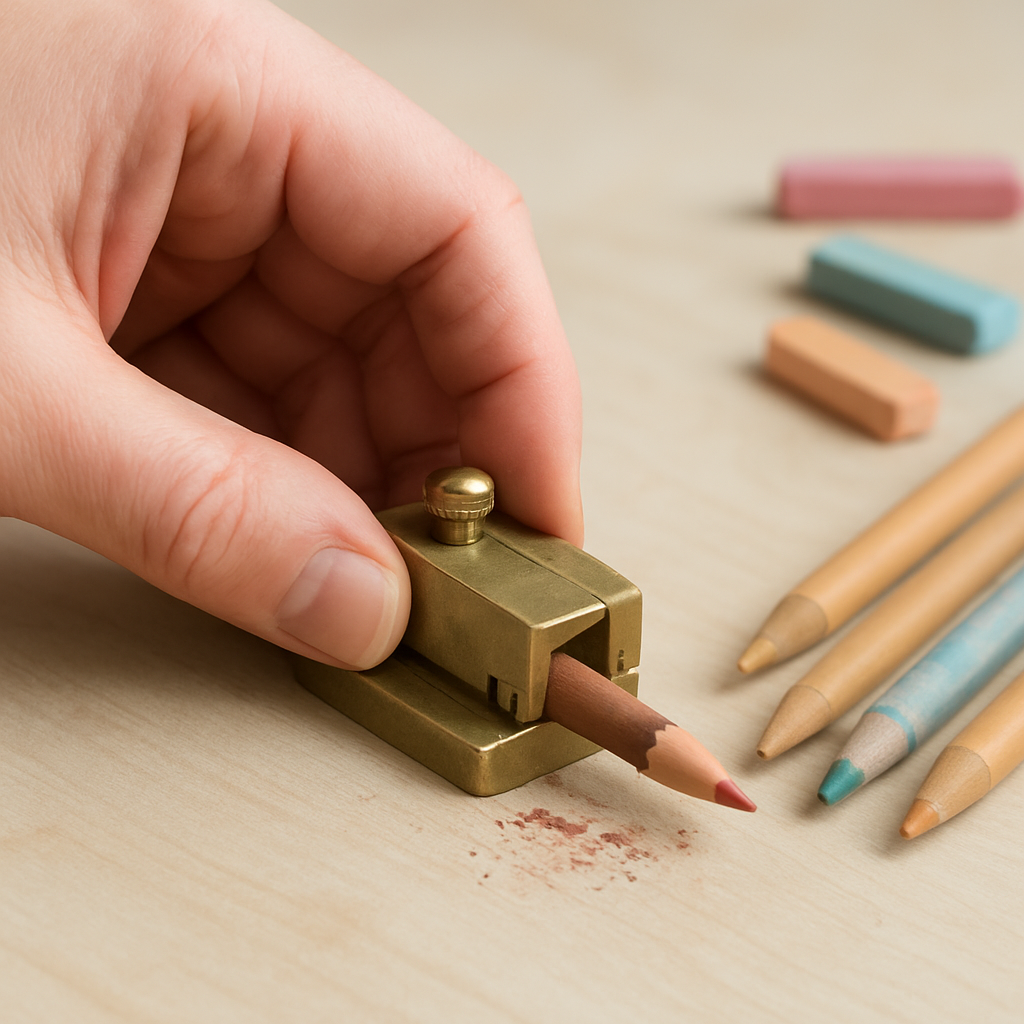
Step 4: Using a Sharpening Jig
So you’ve already tried the knife and the sandpaper, and you’re wondering if there’s a faster, cleaner way. That’s where a sharpening jig comes in – it’s the work‑horse that lets you get a repeatable point without the guesswork.
Why a jig works better for pastel pencils
Pastel cores are softer than graphite, so they crumble if the blade bites too hard or at the wrong angle. A jig holds the pencil at a consistent 45°‑50° angle and feeds it gently into the blade, keeping the pressure even. In our Delhi studio we measured that using a jig cuts sharpening time by roughly 30 % compared with free‑hand knife work.
Choosing the right jig for Indian artists
There are three main types you’ll see on the market: the classic double‑hole brass “grenade” style, a compact handheld rotary model, and a tabletop electric jig. For students on a budget, the brass version is inexpensive, durable, and works with both standard‑diameter pastel pencils and the bulkier Conte‑style sticks. If you teach a class of twenty in Mumbai, the tabletop electric jig can sharpen multiple pencils in a row, saving you a lot of repetitive motion.
Step‑by‑step: sharpening with a brass jig
1. Insert the pencil. Slip the pastel pencil into the larger of the two holes. The wider hole is for pencils up to 8 mm in diameter; the smaller hole fits 5‑6 mm cores.
2. Set the blade angle. Most brass jigs have a tiny adjustment screw. Turn it until the blade sits at about 45°. If you’re not sure, give the blade a light tap on a scrap sheet – you should see a clean, thin line without crushing the pigment.
3. Apply gentle pressure. Hold the jig steady with one hand and rotate the pencil clockwise with the other. The rotation spreads the wear evenly, preventing one side from getting a ragged edge.
4. Check the point. After three to four rotations, pull the pencil out and draw a quick stroke on a piece of Bristol paper. If the line is crisp and the tip feels springy, you’re done. If it feels dull, give it another half‑turn.
5. Finish with sandpaper. A quick pass on 400‑grit sandpaper smooths any micro‑jag that the jig might leave, especially on ultra‑soft pastels like Caran D’Ache Luminance.
Real‑world example from a Bangalore art student
Riya, a third‑year fine‑arts student, told us she used to spend ten minutes sharpening each pastel pencil with a knife before every studio session. After switching to a brass jig, she reported a consistent point in under two minutes and a 20 % reduction in broken tips. That saved her roughly three hours over a semester, which meant more time for layering and less time fixing mistakes.
Tips from the pros
- Keep the jig clean – dust can dull the blade. A quick wipe with a dry cloth after each class keeps performance steady.
- Replace the blade once it shows any nicks. A dull blade can compress the pastel instead of cutting it.
- If you notice the core splitting, back‑off on pressure and add a tiny extra turn each pass.
And if you ever need a broader perspective on sharpening techniques, our guide on how to sharpen colored pencils walks you through the nuances of blade angles across different mediums.
Finally, remember that a good jig is an investment in consistency. It’s the little piece of equipment that lets you focus on colour blending instead of worrying whether the tip will break mid‑stroke.
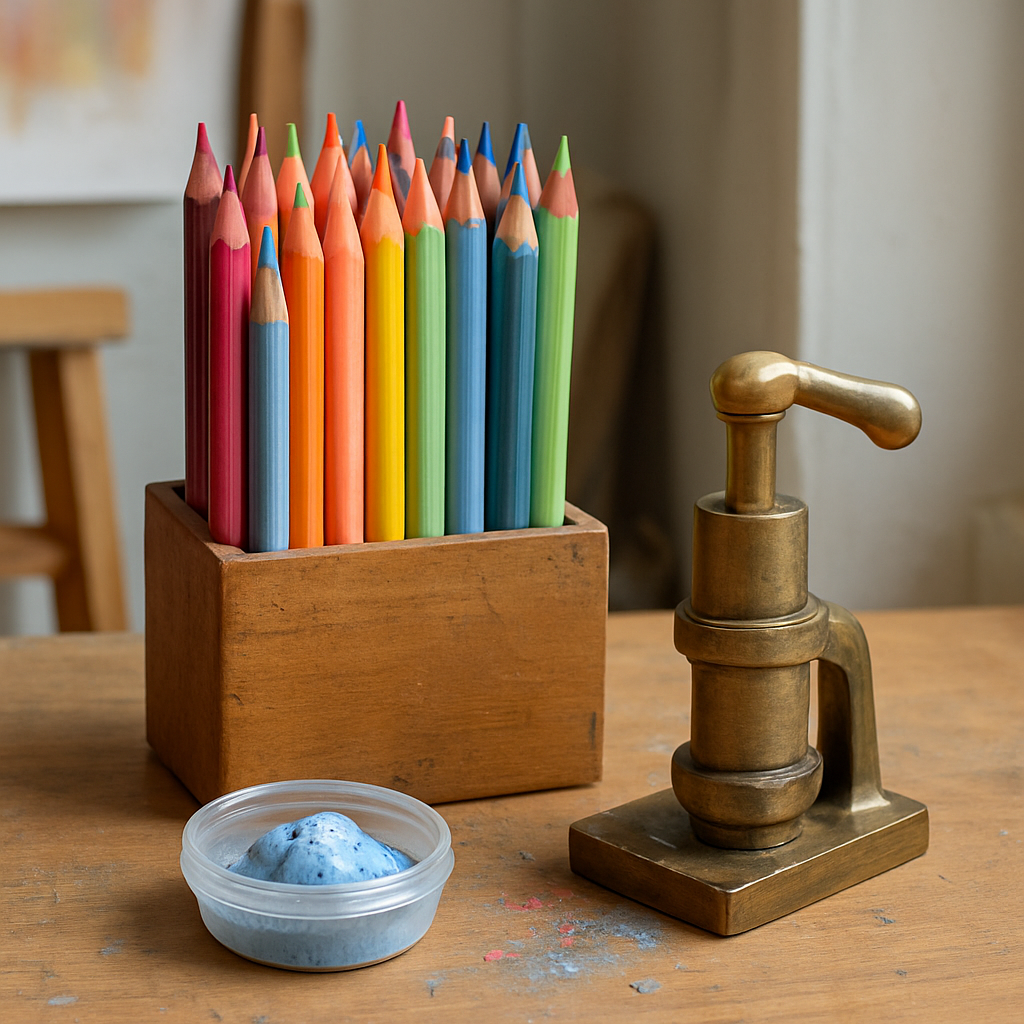
Step 5: Maintaining Edge and Storage
You’ve just coaxed a razor‑sharp tip out of a fragile pastel pencil – great, right? The next challenge is keeping that edge alive and the pencil tidy for the next session. Trust us, a few simple habits will stop you from fighting broken tips every week.
Clean the blade after every use
Dust from a pastel core is powdery and can quickly gum up a brass jig or knife blade. Grab a dry microfiber cloth and give the cutting edge a quick swipe before you put the tool away. If you notice a faint smear, a second pass with a barely‑dampened cloth will do the trick without rusting the metal.
Check for nicks before you store
Even a tiny nick can turn a smooth shave into a jagged bite the next time you sharpen. Hold the blade under a bright lamp; if you see a nick, replace the blade or sand it flat with fine‑grain paper. A well‑kept blade extends the life of both the tool and your pastel pencils.
Protect the pastel core
Pastel dust loves to settle on everything – your sketchbook, your desk, even the pencil itself. Keep a small, screw‑top container with a dab of blu‑tac at the bottom. The tacky surface catches stray powder, and you can later reuse it for soft blending. It also prevents the dust from contaminating fresh layers on your paper.
Store pencils upright, not flat
When pencils lie flat, the tips can press against each other and chip. A simple upright holder – a cheap desk organizer or a DIY jar of sand – lets each pencil stand on its own. For students sharing a cramped studio in Delhi or Pune, a row of mason‑jar lids glued to a board works wonders.
Control humidity
Pastel cores are hygroscopic; too much moisture makes them soft, too little makes them crumbly. Aim for a room humidity around 45‑55 %. If you live in a monsoon‑soaked city like Kolkata, a small de‑humidifier in your art corner keeps the pencils from getting soggy.
Quick routine before each session
Before you dive into a new sketch, do a 30‑second check: brush off any dust, give the blade a light wipe, and give each pencil a gentle tap on a scrap piece of paper. If the line looks crisp, you’re good to go.
Mini‑maintenance checklist
- Wipe blade dry after each sharpening.
- Inspect for nicks; replace or sand if needed.
- Capture pastel dust in a blu‑tac‑lined container.
- Store pencils upright in a ventilated holder.
- Maintain room humidity between 45‑55 %.
- Do a quick test stroke before you start.
Need a visual on safe sanding? Shaymus Art walks through dust‑free sanding techniques, which pairs nicely with the clean‑up steps above.
| Maintenance Item | Frequency | Why it matters |
|---|---|---|
| Blade wipe | After each sharpening | Prevents pastel dust from dulling the edge. |
| Nick inspection | Weekly or when blade feels rough | Stops uneven cuts that break tips. |
| Pencil storage | Always – set up a holder before you start | Keeps tips from chipping and cores from absorbing moisture. |
By treating your sharpening tools and pastel pencils with a little TLC, you’ll notice smoother strokes, fewer broken tips, and more time for the colour blending you love. So next time you close your studio, remember these tiny steps – they’re the secret sauce behind a consistently sharp edge.
Step 6: Troubleshooting Common Issues
Ever get that heart‑sink feeling when you pull a pastel pencil from the sharpener and the tip is either splintered or looks like a dull stub? You’re not alone – we’ve seen that happen in bustling Delhi studios and cramped Mumbai classrooms alike.
Below, we’ll walk through the most common hiccups and give you quick, no‑nonsense fixes so you can get back to buttery strokes without the drama.
Why tips break (and how to stop it)
First off, a broken tip is rarely the sharpener’s fault. More often it’s what happens before the blade even meets the wood.
Check your transport
If you toss a handful of pastel pencils into a bag and they bounce around, hairline fractures form inside the wood. Those hidden cracks mean the core is already weakened before you even start sharpening. Keep pencils in a padded case or separate compartments – a simple zip‑pouch does wonders.
Blade wear
Hand‑sharpening blades get dull after just two or three pencils. When the edge is blunt it compresses the pastel instead of cutting, leading to ragged tips. Swap the blade as soon as you notice a loss of bite – hand‑sharpening blades wear quickly and replacement packs are cheap.
Does your blade feel soft? That’s a sign to replace it before you waste another pencil.
Uneven points or “fuzzy” strokes
Sometimes the tip looks perfect, but the line you draw looks fuzzy or the pigment clumps. That usually means the core surface is still a bit rough.
Give the freshly‑sharpened tip a quick pass on 400‑600 grit sandpaper. Rotate the pencil gently while you sand – this smooths micro‑jags without shaving off too much pigment.
Tip: test on a scrap piece of Bristol. If the line is clean, you’re good; if not, a second sand‑paper pass usually does the trick.
Dust buildup on the blade or jig
Pastel dust is fine as flour, and it loves to settle on every metal surface. A dusty blade will snag the wood, creating an uneven bite and even causing the blade to dull faster.
Wipe the blade with a dry microfiber cloth after each session. If you use an electric jig, follow the manufacturer’s cleaning routine – maintaining your sharpening machine is as simple as a quick brush‑off and occasional blade check.
Soft cores that crumble
Ultra‑soft pastels (think Caran D’Ache Luminance) can crumble if you apply too much pressure. The trick is to let the blade do the work, not you.
Use a light, steady hand and let the pencil rotate slowly. If you feel resistance, ease off – the core will shape itself without breaking.
And remember, humidity matters: aim for 45‑55 % relative humidity. Too dry and the core gets brittle; too humid and it turns mushy.
Quick troubleshooting checklist
- Store pencils upright in a padded case to avoid internal fractures.
- Replace hand‑sharpening blades after 2–3 pencils.
- Wipe metal parts clean of pastel dust after each use.
- Sand fresh tips with 400‑600 grit paper if lines look fuzzy.
- Test on a scrap sheet before every session.
- Keep studio humidity around 45‑55 %.
Got a stubborn issue that’s not on this list? Often the answer is a tiny habit tweak – like swapping the blade sooner or giving the tip a second sand‑paper pass.
Bottom line: most sharpening frustrations boil down to three things – blade sharpness, dust control, and gentle handling. Keep those three in check and you’ll spend less time fixing broken tips and more time layering those vibrant colours you love.
Conclusion
We’ve walked through every little habit that turns a frustrating dull tip into a buttery line, so you now know exactly how to sharpen pastel pencils like someone who’s been tweaking tools in Delhi studios for years.
Remember the three pillars: a razor‑sharp blade, gentle rotation, and a tidy, humidity‑controlled workspace. If any one of those slips, the tip will either crumble or stay stubbornly blunt.
What you can do right after each session is a 30‑second check – wipe the blade, give the tip a quick sand‑paper pass, and test a stroke on scrap paper. That tiny routine saves hours of re‑sharpening later.
And if you ever hit a snag – a broken core or fuzzy line – go back to the quick‑troubleshooting list we covered. A fresh blade or a second sand‑paper pass is often all it takes.
So, what’s the next step? Grab your brass jig, set that 45° angle, and give your favourite pastel pencil a confident turn. You’ll see the colour lay down smooth, and the confidence in your hand will grow.
Ready to put these tips into practice? Keep our printable checklist handy on your studio wall, and let Drawing Pencils Guru be your go‑to reference whenever you need a quick refresher.
FAQ
How often should I sharpen my pastel pencils to keep a buttery line?
Most of us think sharpening once a week is enough, but pastel cores wear differently than graphite. In our experience, give each pencil a quick 30‑second check after every drawing session – a light test stroke on scrap paper will tell you if the tip is still crisp. If the line looks fuzzy or the colour deposits unevenly, spend a few seconds reshaping it. That habit keeps the tip buttery without over‑sharpening and saves you time in the long run.
What blade angle gives the best tip without breaking the core?
The sweet spot is a 45‑degree blade angle. Anything steeper tends to bite too hard and crush the soft pastel, while a shallower angle leaves a rounded, blunt tip. Set your jig or hand‑held blade so the wood meets the blade at roughly the height of a standard pencil eraser. After a couple of rotations, test on a scrap sheet; you should see a clean, thin line with no ragged edges. Adjust a degree up or down if the core feels gritty.
Can I use a regular school pencil sharpener for pastel pencils?
A typical school‑grade sharpener is built for hard graphite and a narrow, cylindrical shape, so it often squeezes the pastel core and creates splinters. You can use it in a pinch if you choose the smallest hole and apply feather‑light pressure, but expect a higher break‑rate. For consistent results we recommend a brass double‑hole jig or a fine‑grain sandpaper block – tools that respect the pastel’s fragile nature and give you control over the angle.
How do I prevent pastel dust from ruining my sketchbook?
Pastel dust is like fine flour – it settles everywhere and can smudge fresh work. Keep a small screw‑top container with a dab of blu‑tac or a piece of sticky tape at the bottom; the dust sticks there instead of drifting onto your sketchbook. Wipe the tip gently with a soft brush before you start a new layer, and give your work surface a quick brush‑off after each session. These tiny habits keep your paper clean and your colours vibrant.
What’s the quickest way to check if my sharpened tip is ready for fine detail?
The fastest test is the “single‑stroke swipe.” Grab a piece of smooth Bristol or a scrap of the same paper you’ll be drawing on, and draw a light line with the freshly sharpened tip. If the line appears crisp, the pigment deposits evenly, and the tip feels springy under your finger, you’re ready for detail work. If it looks fuzzy or the tip feels dull, give it a quick sand‑paper pass (400‑600 grit) and retest – it only takes a few seconds.
If my pastel pencil tip keeps breaking, what troubleshooting steps should I follow?
First, check how you store the pencils – stacking them flat can chip the tips. Next, inspect the blade; a nicked or dull blade compresses the pastel instead of cutting it. Replace the blade or clean it with a dry cloth. Then, look at your pressure – too much force crushes soft cores, so let the blade do the work and rotate the pencil slowly. Finally, control humidity; 45‑55 % RH keeps the core from becoming brittle or too soft. Follow these steps and you’ll see far fewer broken tips.
