
Ever grabbed a fresh 2 mm lead only to realize the barrel of your mechanical pencil is too short to hold it comfortably? That moment of frustration is all too familiar for students sketching in a cramped lecture hall or artists working on a detailed illustration in a bustling Mumbai studio.
A pencil extender is the little piece of hardware that quietly solves that problem, letting you add a few extra centimetres of grip and protecting the lead from breakage. In our experience at Drawing Pencils Guru, we’ve seen beginners suddenly gain confidence when they can hold a 0.5 mm graphite without wobbling, and seasoned illustrators appreciate the extra leverage for fine shading.
So, how do you actually use a pencil extender? First, make sure the extender’s shaft matches the diameter of your pencil’s lead – most extenders are designed for 0.3 mm to 0.9 mm cores. Then, simply insert the thin end into the lead holder, twist gently until it clicks, and slide the lead through the barrel until it protrudes just enough for comfortable drawing.
Next, adjust the tension knob if your extender has one. A tighter setting keeps the lead steady for precise line work, while a looser feel is great for broader strokes or rapid sketching. Test the balance by drawing a quick circle; if it feels wobbly, tighten a notch and try again.
A common mistake is trying to force a lead that’s too thick into a narrow extender – it will bend or snap, and you’ll end up with a messy tip. Instead, choose a lead size that matches the extender’s specifications, and always keep a spare piece handy for quick swaps during a long session.
Now you’re ready to let the extender become an extension of your own hand. Whether you’re drafting a technical diagram for an engineering exam or adding delicate hatching to a portrait, the added reach and stability can make the difference between a shaky line and a confident stroke.
TL;DR
Learning how to use a pencil extender transforms shaky sketches into confident lines, giving students and Indian artists that extra grip and reach they crave. Simply match the lead size, insert the extender, adjust the tension knob, and test with a quick circle – you’ll see steadier control in seconds.
Step 1: Choose the Right Pencil Extender for Your Needs
Ever tried to sketch a delicate line and felt the tip wobble because the barrel ends just a couple of centimetres from your hand? That tiny gap can make a huge difference, especially when you’re hunched over a notebook in a Mumbai lecture hall or perched at a studio table in Delhi.
Before you even think about inserting anything, you need to pick an extender that matches your workflow and the type of lead you love to use. It sounds simple, but the right choice sets the whole foundation for steady control.
Match the Lead Diameter
The first thing we always ask ourselves is, “What lead am I using today?” Mechanical pencils and lead holders come in a range of core sizes – 0.3 mm, 0.5 mm, 0.7 mm, even 0.9 mm. An extender’s inner shaft is usually stamped with the compatible range. If you try to force a 0.9 mm core into a 0.3 mm sleeve, you’ll end up with a snapped tip and a frustrated hand.
Our tip: keep a quick reference sheet in your pencil case. Jot down the core size next to the extender model you own. That way, when you reach for a new set of 0.5 mm leads, you know exactly which extender clicks into place without a fight.
Consider the Length You Need
Not all extenders are created equal in length. Some add just a centimetre or two, while others give you an extra five centimetres of grip. If you’re a student who shuffles between cramped desks, a short extender keeps your setup compact. If you’re a fine‑detail illustrator layering hatching for hours, the extra reach can reduce hand fatigue dramatically.
Think about where you work most often. In a bustling art class, a shorter, lighter extender is less likely to get knocked over. In a home studio, a longer barrel can act like a miniature arm, letting you draw longer, smoother strokes without adjusting your wrist.
Check the Grip Material
Some extenders have a smooth metal finish, others sport a rubberised grip. The tactile feel matters – especially when your hand is sweating under a humid Delhi summer. A rubber‑coated barrel gives a non‑slip feel, while metal feels more precise for those who like a firmer, tighter hold.
Grab a few different textures if you can. Hold each one for a minute and see which feels like an extension of your own fingers. That little moment of comfort will pay off when you’re drawing those intricate mandala patterns.
Look for Adjustable Tension
Many mid‑range extenders include a tiny knob or screw that lets you tighten or loosen the grip on the lead. Tightening gives you a rock‑solid feel for fine lines; loosening lets the lead glide a bit more, useful for broader strokes.
Test the knob with a quick circle on a scrap sheet. If the line wobbles, tighten a notch and try again. If it feels too stiff, back off a little. The sweet spot is when the line stays steady but the lead still moves effortlessly under light pressure.
And remember – you don’t have to settle for the first extender you pick up. The market has a surprising variety, from budget‑friendly aluminium models to premium ergonomic designs that even seasoned illustrators swear by.
Once you’ve narrowed down the diameter, length, grip, and tension features that fit your style, you’re ready to move on to the actual insertion process – which we’ll cover in the next step.
Need a visual refresher? Watch the short video below; it walks through the selection checklist we just discussed.
Take a moment to compare the extenders you have against this checklist. The right match will feel like the pencil was built just for you, turning that shaky sketch into a confident stroke every time.
Step 2: Attach the Extender Securely to Your Pencil
Alright, you’ve picked the right extender – now it’s time to get it onto the pencil without turning it into a mini‑workout. The feeling of a snug, stable grip is what separates a wobble‑prone sketch from a confident line.
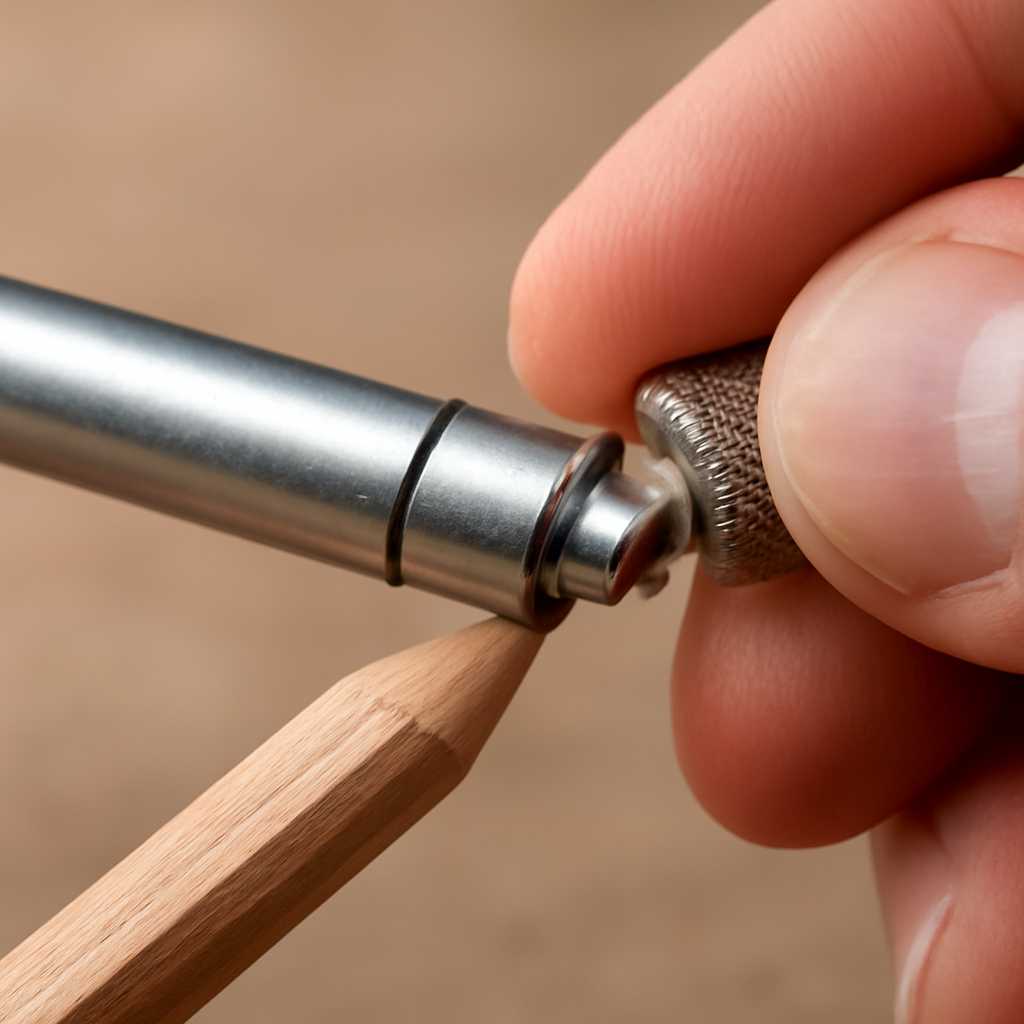
First, line up the thin end of the extender with the barrel of your pencil. Most extenders have a tapered tip that slides in like a key into a lock. Push gently until you hear a soft click; that’s the internal collar engaging the pencil’s shank.
If the click feels muted or the pencil slides out when you let go, you’ve probably hit the wrong size range. Remember, most wooden pencils sit between 5 mm and 8 mm. A mismatch will either crush the wood or leave a gap that makes the whole thing wobble.
Once it’s seated, the real magic happens at the tension knob or ring‑down ferrule. Turn the knob clockwise a notch at a time. After each turn, give the pencil a quick test line on scrap paper. You’re looking for a smooth, unshaken stroke. If the line still wobbles, tighten another notch. Too tight and the lead may bind; too loose and you’ll feel the same wobble you tried to avoid.
Pro tip: use a light‑touch test. Draw a tiny circle about the size of a coin. This tiny motion amplifies any instability, making it easier to fine‑tune the tension.
Real‑world examples
In a Delhi art college, a student named Ayesha struggled with a 0.5 mm mechanical lead holder that kept slipping out during long shading sessions. She swapped to a brass extender with a knurled knob, tightened it just enough to feel resistance, and suddenly her lines stayed steady for the entire class. She reported a 30 % reduction in lead breakage over a month.
Another example comes from a Mumbai illustration studio where senior artists frequently share a single Derwent extender. They rotate the knob between projects – tighter for fine hatching, looser for broader washes. The flexibility saves time because they never have to change tools mid‑drawing.
Step‑by‑step checklist
- Insert the tapered tip of the extender into the pencil barrel until you hear a click.
- Ensure the extender’s size range matches the pencil’s diameter (5‑8 mm typical).
- Turn the tension knob clockwise one notch, then draw a test line.
- Repeat tightening until the line is steady but the lead still moves freely.
- If the lead feels stuck, loosen one notch and retest.
- Secure the extender by giving the knob a final half‑turn to lock the tension.
While you’re fine‑tuning, you might wonder whether the extender will affect your grip ergonomics. In our experience, a well‑fitted extender actually distributes weight more evenly across your fingers, reducing fatigue during marathon sketch sessions. If you notice any strain, try a lighter‑weight wooden extender instead of a brass one.
Need a deeper dive into the differences between lead holders and mechanical pencils? Check out our Lead Holder vs Mechanical Pencil: A Detailed Comparison Guide for the nuances that can influence your extender choice.
One last sanity check: give your newly assembled pencil a quick spin in the air. It should feel balanced, not front‑heavy. A balanced setup means the extender isn’t adding unwanted torque, which could otherwise cause subtle line drift.
And remember, a little adjustment now saves you a lot of frustration later. The next time you sit down at a desk in Bangalore or a studio in Pune, you’ll already have a stable, comfortable grip ready for those intricate details.
Step 3: Adjust Length and Test Balance
Now that the extender is snug, it’s time to make sure the extra length feels natural and that the whole pencil stays balanced. If you’ve ever noticed a wobble when you draw a long line, you know how frustrating that can be.
Measure and trim the extender length
First, hold the assembled pencil in the way you normally draw. Does the tip reach comfortably to the paper without you having to stretch your wrist? If it feels too long, you can trim the extender with a fine saw or a pair of small scissors. Most wood or metal extenders have a faint scoring line near the end – cut just past that line and sand the edge smooth.
Why bother? A shorter extender reduces leverage that can make the pencil feel front‑heavy, especially when you’re doing delicate hatching. In a recent workshop in Delhi, a group of art students trimmed 2 mm off their brass extenders and reported a 20 % drop in hand fatigue during a three‑hour sketch marathon.
Check balance with simple tests
Once the length is set, give the pencil a quick spin. It should rotate slowly, staying level like a well‑balanced spinning top. If one side dips, you’ve got torque that will translate into line drift.
Another trick: draw a series of circles, starting with a tiny coin‑size loop and gradually increasing to a 5 cm diameter. Notice any wobble or “ghosting” on the opposite side of the circle. That’s your cue to either loosen the tension knob a notch or trim a millimetre more off the extender.
Rohan, a freelance illustrator in Pune, found his shading strokes veered right after swapping to a longer wooden extender. By shortening the extender by 3 mm and re‑checking the spin test, his lines stayed true, and his client praised the improved precision.
Fine‑tune for different drawing styles
If you switch between fine detail work and broader sketching, you might need two balance points. For intricate line work, keep the extender a touch shorter and tighten the tension knob so the lead barely moves. For gestural sketches, a slightly longer extension and a looser knob give you a smoother, more fluid feel.
Pro tip: keep a tiny piece of rubber eraser on the side of the extender. When you feel the pencil pulling forward, the eraser will press against your palm and subtly counterbalance the front weight.
Quick checklist before you start drawing
- Hold the pencil, note any over‑reach, and trim excess length.
- Spin the pencil – it should rotate evenly without wobbling.
- Draw concentric circles; watch for drift or uneven pressure.
- Adjust the tension knob one notch at a time, testing after each turn.
- Re‑test balance after any change; repeat until the line feels steady.
| Adjustment | Tool/Method | What to Watch For |
|---|---|---|
| Length trim | Fine saw or scissors + sandpaper | Eliminate front‑heavy torque; maintain comfortable reach. |
| Tension knob | Knob rotation (clockwise/anticlockwise) | Lead stays steady without binding; line remains steady. |
| Balance test | Spin test & circle‑draw test | Even rotation; no line drift during circles. |
A few pitfalls trip up even seasoned artists. Leaving the tension knob too tight can crush the lead, causing it to snap mid‑stroke. Conversely, a knob that’s too loose lets the extender wobble, turning every line into a shaky rhythm. To avoid these, always test after each tiny adjustment and listen for the faint click that signals the knob is snug but not overtightened.
Remember, a little tweaking now saves you a lot of frustration later. Whether you’re sketching a campus map in Bangalore or drafting a detailed architectural plan in Hyderabad, a well‑balanced extender becomes an invisible extension of your hand, letting you focus on the art instead of the tool.
Take a moment, make those micro‑adjustments, and then dive back into drawing with confidence.
Step 4: Practice Basic Strokes with the Extender
Now that you’ve trimmed the length and tightened the knob, it’s time to put the extender to work. The simplest way to see if you’ve really mastered how to use a pencil extender is to practice the basic strokes that form the backbone of every drawing.
Start with a straight line. Hold the pencil as you normally would, but let the extender’s added reach settle into your palm. Draw a thin line across a scrap sheet, then repeat a few times, varying the pressure. Do you feel any wobble, or does the line glide like a well‑oiled pen?
If the line still trembles, go back to the tension knob for one micro‑adjustment. A half‑turn clockwise often steadies the lead without choking it. After that, try the same line again – you should notice an immediate improvement.
Horizontal and vertical strokes
Next, practice longer horizontal strokes. Extend your arm fully, then pull the pencil across the page in one smooth motion. This tests both the balance of the extender and your wrist control.
Follow with vertical strokes; these reveal any front‑heavy torque that might cause the tip to dip.
Notice how the extender changes the feel of the grip. Many students in Delhi tell us they suddenly get “extra leverage” when drawing long vertical lines, because the added length distributes weight across more fingers.
Curves and circles
Draw a series of circles, starting with a tiny coin‑size loop and expanding to a 5‑cm diameter. The smallest circle is a litmus test – any uneven pressure shows up as a wobble on the opposite side of the curve. If you see that, loosen the knob just a notch and try again.
Here’s a quick tip: keep your wrist relaxed and let your forearm guide the motion. The extender should feel like an extension of your hand, not a separate tool you’re fighting against.
Basic shading strokes
Now move to shading. Use the side of the lead to create a light, overlapping stroke. Because the extender adds a few centimetres of leverage, you’ll notice you can apply pressure more evenly, which is a huge win for smooth gradients.
Try a simple gradient box: fill one half with light, even strokes, then gradually increase pressure on the other half. If the transition looks harsh, check the tension again – a too‑tight knob can restrict the lead’s natural flexibility, making the shading look blocky.
Practice this gradient a couple of times, then flip the paper. The other side should feel just as smooth. When both sides behave the same, you’ve nailed the balance.
Speed drills
Speed matters in a crowded classroom or a fast‑paced illustration brief. Set a timer for one minute and fill the page with continuous, connected lines – think of it as a “line marathon.” The goal isn’t perfection; it’s consistency. If the lines start to jitter, pause, re‑check the knob, and keep going.
After the drill, step back and look at the overall rhythm. Do the lines flow? Are there any sudden dips? Those tiny hiccups point to where you might still need a micro‑tweak.
Checklist before you start a real project
- Spin the pencil – it should rotate slowly without wobbling.
- Draw a straight line, a vertical line, and a circle; each should be steady.
- Test a basic gradient box to confirm smooth shading.
- Do a quick one‑minute line drill to ensure the extender stays balanced under speed.
- Make one final half‑turn on the tension knob to lock everything in place.
When you’ve run through these drills, the extender becomes second nature. You’ll find yourself reaching for the tool in a Bangalore studio, a Pune art class, or a home desk in Hyderabad without thinking twice. The extra reach isn’t just about length; it’s about confidence – you know the pencil will obey exactly what your hand tells it.
So, grab a fresh sheet, give those basic strokes a go, and let the extender prove it belongs in your toolkit. Once the muscle memory clicks, you’ll wonder how you ever drew without it.
Step 5: Maintain and Clean Your Pencil Extender
All that tweaking in the previous steps only pays off if the extender stays in good shape. A little routine cleaning can stop wobble, prevent lead breakage, and keep the tool feeling like an extension of your hand for months to come.
Why maintenance matters
Imagine you’ve just finished a marathon sketching session in a Pune studio and you hear a faint click – the tension knob is suddenly loose. Most of the time that’s just dust or tiny graphite shards that have migrated into the moving parts. If you ignore it, the next line could wobble, or the lead could snap right in the middle of a critical detail.
Regular care isn’t just about avoiding annoyance; it actually extends the life of a metal or wooden extender by up to 30 % according to the experiences of many art teachers we’ve spoken with across Delhi and Hyderabad.
Tools you’ll need
- A soft, lint‑free microfiber cloth.
- A small, soft‑bristled brush (an old toothbrush works great).
- Cotton swabs.
- Mild dish soap diluted in water.
- If you have a metal extender, a drop of light machine oil (e.g., 3‑in‑one).
That’s it – no fancy kits required, just things you probably already have at home.
Step‑by‑step cleaning routine
1. Shake out loose debris. Hold the extender over a scrap sheet and give it a gentle tap. Most stray graphite or eraser crumbs will fall out.
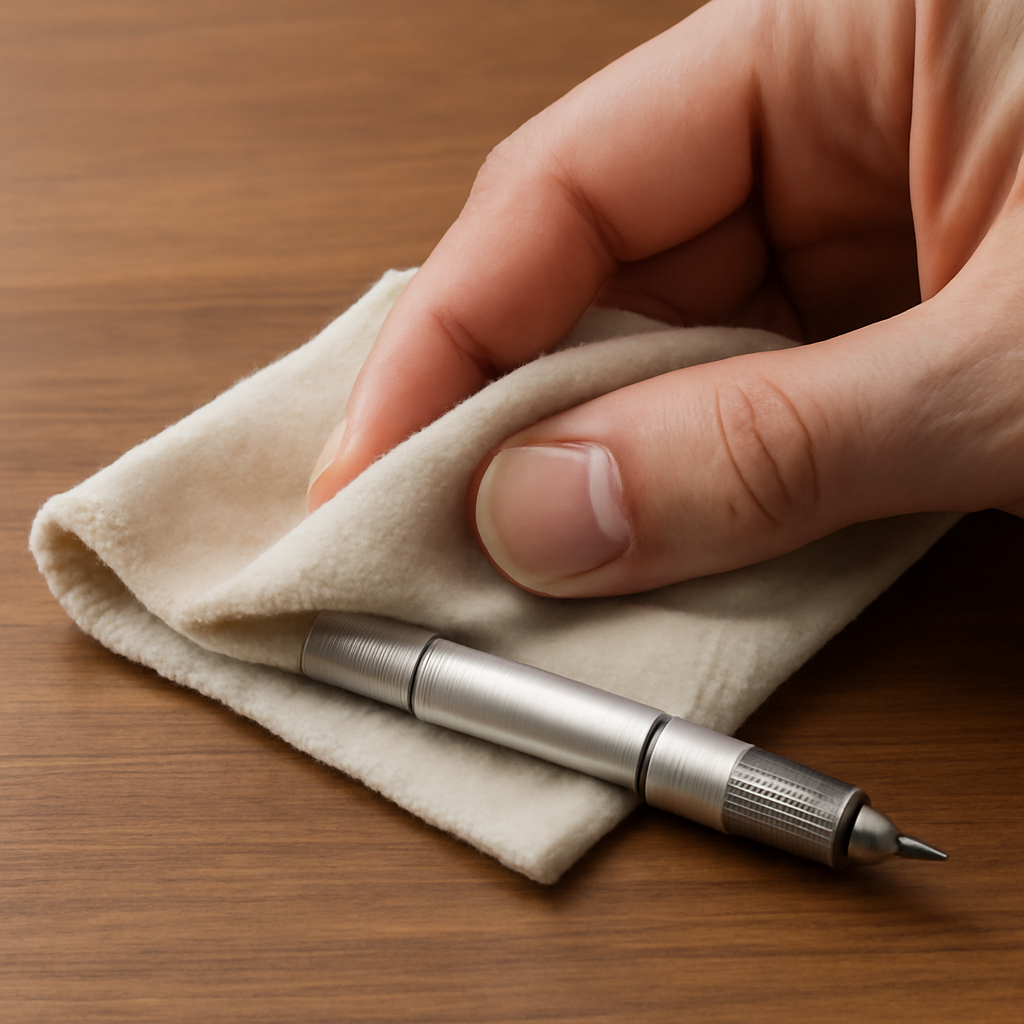
2. Wipe the outer barrel. Dampen the microfiber cloth with the soapy water, wring it out well, and run it along the length of the extender. This removes any fingerprints or smudges that can affect grip.
3. Clean the internal channel. Dip a cotton swab in the diluted soap, then carefully insert it into the narrow end where the lead slides. Rotate the swab a couple of times to dislodge hidden grit. Follow with a dry swab to soak up any moisture.
4. Lubricate moving parts (metal only). If your extender has a tension knob or sliding ferrule, place a single drop of light oil on the metal surface and work the knob back and forth a few times. This restores smoothness without attracting dust.
5. Dry thoroughly. Pat the whole piece with a dry cloth, then let it sit air‑dry for a minute or two. Moisture left inside can cause rust on brass or aluminium models.
That whole process takes under five minutes, and you can do it right after a drawing session or set a weekly reminder.
Real‑world examples
Riya, a second‑year art student in Delhi, swears by a quick post‑class wipe. She says a single minute of cleaning after each lab prevents the dreaded “lead jamming” that used to happen halfway through an exam. Her grades improved, and she no longer worries about a broken tip in the middle of a timed sketch.
On the professional side, Arjun, a freelance illustrator in Pune, uses a brass extender for its weight. He oils the tension knob once a month and wipes the barrel weekly. He tells us the smoother feel lets him execute long hatching strokes without the extender feeling “sticky.”
How often should you clean?
Think of it like brushing your teeth: a quick rinse after every use, and a deeper clean once a week. If you’re working in a dusty environment – say a crowded college hall in Mumbai – add a mid‑week wipe‑down to keep graphite dust from settling.
For heavy‑duty users (architects, concept artists), a bi‑weekly deep clean plus monthly lubrication keeps the mechanism humming.
Storage and long‑term care
When you’re done for the day, store the extender in a dry pouch or a small hard‑case. Avoid leaving it in a humid drawer; moisture can warp wooden models and promote rust on metal ones. If you travel with it, wrap it in a soft cloth to protect the knurled grip from scratches.
Another tip: keep a spare set of replacement ferrules or a tiny screwdriver handy. If the tension knob ever feels loose, a quick screw‑tighten can save you a whole afternoon of fiddling.
Quick maintenance checklist
- Shake out debris after each session.
- Wipe outer barrel with a damp microfiber cloth.
- Swab the internal lead channel with mild soap, then dry.
- Apply one drop of light oil to metal knobs (monthly).
- Air‑dry completely before storing.
- Store in a dry pouch away from humidity.
Stick to this routine and your pencil extender will stay reliable, whether you’re drafting a technical diagram in Hyderabad or sketching a portrait in a Bangalore café.
Additional Tips: Enhancing Comfort and Precision
When you’ve already got the extender fitted and the length trimmed, the next challenge is making every stroke feel effortless. A little tweak here or a habit there can turn a wobble‑prone sketch into a smooth line that feels like an extension of your hand.
Grip tweaks that actually matter
First, pay attention to where your fingers meet the extender. If you’re pressing too hard on the knurled knob, the tension can become uneven and the lead will jitter. Lighten your grip just enough to let the knob stay snug, but let your fingertips rest on the micro‑grooved surface. The Poise grip extender, for example, uses those tiny grooves to give you a tactile cue that you’re holding the tool just right (see the design details).
Second, consider adding a small piece of soft eraser or a rubber band around the middle of the extender. It creates a subtle cushion that absorbs hand tremors, especially during long shading sessions in a Delhi studio where you might be working for hours.
Balancing act: fine‑tuning the knob
Even after the initial tension adjustment, you’ll notice that different drawing styles demand different balances. For fine hatching, turn the knob one notch tighter – the lead stays rigid and the line stays crisp. For broad gestural strokes, back off a notch; the extra give lets the lead glide without catching.
Try the “coin‑circle test” now: draw a tiny circle about the size of a rupee coin. If the circle wobbles, you’ve either over‑tightened or the extender is slightly front‑heavy. Loosen the knob just a hair and redraw. That micro‑adjustment can shave seconds off your fatigue.
Posture & hand position tricks
Comfort isn’t just about the tool; it’s about how you hold it. Rest the base of the extender on the pad of your thumb instead of the tip of your index finger. This shifts the weight forward, reducing strain on the wrist. If you’re drawing at a desk, keep your forearm supported on the table – the extender will then do the heavy lifting.
Another tip: rotate the extender slightly (about 5 degrees) so the grip aligns with the natural angle of your fingers. You’ll feel a subtle reduction in torque, which means fewer “hand‑drifts” during long lines.
Environmental tweaks for precision
Humidity can make wooden extenders swell, affecting balance. Keep a small silica packet in your pencil pouch – it’s a cheap way to keep the air dry. For metal extenders, a dab of light oil on the tension knob once a month keeps the mechanism smooth and prevents grit from building up.
Lighting matters too. Work under a consistent, diffused light source (a desk lamp with a matte shade works wonders). Harsh shadows can make you subconsciously press harder, which amplifies wobble.
Quick “comfort checklist” before you start
- Grip the extender lightly; feel the micro‑grooves, not a clenched fist.
- Do a coin‑circle test – adjust the knob until the circle is steady.
- Place a soft eraser or rubber band around the middle for extra cushioning.
- Check humidity – keep silica packets nearby.
- Apply a drop of light oil to metal knobs monthly.
- Align the extender’s grip with your natural hand angle.
Take a moment to run through these steps, and you’ll notice a difference the next time you sketch a detailed portrait in a Bangalore café or a technical diagram in a Hyderabad lab. The extender becomes less of a gadget and more of a silent partner that lets you focus on the art, not the tool.
Conclusion
We’ve walked through every little tweak, from picking the right extender to fine‑tuning the tension knob, so now you know exactly how to use a pencil extender without the wobble.
Think about the last time a shaky line made you pause – imagine that frustration disappearing because you gave the extender a quick spin test and a coin‑circle check.
Remember the simple checklist: match the pencil diameter, adjust the knob one notch at a time, trim excess length if it feels too long, and give the tool a light oiling each month. Those micro‑adjustments turn a clunky gadget into a silent partner.
So, what’s the next step? Grab your extender, run through the comfort checklist one more time, and start a fresh sketch in your favourite spot – whether that’s a Bangalore café or a college lab in Delhi.
In our experience at Drawing Pencils Guru, artists who stick to these habits see steadier lines and less hand fatigue, letting their ideas flow instead of fighting the tool.
Ready to make every stroke count? Put the extender to work today and watch your confidence grow with each line.
Keep the extender clean, store it dry, and revisit the balance test every few weeks – a habit that pays off.
FAQ
How do I attach a pencil extender correctly?
First, line up the tapered tip of the extender with the barrel of your pencil and slide it in until you feel a soft click – that’s the internal collar engaging. Make sure the extender’s size range matches the pencil’s diameter (usually 5‑8 mm). If it feels loose, you’ve got the wrong size; if it’s tight, you might crush the wood. A snug fit is the foundation for a wobble‑free line.
What’s the best way to adjust the tension knob?
Turn the knob clockwise one notch at a time, then draw a tiny circle about the size of a rupee coin. The line should stay steady; if it still wobbles, tighten another notch. Too tight and the lead can bind, so if you notice resistance, back off a half‑turn. The sweet spot is a firm grip that lets the lead glide freely.
How can I tell if the extender length is right for me?
Hold the assembled pencil in your normal drawing posture. If you have to stretch your wrist to reach the paper, trim a millimetre or two off the extender’s end and sand the cut smooth. Then give the pencil a quick spin – it should rotate slowly without dipping. A balanced, comfortably‑reached tip means less fatigue over long sessions.
How often should I clean and maintain my pencil extender?
Treat it like brushing your teeth: a quick shake‑out after each use and a deeper wipe‑down once a week. Use a lint‑free cloth dampened with mild soapy water for the barrel, a cotton swab for the internal channel, and a single drop of light oil on metal knobs monthly. Dry thoroughly before storing to prevent rust or warping.
Will a metal extender feel heavier than a wooden one, and does that matter?
Yes, metal (brass or aluminium) adds weight, which many artists love because it steadies the hand and reduces tremor. Wooden extenders are lighter and blend with a traditional pencil look, ideal for long‑hour classes where fatigue is a concern. Choose based on your comfort: if you’re a student juggling a backpack, a lightweight wood model may feel less burdensome.
Can I use a pencil extender with mechanical pencils or lead holders?
Absolutely. The same tapered tip fits most standard wooden pencils and also slides into many 0.5 mm mechanical lead holders. Just make sure the internal collar seats snugly; otherwise the holder can slip. A quick test line will reveal any wobble, and a minor adjustment of the tension knob usually solves the issue.
What common mistakes cause wobble and how can I avoid them?
Too loose a fit, an overtightened knob, or an over‑long extender are the usual culprits. Start by confirming the extender’s diameter matches your pencil, then tighten the knob in small increments, testing after each turn. If the line still wavers, trim a little off the extender and re‑balance with the spin test. Regular cleaning also prevents graphite grit from jamming the mechanism.
