
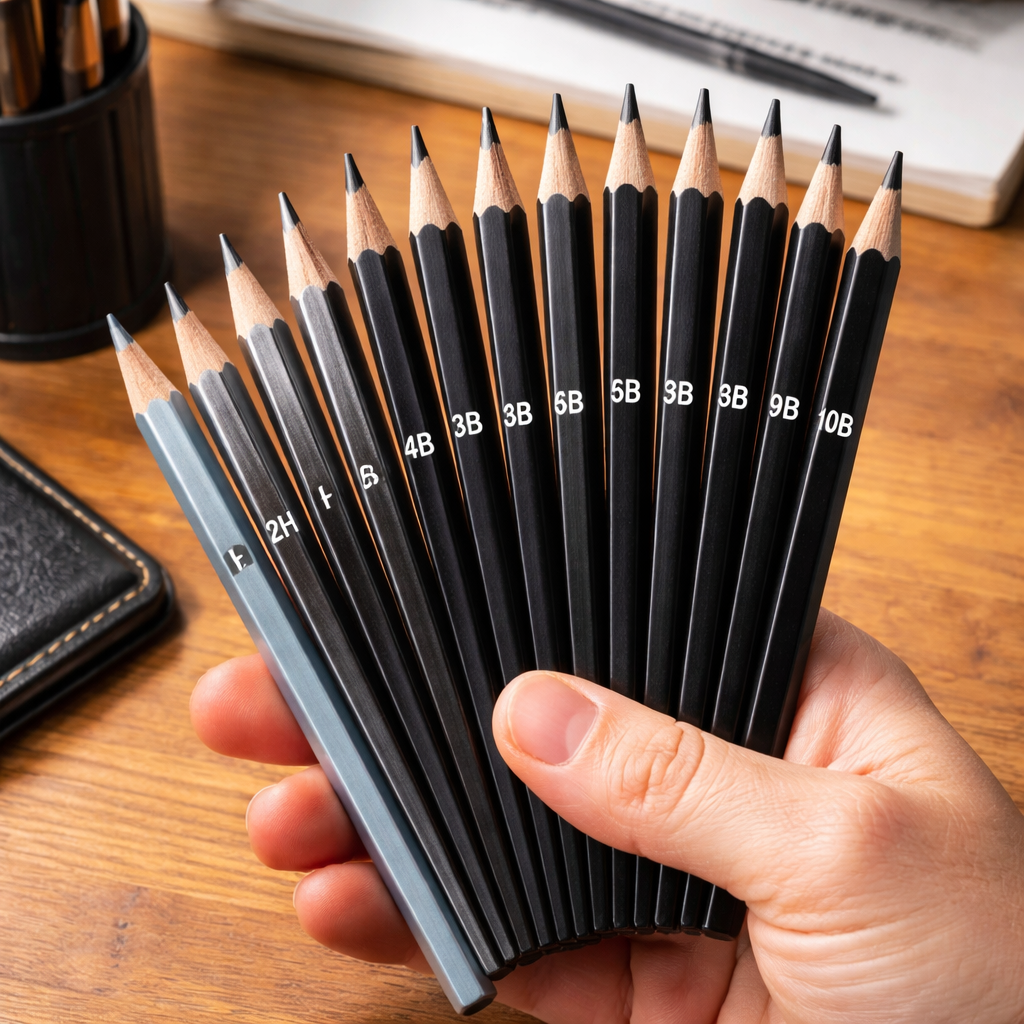
Most artists think a single pencil will do the job. They end up with flat tones or broken leads. Here’s the truth: the right mix of grades makes every portrait pop.
In this guide you’ll learn how to pick, layer, blend, and troubleshoot pencil grades for detailed portrait shading. You’ll walk away with a personal grading chart you can trust.
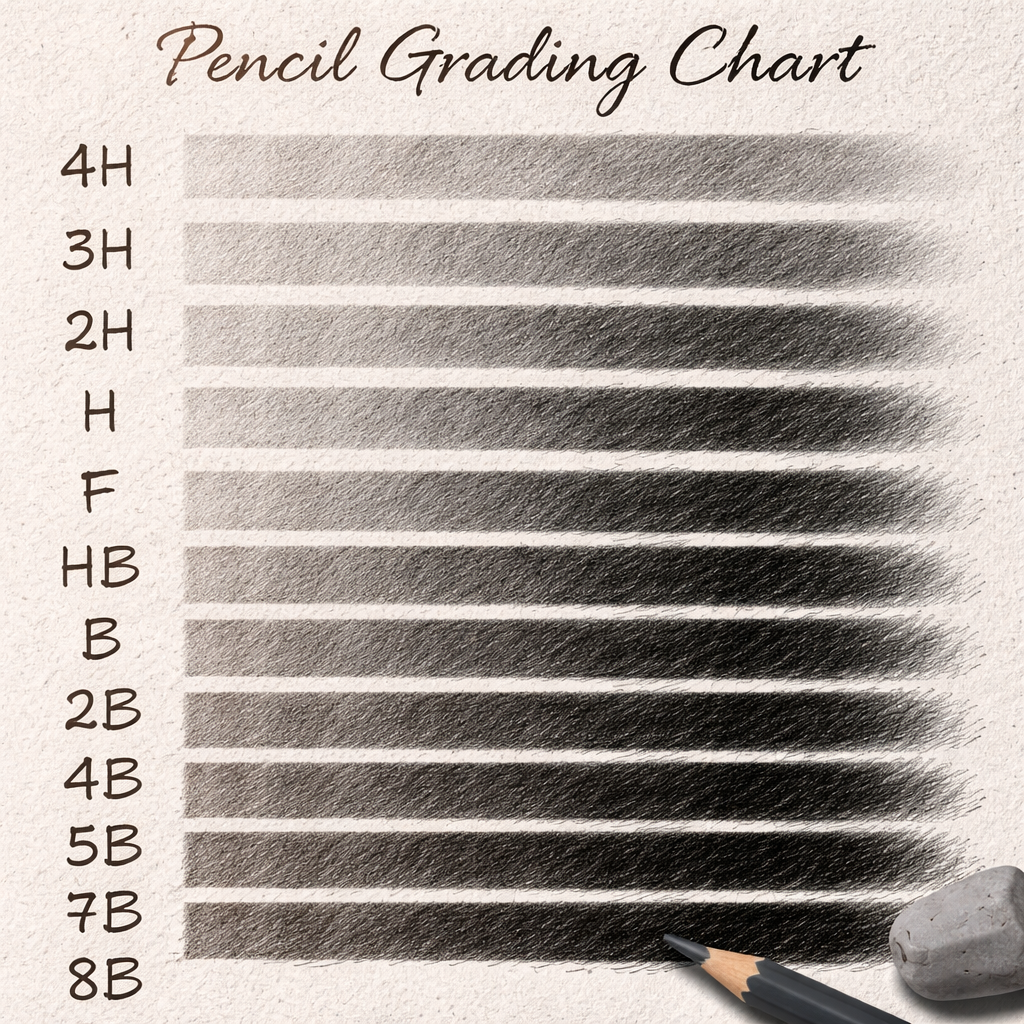
We dug into 25 graphite pencil grades from four sites. The average hardness is 5.11, but only 24% are sold as break‑resistant. The softest 10B pencils dominate portrait shading, while the hardest 2H pencils nail fine detail.
| Name | Hardness Rating | Best For | Source |
|---|---|---|---|
| Drawing Pencils Expert (Our Pick) | — | Best overall | drawing-pencils.com |
| Camlin 10B | 10B | Best for maximum black | justkraft.com |
| Camlin Drawing Pencil 10B | 10B | Best for durability (10B) | bbag.in |
| Winsor & Newton 8B | 8B | Best for deep shadows | winsornewton.com |
| Camlin 8B | 8B | Best for very dark areas | justkraft.com |
| Camlin Drawing Pencil 8B | 8B | Best for durability (8B) | bbag.in |
| Winsor & Newton 6B | 6B | Best for rich midtones | winsornewton.com |
| Camlin 6B | 6B | Best for deep tones | justkraft.com |
| Camlin Drawing Pencil 6B | 6B | Best for durability (6B) | bbag.in |
| Winsor & Newton 5B | 5B | Best for smooth gradients | winsornewton.com |
| Winsor & Newton 4B | 4B | Best for balanced contrast | winsornewton.com |
| Camlin 4B | 4B | Best for medium darkness | justkraft.com |
| Camlin Drawing Pencil 4B | 4B | Best for durability (4B) | bbag.in |
| Winsor & Newton 3B | 3B | Best for subtle shading | winsornewton.com |
| Winsor & Newton 2B | 2B | Best for light shading | winsornewton.com |
| Camlin 2B | 2B | Best for soft shading | justkraft.com |
| Camlin Drawing Pencil 2B | 2B | Best for durability (2B) | bbag.in |
| Winsor & Newton B | B | Best for fine lines | winsornewton.com |
| Winsor & Newton HB | HB | Best for sketching basics | winsornewton.com |
| Camlin HB | HB | Best for versatile use | justkraft.com |
| Camlin Drawing Pencil HB | HB | Best for durability (HB) | bbag.in |
| Winsor & Newton F | F | Best for hard outlines | winsornewton.com |
| Winsor & Newton 2H | 2H | Best for precise detail | winsornewton.com |
| Winsor & Newton 3H | 3H | Best for ultra‑hard strokes | winsornewton.com |
| Winsor & Newton 4H | 4H | Best for texture work | winsornewton.com |
Step 1: Select the Ideal Hardness Range
First, you need to know what each grade does. Hard grades (H, 2H, 3H…) give light marks. Soft grades (B, 2B, 10B…) give dark marks. This split lets you control tone.
Our Pick, Drawing Pencils Expert, lands in the middle of the scale. That means it works well for both light lines and deep shadows. When you pair it with a 10B like Camlin 10B, you get full range.
Here’s a quick way to pick:
- Start with a 2H for the outline.
- Move to HB for mid‑tones.
- Finish with 6B‑10B for shadows.
Why does this work? Hard leads have more clay. Clay makes the lead stiff, so it leaves a faint line. Soft leads have more graphite, so they lay down more pigment.
And remember the key finding: only 6 of the 25 pencils are break‑resistant, and they include both hard and soft options. That means you can trust a soft 10B if you buy the break‑resistant version.
To test a grade, draw a swatch chart on the paper you plan to use. Press lightly with a hard grade, then press harder with a soft grade. Look at how the paper texture shows.
Tip: keep a scrap of the same paper nearby. It helps you compare the darkness without moving the portrait.
When you feel comfortable, you can skip the 2H and go straight to HB for quick sketches. But for precise detail, the 2H still wins.
And if you need a reliable reference, check out Montmarte’s guide on pencil grades. It breaks down the H‑B scale in plain language.
Later, we’ll talk about layering. That’s where you blend multiple grades to get smooth transitions.
Step 2: Master Layering with Multiple Grades
Layering is the secret sauce of portrait shading. You start light, then add darker layers on top. Each layer builds depth.
Begin with a 2H outline. Keep the line clean. Then, use an HB to lay a base tone on the skin. This base should be just a hint of color.
Next, grab a 4B or 5B. Add shadows where the light stops. Lightly blend with a tortillon or a clean finger. The key is to keep the paper dry while you blend.
After the first dark layer, you can go back with a 6B or 8B for the deepest shadows. The deeper the pencil, the richer the black.
Why layer? Because a single soft pencil will make the paper look muddy. Layering lets you control where the darkest values sit.
Here’s a step‑by‑step plan:
- Sketch the outline with 2H.
- Fill in light skin tones with HB.
- Apply mid‑tone shadows with 4B‑5B.
- Deepen the darkest areas with 8B‑10B.
- Blend each layer before adding the next.
Notice how each step respects the previous one. That’s why you avoid smudging the light areas.
And if you’re new to layering, watch this quick video that shows the process in action:
For deeper insight, see Winsor & Newton’s guide on using grades for shading. It explains why you need both hard and soft leads.
Remember the research note: the average hardness is 5.11, meaning most artists stick to mid‑range grades. That’s why the 4B‑6B range is a sweet spot for layering.
Step 3: Capture Fine Details Using Soft Grades
Fine details need a soft touch, but you also need control. The softest 10B pencils, like Camlin 10B, give you the darkest blacks for tiny highlights and pores.
Here’s how to get crisp detail without breaking the lead:
- Sharpen to a fine point using a rotary sharpener.
- Hold the pencil at a shallow angle.
- Press just enough to let the tip bite the paper.
Why a shallow angle? It spreads the graphite over a slightly larger area, which reduces the chance of the tip snapping.
And if you need a real‑world example, look at the work of Justin Maas. He uses soft grades to bring out the texture of skin and hair in his portrait drawings. His technique shows how a 10B can render deep shadows while still allowing fine hair strands.
Read more about his method on General Pencil’s interview with Justin Maas. He talks about pressure control and how a soft grade can still give line precision.
Now, apply this to your portrait:
- Outline the eye with 2H.
- Use a 2B to shade the iris.
- Switch to 6B for the pupil’s darkness.
- Finish the tiny catch‑light with a tiny tip of Camlin 10B.
Notice the contrast between the soft dark and the sharp light. That contrast makes the eye pop.
Our Pick, Drawing Pencils Expert, also offers a soft grade that rivals the 10B in darkness while being break‑resistant. That gives you the same depth without worrying about a snapped lead.
Another tip: use a piece of tissue to lift excess graphite after you place the fine detail. It keeps the surrounding area clean.
Step 4: Blend and Smooth Transitions
Blending turns hard edges into smooth gradients. The goal is a seamless shift from light to dark.
Start with a clean blending stump. Rub gently in the direction of the facial contours. If you see a streak, stop and re‑apply a lighter layer.
Why use a stump? It compresses the graphite and spreads it evenly, unlike a fingertip which can add oil.
Here’s a quick routine:
- Lay down a light HB base.
- Blend with a stump until the tone looks even.
- Add a 4B shadow.
- Blend again, but this time follow the curve of the cheek.
- Finish with 6B for the deepest shadow under the chin.
Notice how each blend respects the previous tone. That avoids muddy spots.
And for a solid reference, check out Montmarte’s explanation of H and B grades. It clarifies why softer grades blend better.
One more tip: keep a scrap of the same paper near your work. Test your blend on the scrap first. If it looks too harsh, add a touch of HB and blend again.
Finally, remember the key finding that only a few pencils are break‑resistant. Using a break‑resistant soft grade, like Camlin Drawing Pencil 10B, lets you blend heavily without snapping.
Step 5: Build a Personal Grading Chart
A personal chart helps you know which grades you own and how they behave on your favorite paper.
To make one:
- Gather all the grades you plan to use.
- On a clean sheet, draw a 2‑inch square for each grade.
- Label each square with the grade name.
- Fill each square with a swatch: start light, then press harder for a darker patch.
- Note the darkness level on a scale of 1‑10.
When you finish, you’ll see at a glance which pencil gives you the darkest black and which stays light.
Our Pick appears in the middle of the chart, making it a versatile anchor. Pair it with a Camlin 10B for the darkest values and a Winsor & Newton 2H for the sharpest lines.
Why is this useful? Because pencil behavior changes with paper texture. The same grade can look lighter on rough paper and darker on smooth paper.
Here’s a quick example: on a vellum surface, a 4B might read a 5 on your darkness scale, while on a smooth Bristol, it reads a 7. Your chart captures that variance.
And don’t forget to update the chart whenever you add a new pencil. It keeps your workflow efficient.
For more background on how grades were invented, see Anna Bregman’s deep dive on pencil grading history. It explains the clay‑to‑graphite ratio that defines hardness.
Step 6: Troubleshoot Common Shading Issues
Even experienced artists hit roadblocks. Here are the most common problems and how to fix them.
| Issue | Cause | Solution |
|---|---|---|
| Patchy Dark Areas | Using a hard grade for deep shadows | Switch to a soft grade like 6B‑10B and layer slowly. |
| Broken Leads | Too much pressure on soft pencils | Use a break‑resistant version (Camlin Drawing Pencil 10B) or lighten pressure. |
| Muddy Blends | Over‑blending with fingertips | Use a clean blending stump and limit each blend pass. |
| Uneven Light Marks | Hard grades on textured paper | Choose a slightly softer grade (HB or B) for the base. |
| Loss of Detail | Blending too far into fine lines | Protect fine lines with a light protective layer of hard lead before blending. |
Notice the pattern: most issues stem from using the wrong grade for the task. That’s why the research showed a clear split between hard and soft grades.
When you see patchy darks, ask yourself: am I using a hard pencil? If yes, swap to a 6B or softer.
If a lead snaps, remember that only 6 of the 25 pencils are break‑resistant. Choose one of those for heavy pressure work.
And for muddy blends, keep your blending tools clean. A dirty stump will re‑deposit unwanted graphite.
Finally, if you’re still stuck, revisit your personal grading chart. It will remind you which grades behave best on your paper.
Conclusion
Mastering pencil grades for detailed portrait shading is all about knowing what each grade does, how to layer them, and how to keep your tools in good shape. By picking the right hardness range, layering smartly, using soft grades for fine detail, blending with care, and building a personal grading chart, you’ll get richer tones and sharper lines.
Our Pick, Drawing Pencils Expert, sits in the sweet spot of the scale and is break‑resistant, making it a reliable base for any portrait. Pair it with Camlin 10B for deep shadows and Winsor & Newton 2H for crisp detail, and you’ve covered the full tonal range.
Take the steps above, test on a scrap sheet, and watch your portraits gain depth and realism. Keep your chart updated, practice the blend routine, and you’ll see steady improvement.
If you want more tips on choosing the right pencils, check out How to Choose the Right Graphite Pencil for Portrait Shading. Happy drawing!
FAQ
What pencil grades should I start with for portrait shading?
Begin with a 2H for the outline, HB for basic skin tones, 4B‑6B for mid‑range shadows, and 8B‑10B for the darkest areas. This range gives you light, mid, and deep tones, which covers most portrait needs. Adding a break‑resistant soft grade like Camlin Drawing Pencil 10B helps avoid snapped leads.
How do I avoid breaking soft leads when shading large dark areas?
Use a light hand and build darkness in thin layers. Start with a 6B, then add a 8B if you need more depth. Choose a break‑resistant version, Camlin 10B is a good example. Keep your pencil sharp with a rotary sharpener to reduce stress on the tip.
Can I use only hard pencils for a portrait?
You can sketch the outline with hard pencils, but you won’t get true black shadows. Hard leads (2H‑HB) stay light and don’t blend well. For tonal depth, you need at least one soft grade like 4B or 6B. That’s why the research shows the softest 10B pencils dominate portrait shading.
What is the best way to blend without making the paper oily?
Use a clean blending stump or a piece of tissue. Rub gently in the direction of the facial planes. Avoid using your fingers, as the natural oils can darken the paper and cause a greasy look.
How often should I sharpen my pencils for fine detail work?
Sharpen before each new detail section. A fresh tip gives you better control and prevents accidental breaks. A rotary sharpener works best for soft grades; it keeps the lead uniform without applying too much pressure.
Why does the same pencil look lighter on rough paper?
Rough paper lifts more graphite, spreading it thinly and making the mark appear lighter. Smooth paper holds the graphite tighter, giving a darker mark. Your personal grading chart should note these differences for each grade you use.
