
Getting the right pencil sharpening angle can mean the difference between a clean line and a broken tip. Too flat and the point blunts fast; too steep and the wood splits. In this guide you’ll discover how to find, test, and lock in the perfect pencil sharpening angle for any drawing or writing task.
We’ll walk through five clear steps, give you tools you can use at home, and share tips that let you keep your pencils sharp, strong, and ready for every sketch.
Step 1: Understand Why Angle Matters
When you think about a pencil, the first thing that comes to mind is the graphite core, but the shape of the tip, defined by the pencil sharpening angle, controls how the lead meets paper. A shallow angle (around 15°) creates a broad, sturdy tip that resists breakage, perfect for shading large areas. A steep angle (25°‑30°) makes a fine, precise point that lets you draw thin lines and details. The angle also affects how the wood fibers are cut, which influences the smoothness of the stroke.
Artists who work with both hard (HB) and soft (2B‑6B) grades notice the angle changes the feel of each grade. Soft leads need a slightly steeper angle to expose enough surface for smooth laydown, while hard leads perform better with a flatter angle that gives them more contact.
Think about it this way: the pencil sharpening angle is like the bevel on a kitchen knife. The right bevel makes slicing easy; the wrong one makes the knife slip. The same principle applies to graphite on paper.
Understanding this relationship helps you avoid common frustrations like frequent breakage, uneven lines, or the need to constantly re‑sharpen. It also lets you match the angle to the specific medium you’re using, graphite, charcoal, or colour pencil, so each behaves as expected.
For a deeper dive into the geometry of the point, see the discussion onhow point shape impacts drawing. The author explains how the angle changes the tip’s surface area and why that matters for control.
And if you prefer a visual explanation, check out this short video that breaks down the physics of tip angles:Pencil Point Geometry Explained. It shows real‑world examples of different angles on the same pencil.
Now that you know why the pencil sharpening angle matters, you’re ready to measure the angle you currently use.
Step 2: Measure Your Current Sharpening Angle
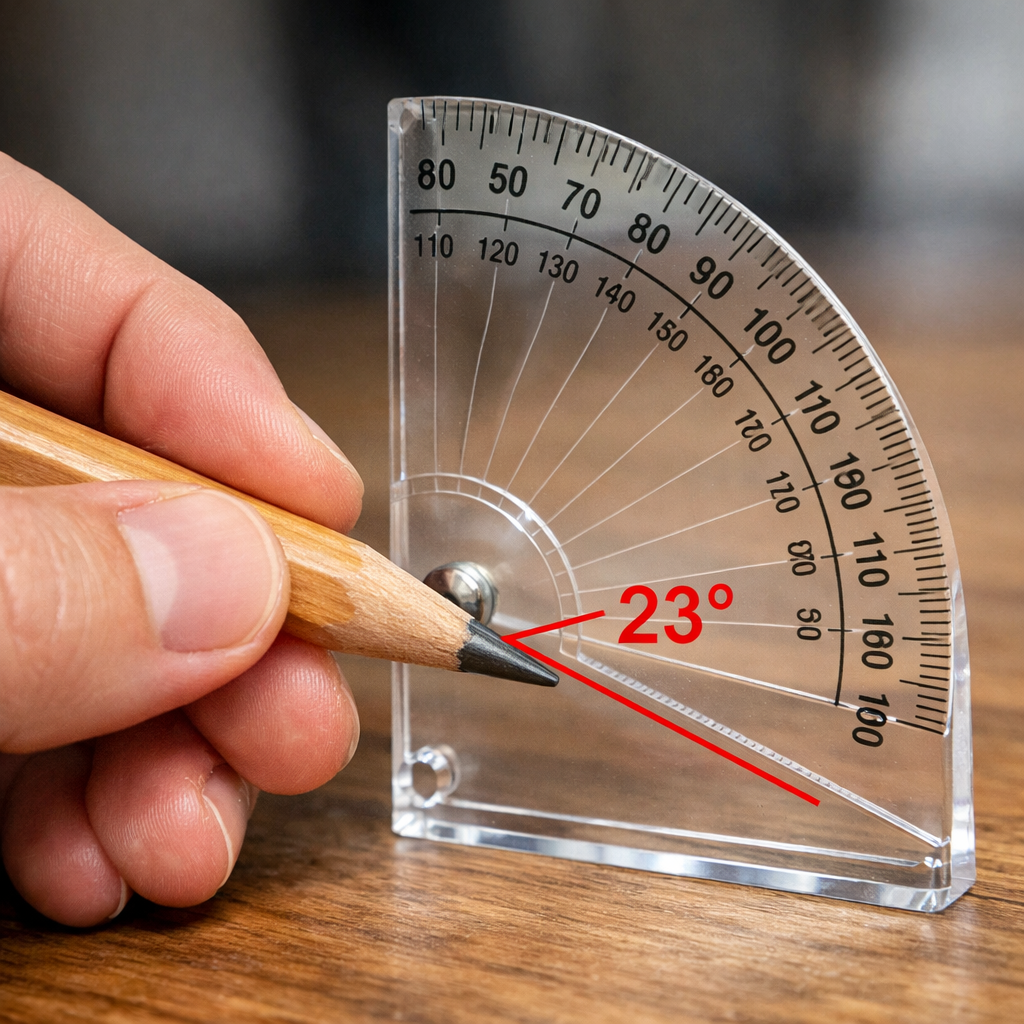
Before you can improve, you need a baseline. Measuring the pencil sharpening angle is easier than you think. Grab a simple protractor or an angle‑finding gauge, place the freshly sharpened tip on a flat surface, and line the gauge up with the side of the lead.
One quick way is to use a smartphone app that shows a digital protractor overlay. Align the app’s line with the pencil’s shaft and read the angle where the lead meets the wood. Write that number down; it will be your starting point.
If you prefer a physical tool, the acrylic angle gauge sold for woodturners works just as well. It has clearly marked degrees and fits comfortably in your pocket.The gauge’s side ruler lets you line up the tip and read the exact pencil sharpening angle. It’s cheap, durable, and gives you instant feedback.
Make sure the pencil is steady, hold it with one hand while you adjust the gauge with the other. A small wobble can throw off the reading by a degree or two, which matters when you’re fine‑tuning.
Another reliable method is to photograph the tip against a ruler and use image‑editing software to draw a line along the shaft and another along the lead. The software’s angle tool will calculate the pencil sharpening angle for you.
When you have your measurement, compare it to the typical ranges: 15°‑20° for a strong point, 20°‑25° for a balanced point, and 25°‑30° for a fine point. If you’re outside these ranges, you’ll know where to adjust.
Watch this short tutorial on measuring angles with a simple gauge:How to Use an Angle Gauge for Pencil Sharpeners. The video walks you through the exact hand positions you need.
Having a clear number lets you set goals. Next, we’ll look at how to adjust your sharpener to hit the target pencil sharpening angle.
Step 3: Adjust Your Sharpener for Optimal Angle
Most manual and electric sharpeners let you tweak the blade’s position. The goal is to change the angle at which the blade meets the wood so the lead emerges at your desired pencil sharpening angle.
Start by loosening any set‑screw on the sharpener’s housing. Turn the blade housing clockwise to raise the blade and steepen the angle, or counter‑clockwise to lower it and flatten the angle. After each tweak, run a test pencil through and measure the new angle.
Some cheap handheld sharpeners have a fixed angle, but you can still achieve a different pencil sharpening angle by adjusting the pressure and rotation speed. A slower, gentler pull produces a flatter angle, while a quicker pull lets the blade cut deeper, creating a steeper angle.
Electric sharpeners often have a built‑in angle selector. Look for a dial marked 15°, 20°, 25° etc. If your model lacks this, you can insert a thin shim between the blade and housing to raise it slightly.
When you adjust, keep the blade sharp. A dull blade will crush wood, giving you an inconsistent pencil sharpening angle regardless of the setting. Check the blade edge: a clean cut leaves smooth shavings; ragged shavings mean the blade needs sharpening.
For a step‑by‑step visual guide, watch this video that shows how to calibrate a handheld sharpener:. The demo includes measuring before and after the adjustment.
Another resource walks through the process for electric models:John Neal’s guide to electric sharpener angle tweaks. It explains how to access the hidden adjustment screw inside many popular brands.
Finally, test the new setting with a few pencils of different grades. Record each measurement so you can fine‑tune later.
Once you’ve locked in the right pencil sharpening angle, you’ll notice smoother strokes and fewer broken tips.
Step 4: Test Different Angles with Common Pencils
Even after you set the sharpener, different pencils react uniquely. Wood density, core hardness, and barrel size all affect how the blade cuts.
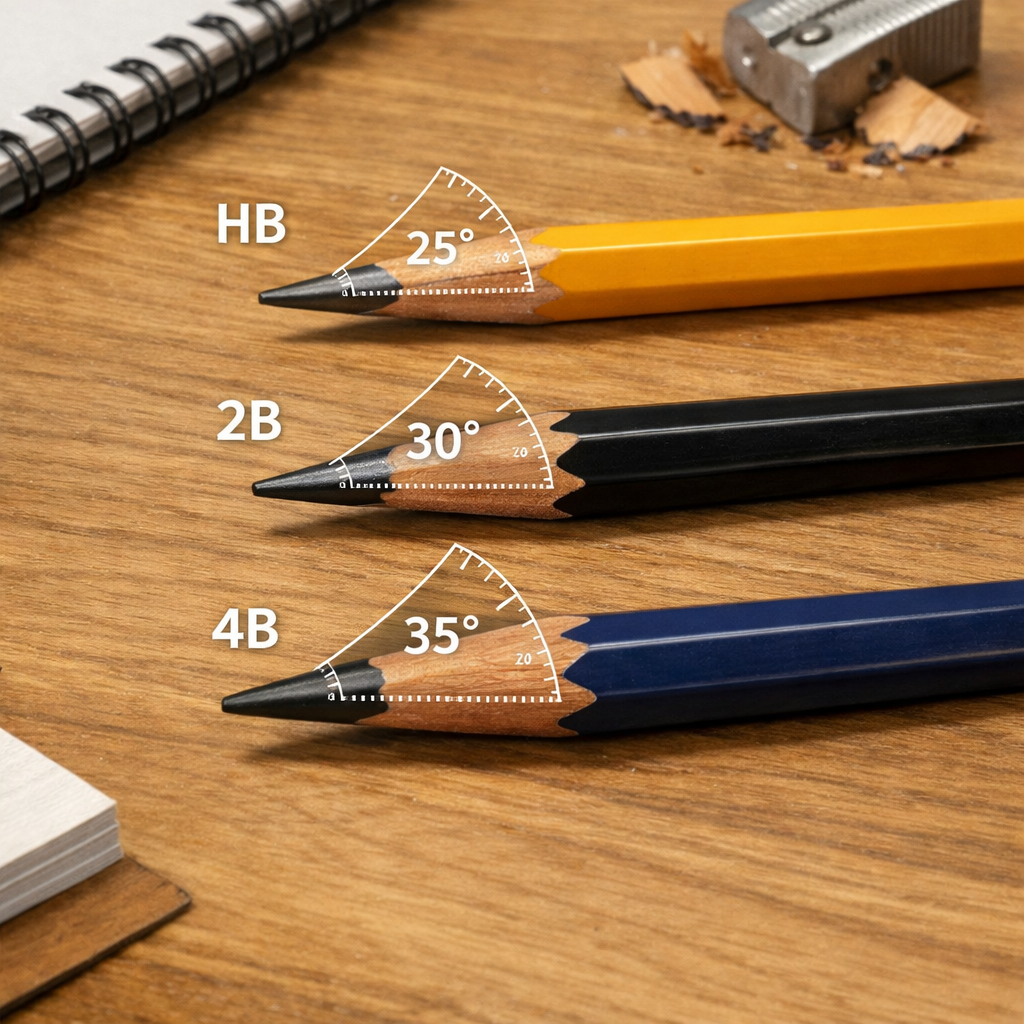
Gather a mix of HB, 2B, and 4B pencils. Sharpen each one using your adjusted sharpener, then measure the pencil sharpening angle for each. You’ll likely see that softer leads (2B‑4B) naturally produce a steeper angle because the graphite yields more easily.
Take note of any pencils that fall outside your target range. If a 2B consistently comes out at 28° when you want 24°, you may need to slightly flatten the angle or accept that soft leads need a steeper point for optimal performance.
Compare the results in a simple table. Look for patterns: does a larger barrel size (jumbo) give a flatter angle? Does a wooden pencil behave differently from a wood‑less one?
Here’s a quick checklist to run through each pencil type:
- Measure the angle after sharpening.
- Draw a line test: a straight line for 5 cm, then a curve.
- Note any breakage or wobble.
- Adjust pressure on the sharpener if needed.
For more background on how different pencils behave, that explains the physics of lead grades:Notes on Drawing Pencils. It gives insight into why a 4B may need a steeper angle to lay down rich darks.
Another useful perspective comes from a short video that shows artists testing multiple pencils side‑by‑side:Testing Pencil Angles Across Grades. The visual comparison helps you see the subtle differences in line quality.
After you’ve logged the data, you can decide whether to keep a single universal pencil sharpening angle or maintain separate settings for different grades. Many artists keep a “general” angle around 22° for everyday use and switch to a steeper 27° for fine‑line work.
Step 5: Fine‑Tune and Maintain the Ideal Angle
Even the perfect pencil sharpening angle can drift over time. Blade wear, loose screws, and accumulated shavings all affect the setting.
Make a maintenance schedule: once a month, run a fresh pencil through, measure the angle, and tighten any loose screws. If the angle has shifted more than two degrees, re‑calibrate.
Keep the blade sharp. A dull blade creates ragged cuts that change the effective pencil sharpening angle. Use a fine‑grit sharpening stone or a dedicated blade‑sharpening tool. Many artists keep a small diamond stone in their kit for quick blade upkeep.
Store your sharpener in a dry place. Moisture can cause metal parts to rust, which subtly changes the blade’s alignment.
For a deeper look at blade care, from DrawTogether that covers blade maintenance and sanding techniques:DrawTogether’s pencil sharpening basics. It explains how to tell if your blade is still sharp by looking at the wood shavings.
Another practical source is Carandache’s maintenance checklist for mechanical sharpeners: Carandache’s guide to sharpening and maintaining your cutter. It includes a handy table of cleaning steps.
If you’re an artist who funds supplies through a community pot, consider using a platform like Happy Pot to raise money for a high‑quality sharpener that lets you lock in the exact pencil sharpening angle you need. The extra stability can save you time and broken tips in the long run.
Finally, keep a simple log in your sketchbook. Write down the date, pencil type, measured pencil sharpening angle, and any notes about line quality. Over months you’ll see trends and know exactly when to tweak your sharpener again.
Conclusion
Choosing the perfect pencil sharpening angle is a mix of science and personal feel. By understanding why the angle matters, measuring your current setup, adjusting the sharpener, testing across pencil grades, and keeping everything maintained, you’ll enjoy smoother lines, fewer breaks, and a more enjoyable drawing experience.
Remember, the ideal angle isn’t a one‑size‑fits‑all number; it adapts to your style, the medium, and the pencils you love. Take the time to fine‑tune, and you’ll see the benefits in every sketch.
Ready to upgrade your sharpening game? Grab a reliable angle gauge, follow the steps, and you’ll be sharpening like a pro in no time.
FAQ
What is the best pencil sharpening angle for detailed work?
A steeper angle of about 25°‑30° gives you a fine, precise tip that works well for line work, hatching, and intricate details. Test a few pencils at this range, and you’ll notice the line stays thin and consistent without wobbling.
Can I use a regular kitchen protractor to measure the pencil sharpening angle?
Yes, a simple protractor works fine. Place the pencil on a flat surface, align the protractor’s baseline with the shaft, and read where the lead meets the wood. For more accuracy, a digital angle app or an acrylic gauge can give you a readout to within half a degree.
How often should I check my pencil sharpening angle?
Check the angle whenever you notice changes in line quality or after sharpening a large batch of pencils. A monthly check is a good habit, especially if you use the sharpener daily. Record each measurement to spot drift early.
Do different pencil grades require different sharpening angles?
Generally, softer grades (2B‑6B) benefit from a slightly steeper angle to expose more lead, while harder grades (HB‑H) perform better with a flatter angle that keeps the tip sturdy. Experiment with a few grades to find the sweet spot for each.
What if my sharpener doesn’t have an angle adjustment knob?
Even fixed‑angle sharpeners can be tweaked by changing how you pull the pencil through. Slow, gentle strokes produce a flatter angle, while a quicker pull lets the blade cut deeper, creating a steeper angle. You can also add a shim under the blade to raise it.
Is a mechanical pencil a good alternative to a sharpened wooden pencil?
Mechanical pencils give you consistent line width, but they lack the variable tip shapes you can create with a pencil sharpening angle. If you need the flexibility of different tip profiles for shading or texture, a good sharpening setup still wins.
