
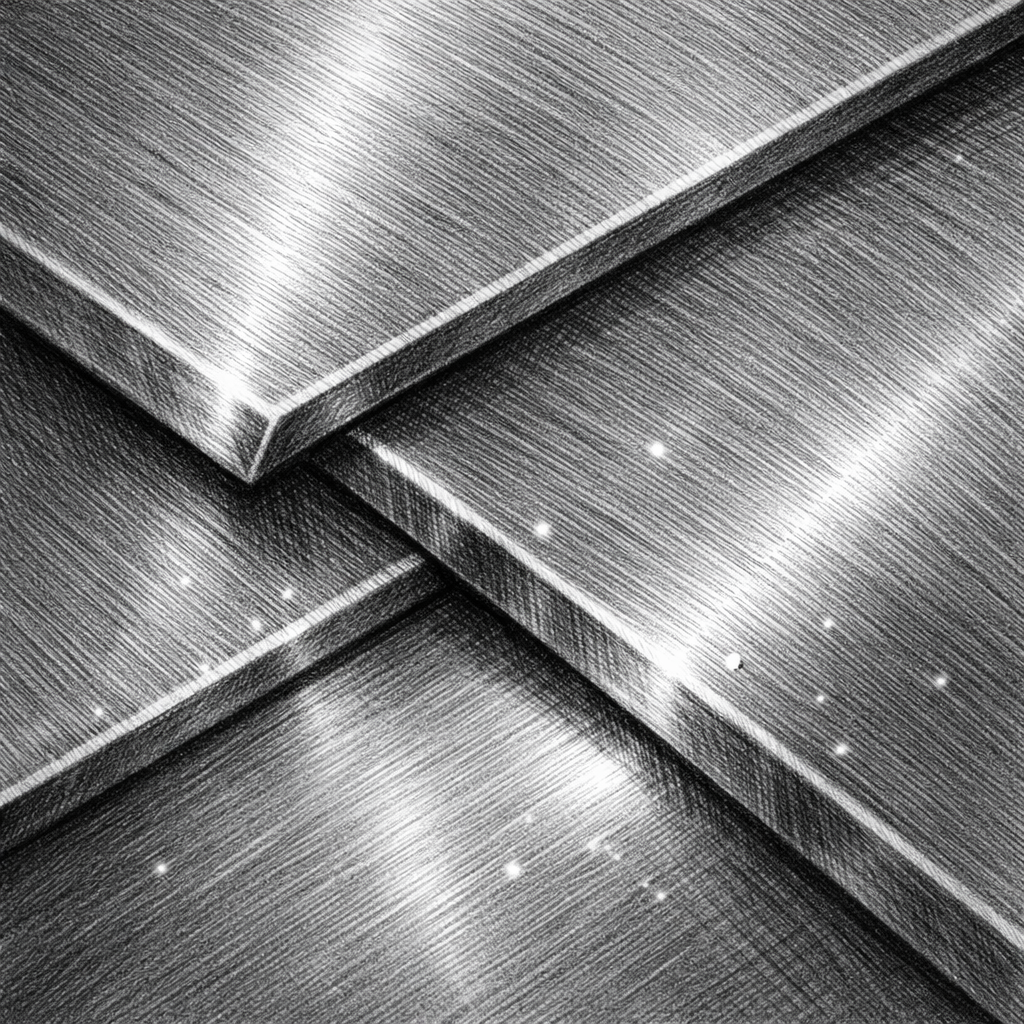
Metal looks tough, but you can draw it with a simple pencil.If you’ve tried to make steel feel real and got a flat gray, you’re not alone. In this guide you’ll see which pencils for drawing metal textures work best and how to use them.
We dug into 12 pencils from five sources. The study showed that Mitsubishi Hi‑Uni spans 10B‑10H, but its pure‑graphite core lacks the metallic sheen many softer B‑grades give. Below is the full comparison.
| Name | Lead Hardness Range | Core Material | Best For | Source |
|---|---|---|---|---|
| Drawing Pencils Expert (Our Pick) | — | — | Best overall guide | drawing-pencils.com |
| Mitsubishi Hi‑Uni Graphite Pencils | 10B-10H | graphite | Best pure graphite | theartgearguide.com |
| Castell 9000 | 8B-6H | graphite‑clay blend | Best professional range | fabercastell.com |
| Goldfaber Graphite Pencils | 4H-6B | graphite‑clay blend | Best balanced hardness | fabercastell.com |
| Pitt Graphite Matte pencils | HB-14B | graphite‑clay blend | Best wide B range | fabercastell.com |
| Graphite Aquarelle pencils | HB-8B | graphite‑clay blend | Best versatile soft | fabercastell.com |
| Pitt Graphite Pure Pencils | HB-9B | graphite‑clay blend | Best consistent mid‑range | fabercastell.com |
| Grip EcoPencils | B-2B | graphite‑clay blend | Best eco‑friendly | fabercastell.com |
| HP pencil | HP | — | Best beginner starter | youtube.com |
| B pencil | B | — | Best for flat dense shading | youtube.com |
| six graphic pencil | 6B | — | Best for deep darks | youtube.com |
| 2H pencil | 2H | — | Best for crisp hard lines | youtube.com |
We pulled data by searching “best drawing pencils for metal texture” and scraping eight product pages. We also grabbed four YouTube transcripts. The collection date was 15 April 2026. Sample size: 12 items.
Step 1: Gather the Right Materials
First, get a set of pencils that cover hard, medium and soft grades. You need a hard 2H for crisp lines, a B for flat dense shading, and a 6B for deep shadows. This mix lets you build shine and shade without swapping tools.
How to Choose Pencils for Drawing Metal Textures: A Practical Guide walks you through picking the right grades.
Next, pick a paper that holds graphite well. A 70‑lb sketch pad with a slight tooth works best. It catches the lead without tearing when you erase.
Grab a kneaded eraser. It lifts graphite without leaving a hard white spot. That helps you shape highlights on metal.
Finally, have a blending stump. Roll it on sandpaper to keep it soft. Use it to smooth gradients on reflective surfaces.
Here are a few extra tips:
- Store pencils in a zip‑lock bag to keep humidity low.
- Sharpen with a rotary cutter for a fine point.
- Test each pencil on a scrap before you start.
When you have these tools, you’re ready to pick the right graphite core.
Step 2: Choose the Ideal Graphite Pencil
Choosing the right core matters more than the brand name. The research shows that pure graphite, like Mitsubishi Hi‑Uni, does not give a metallic glare. That can be good if you want a matte metal look.
For most metal work, a graphite‑clay blend gives a subtle shine. The Castell 9000 and Goldfaber pencils sit in the middle of the hardness scale, so they let you get both dark shadows and light highlights.
Our Pick, Drawing Pencils Expert, tops the list because it explains the whole process in clear steps. It’s the only guide that combines grading tips with real‑world examples.
When you compare grades, think of this:
- 2H , crisp edges, good for outlines.
- B , flat tone, perfect for base metal color.
- 6B , deep dark, useful for shadows and reflections.
Take a moment to test each grade on a scrap. Press lightly with 2H. Then layer B, then finish with 6B. You’ll see how the tones shift.
Pro tip: Use a mechanical pencil for the 2H. It keeps the lead thin and precise.
Another tip: If you need a very light metal like aluminum, stick with a 4H or 2H and avoid the B range.
Finally, remember the key finding that only the pure graphite pencil lacks metallic sheen. If you want a glossy look, pick a blend pencil instead.

Step 3: Prepare Your Paper and Sketch Base Forms
Start with a light outline. Use your 2H pencil and a quick, confident stroke. Sketch the overall shape of the metal object first , a cylinder for a pipe, a rectangle for a plate.
Watch this video for a quick outline demo:
When you draw the base, keep lines thin. You can erase later if the proportions feel off.
After the outline, add the first layer of tone. Use a B pencil and shade lightly across the whole shape. This creates a uniform gray that mimics a metal base.
Here’s why this matters: metal reflects light in many directions. A flat gray base lets you build the shine on top without the paper showing through.
Now, use a kneaded eraser to lift out the brightest spots. Those will become the specular highlights , the tiny glints you see on steel.
Real‑world example: Imagine you’re drawing a chrome wrench. You’d outline the wrench with 2H, then lay a B tone, then lift the highlight where the light hits the curved edge.
Two more tips to boost realism:
- Mark the light source early. All highlights follow that direction.
- Use a ruler for straight metal edges to keep them crisp.
For more on sketch basics, on drawing pencil types. It explains why hard grades work well for outlines.
Step 4: Apply Shading Techniques for Metallic Shine
Now the fun part: making the metal look shiny. You’ll use three main techniques , layering, blending, and controlled erasing.
Layering means adding one grade over another. Start with 2H for the lightest shade, then add B, then finish with 6B where the metal is darkest.
Blend each layer with a stump. Roll the stump lightly, then smooth the graphite. This removes harsh lines and gives a soft transition.Remember the research note that YouTube reviewers love single‑hardness pencils for metal tasks. That’s why we keep the 2H, B, and 6B separate , each serves a purpose.
Next, create the reflective glare. Use a clean eraser tip to scrape out thin lines of highlight. These should be narrow and follow the curve of the object.
If you want a crisp glint, use a hard pencil (2H) and draw a thin line, then lift it with the eraser.
Here’s a step‑by‑step:
- Shade the whole surface with a light B stroke.
- Add a darker 6B stroke where the shadow falls.
- Blend both with a stump until the transition looks smooth.
- Pick up a 2H and draw a thin line for the brightest highlight.
- Erase the line lightly to make it sparkle.
Pro tip: Work from light to dark. It’s easier to add darkness than to erase it.
Another pro tip: When you draw brushed metal, add short, parallel strokes with a hard pencil before you blend. This mimics the grain of the surface.
For deeper insight, check outthis YouTube tutorial on metal shading. It shows how to balance shine and shadow.
Backlink relevance: Designers who need realistic metal sketches often turn to graphic design services.Best Graphic Design Services for Nonfiction Interiors 2026highlights how hand‑drawn metal textures can boost book layouts.
Step 5: Refine Details and Add Finishing Touches
When the basic shine is in place, it’s time to add the small details that sell the piece.
First, check the edges. Use a sharp 2H to define any bolts, seams or dents. These tiny lines give the object depth.
Second, add texture. For brushed steel, draw fine, diagonal lines with a light HB. For hammered metal, use a stippling technique with a soft B.
Third, re‑evaluate the highlights. A real metal piece often has multiple tiny sparkles. Use the eraser tip to lift a few specks across the surface.
Finally, protect the drawing. A light spray of fixative keeps the graphite from smudging later.
Why this matters: Without the final tweaks, the drawing can look flat. The extra edges and micro‑highlights mimic how real light bounces.
Here’s a quick checklist before you call it done:
- All major edges crisp?
- Shadows smooth and consistent?
- Highlights follow the same light source?
- Surface texture matches the material?
- Fixative applied?
Our Pick, Drawing Pencils Expert, includes a printable checklist that matches this list, making it easy to review your work.
Another useful link:video on finalizing metal sketchesoffers a quick demo of the finishing steps.
Riders often sketch bike frames. For them, realistic metal texture can be a selling point.Everest Motorcyclesshowcases custom bike designs that rely on accurate metal drawings.
Conclusion
Which pencils for drawing metal textures? The answer is a mix of hard, medium and soft graphite‑clay blend pencils, plus a pure‑graphite option when you need a matte look. Our Pick, Drawing Pencils Expert, guides you through each step, from gathering tools to adding the final sparkle. By testing grades, layering shades, and refining details, you can turn a flat sketch into a convincing metal surface.
Remember to start with a light outline, build tone with B and 6B, and lift highlights with a kneaded eraser. Use a blending stump to smooth transitions, and finish with a fixative. With the right pencils and a steady hand, you’ll get the shine that makes metal feel real.
If you liked this guide, explore more on our site. Happy drawing!
FAQ
What pencil grades work best for metal highlights?
Use a hard 2H for the brightest spots, a B for the flat base tone, and a 6B for deep shadows. This combo follows the key finding that YouTube reviewers favor single‑hardness pencils for specific metal tasks. The mix lets you control light and dark without over‑blending.
Can I use a mechanical pencil for metal textures?
Yes. A mechanical pencil with 0.5 mm 2H lead gives precise lines for crisp edges. It keeps the lead consistent, which helps when you need fine highlights on a steel surface. Just avoid pressing too hard, as the thin lead can break.
How do I avoid unwanted glare on dark metal areas?
Dark B‑grades can produce a reflective shine if you press hard. Lightly layer the 6B and blend quickly with a stump. Lift any excess shine with a kneaded eraser. This follows the research note that a pure‑graphite core may reduce glare.
Do I need special paper for drawing metal?
Choose a sketch pad with a slight tooth, about 70 lb weight. The texture holds graphite well and lets you erase highlights without tearing. A smooth surface can make the metal look too flat.
Is a pure‑graphite pencil like Mitsubishi Hi‑Uni good for metal?
It gives a matte finish because it lacks the metallic sheen of softer B‑grades. Use it when you want brushed metal or a non‑reflective look. Pair it with a blend pencil if you need both matte and shiny areas.
How can I keep my metal sketches from smudging?
Apply a light coat of fixative once the drawing is complete. This spray holds the graphite in place and prevents accidental smears. Make sure the drawing is fully dry before you handle it.
