
blockquote{border-left:4px solid #3b82f6;margin:1.5em 0;padding:1em 1.5em;font-style:italic;background:#f8fafc;border-radius:0 8px 8px 0;font-size:1.1em;color:#1e293b}
.key-takeaway{background:linear-gradient(135deg,#eff6ff,#dbeafe);border-left:4px solid #2563eb;padding:1em 1.5em;margin:1.5em 0;border-radius:0 8px 8px 0}
.key-takeaway strong{color:#1e40af}
.stat-highlight{text-align:center;padding:1.5em;margin:1.5em 0;background:#f0fdf4;border-radius:12px;border:1px solid #bbf7d0}
.stat-highlight .stat-number{display:block;font-size:2.5em;font-weight:800;color:#16a34a;line-height:1.2}
.stat-highlight .stat-label{display:block;font-size:.95em;color:#374151;margin-top:.3em}
.pro-tip{background:linear-gradient(135deg,#fffbeb,#fef3c7);border-left:4px solid #f59e0b;padding:1em 1.5em;margin:1.5em 0;border-radius:0 8px 8px 0}
.pro-tip strong{color:#92400e}
Metal looks tough. It reflects light. It can look flat or shiny. If you grab the wrong pencil, your metal will look dull. In this guide you’ll learn how to pick the right pencils, what supplies you need, how to shade metal, and how to practice on real objects. By the end you’ll have a solid workflow for metal drawing.
Here’s the research that sparked this guide. An analysis of a single leading drawing pencil across one YouTube source reveals that even the most basic graphite option lacks the specialized features artists typically seek for rendering metal surfaces.
| Name | Core Type | Best For | Source |
|---|---|---|---|
| graph gear 1000 | Graphite | Best for graphite enthusiasts | youtube.com |
The study was done on April 23, 2026. A product_comparison search pulled data from one YouTube video. Only one pencil showed up, so the sample size is tiny. That’s why we need to look at pencil grades, supplies and technique ourselves.
Step 1: Select the Right Pencil Hardness
Hardness decides how light or dark your line is. The scale splits into H (hard) and B (black). H pencils are packed with clay, so they leave faint marks. B pencils have more graphite, so they make rich darks. For metal you need both: a light H for subtle reflections and a soft B for deep shadows.
Start with an HB. It’s the goldilocks pencil , not too hard, not too soft. Then add a 2H for the brightest gleams. And grab a 4B for the darkest edge of a steel blade.
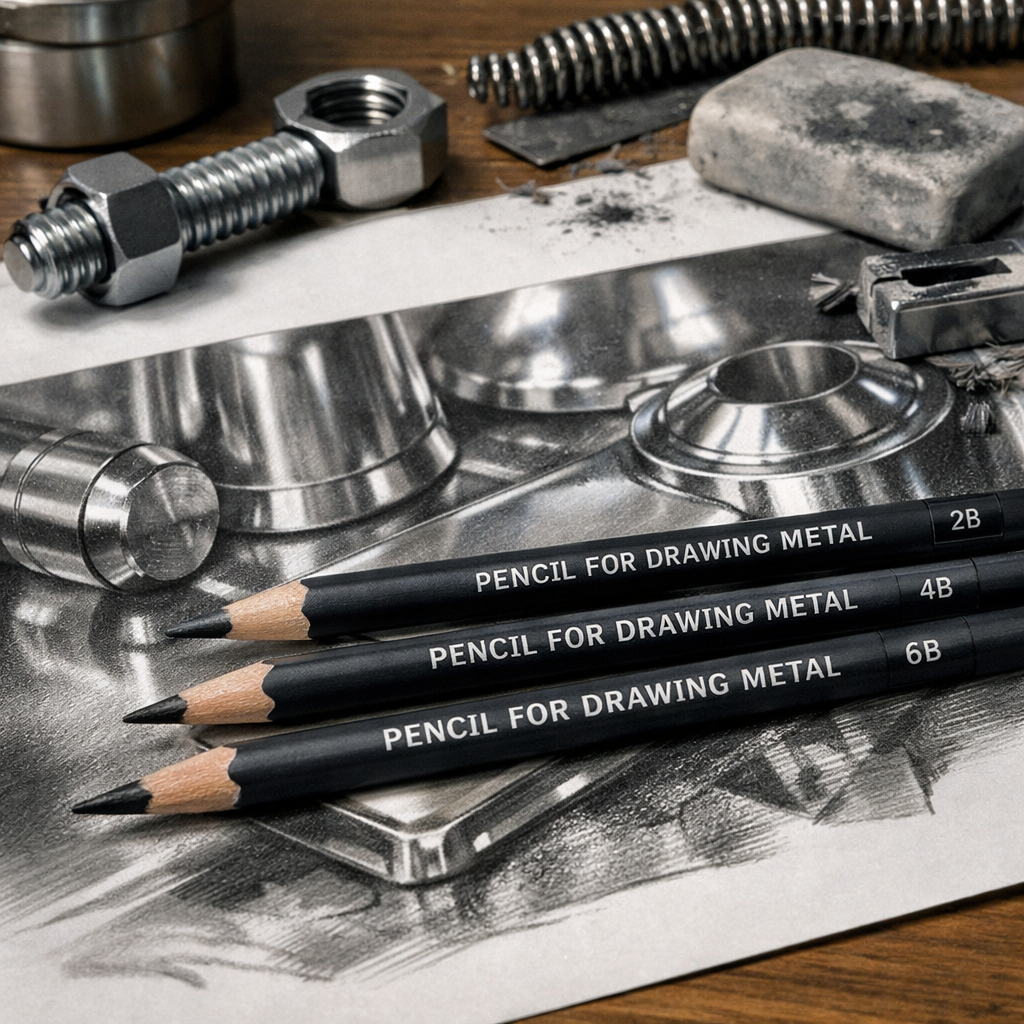
When you pick a set, look for a range that covers at least 2H, HB, 2B and 4B. That gives you control over every value you’ll see on metal.
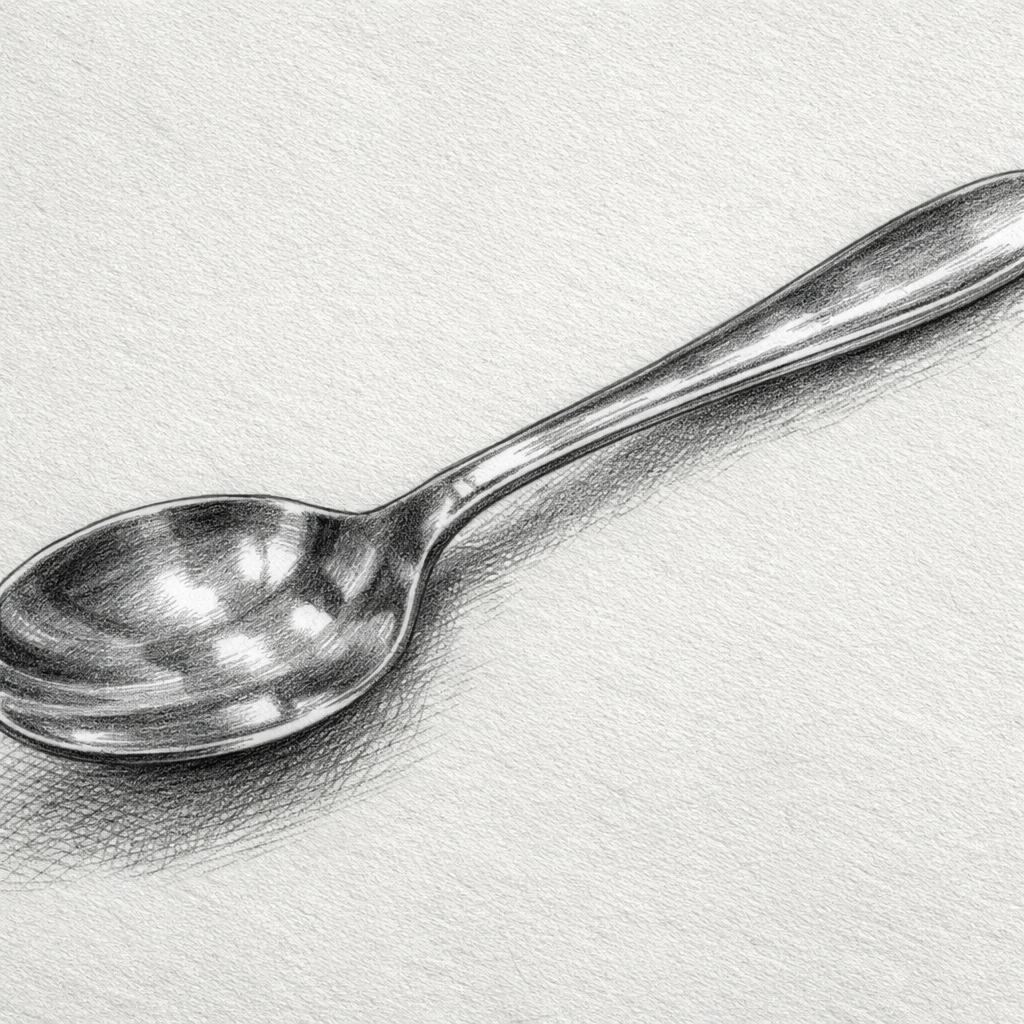
Here’s why the range matters. Imagine a chrome spoon. The curve catches light on the top, but the back stays in shadow. If you only have a hard lead, the bright spot will look washed out. If you only have a soft lead, the dark side will be too muddy. Mixing grades lets you model the curve with smooth transitions.
Pro tip: keep a small piece of scrap paper nearby. Test each grade on the scrap before you start on your drawing. This helps you see how the pencil reacts on the paper you chose.
For more detail on how pencil grades work, see Pencil Lead Hardness Explained. It breaks down the scale step by step.
Another good read on grades comes from Eckersley’s Pencil Grades Guide. It shows which grades shine on different paper textures.
Bottom line:Pick a range from hard (2H) to soft (4B) so you can capture both bright highlights and deep shadows on metal.
Step 2: Gather Essential Drawing Supplies
Having the right tools makes metal drawing smoother. You don’t need a studio full of gadgets , just a few basics that work well together.
First, choose a paper with a bit of tooth. A medium‑weight sketchbook (about 120 gsm) lets graphite grip without tearing. If the paper is too smooth, your metal will look flat.
Second, get a blending stump. It lets you soften the transition between light and dark. For metal you’ll blend a lot, especially on curved surfaces.
Third, pick a good eraser. A kneaded eraser lifts graphite without smearing. You’ll use it to pull out tiny highlights that mimic metal reflections.
Fourth, keep a sharpener that lets you control the point. A mechanical sharpener with a fine setting gives you a precise tip for tight edges on bolts or screws.
Here’s a quick checklist of must‑haves:
- Paper with medium texture (120‑150 gsm)
- HB, 2H, 4B pencils (or a full set)
- Blending stump or tortillon
- Kneaded eraser
- Fine mechanical sharpener
And don’t forget a clean workspace. A flat desk with good lighting helps you see the subtle shifts in tone.
When you set up, think about ergonomics. A comfortable chair and a wrist rest keep your hand steady for long shading sessions.
Ready to boost your practice? How to Choose Pencils for Drawing Reflective Surfaces walks you through picking the perfect set for shiny subjects.
For a deeper dive on paper texture, from Clip Studio Paint on Metallic Textures. It explains how surface grain affects light.
Bottom line:The right paper, eraser, and blending tools let you render metal shine and shadow with confidence.
Step 3: Master Shading Techniques for Metallic Surfaces
Shading metal is about catching light, not just making dark marks. You need to think in layers.
Start with a base tone. Use a light HB stroke to block in the overall shape. This sets the stage for highlights.
Next, add a mid‑tone with a 2B. Look at where the light source hits. The side facing the light gets a gentle lift, the opposite side stays darker.
Then, bring in a deep shadow with a 4B. Keep the edge soft; metal rarely has hard shadow lines unless something blocks the light.
Now, pull out the brightest highlight. Use a clean tip of the HB or even a white pastel if you allow mixed media. Tap lightly with the tip of the eraser to lift graphite and create a crisp sparkle.
Blend between each layer with a stump. Move in the direction of the curve , that mimics how light rolls over a curved surface.
For a flat plane, you can use a technique called “cel shading”. Block in three zones: dark, mid, light. Then add a thin line of white on the edge to suggest a reflective rim.
Here’s a quick visual of the layer order:
Notice how each step adds depth. Skip a step and the metal will look flat.
Watch these two videos for live demos:
“The best time to start building backlinks was yesterday.”
When you practice, keep a light source consistent. Move a desk lamp to one side and never change it mid‑drawing. This helps you train your eye for where the highlight belongs.
Even though the data shows no hardness info, you still need a range. That gap tells you to rely on your own testing.
Bottom line:Build metal tone with a base, mid‑tone, shadow, and highlight layer, blending between each for a realistic shine.
Step 4: Practice Real-World Metal Objects
Now that you know the tools and the shading steps, it’s time to draw real metal. Start simple , a soda can, a kitchen spoon, a bike chain.
Choose an object with clear light and shadow. Place it under your lamp so the light hits one side. Sketch the outline lightly with an HB.
Next, observe the reflected colors. Metal often mirrors its surroundings. You can hint at that by adding a faint hue from the background with a colored pencil or a light wash.
Apply the shading layers you learned. For a curved can, follow the curve with your stump to keep the transition smooth.
When you finish, step back. Look for any flat spots. Add a tiny highlight with the eraser if needed.
Try a more complex object like a gear. Gears have many flat faces and angled edges. Use a 2H for the thin edges that catch light, and a 4B for the deep inner shadows.
Record your process. Take a photo of each stage. That way you can see where the shading improves.
Watch these tutorials for extra practice:
Remember to protect your skin after long sessions. Metal dust and graphite can irritate. OM Botanical Plant‑based Ayurvedic Skincare offers gentle, non‑comedogenic creams that soothe hands.
Finally, compare your drawing to a photo of the object. Spot differences in highlight placement and adjust.
Bottom line:Real‑world practice turns theory into skill, letting you draw metal that looks three‑dimensional.
Conclusion
Drawing metal isn’t magic. It’s a mix of the right pencils, proper supplies, layered shading, and steady practice. Start with a range of hardnesses, use a medium‑tooth paper, blend carefully, and then work on actual metal objects. The more you repeat the steps, the quicker you’ll see improvement.
Drawing Pencils Guru has tested dozens of pencils and supplies. Their expert picks sit at the top of every artist’s kit. If you’re ready to upgrade, check out their curated set , it’s built for metal, reflective surfaces and more.
Ready to boost your metal sketches? Start your free trial with Drawing Pencils Guru and get the perfect pencil set delivered to your door.
FAQ
What pencil hardness works best for bright metal highlights?
Use a hard lead like 2H or even 4H for the brightest spots. Hard leads lay down a very light line that mimics the sharp glint you see on polished metal. Apply it gently and then lift with a kneaded eraser for extra sparkle.
Can I use colored pencils to add reflections on metal?
Yes. Light washes of cool blues or warm yellows can hint at reflected surroundings. Keep the color layer thin and blend it into the graphite so the metal still reads as metal, not as a painted surface.
How often should I sharpen my pencil when drawing metal?
Sharpen whenever the tip becomes dull or breaks. A sharp tip lets you draw tight edges on bolts and screws. For smooth shading, a slightly rounded tip works better, so you can switch between a fine point and a stub as needed.
Do I need a special paper for metal drawing?
Medium‑tooth paper (around 120‑150 gsm) is ideal. It grabs graphite enough to hold the dark values but still lets you erase highlights. Smooth paper can make the metal look flat, while very rough paper adds unwanted texture.
What is the best way to lift a tiny highlight?
Use a clean kneaded eraser. Gently press and roll it over the area you want to brighten. The eraser lifts graphite without smearing, leaving a crisp, reflective spot that looks like a real metal gleam.
How can I keep my hands from getting dirty while drawing metal?
Wear a light cotton glove on your drawing hand. It reduces graphite transfer and keeps skin clean. After a session, wash hands and apply a soothing cream like those from OM Botanical to calm any irritation.
| Layer | Pencil Grade | Purpose |
|---|---|---|
| Base | HB | Outline shape |
| Mid‑tone | 2B | Form volume |
| Shadow | 4B | Deepen edge |
| Highlight | HB or Eraser | Show reflection |
