
Ever caught yourself mid‑sketch, wondering why the line looks wobbly or why your hand gets sore after a few minutes?
You’re not alone. Most beginners (and even seasoned artists) spend more time chasing the perfect line than actually enjoying the act of drawing.
What if I told you that the secret often lies not in the pencil itself, but in the way you hold it?
In this guide, we’ll walk through the subtle shifts that can turn a shaky stroke into a smooth, confident mark—without buying a new set of tools.
First, let’s ditch the grip you learned in school. That tight, pen‑like hold may feel familiar, but it limits the range of motion you need for shading, hatching, and detail work.
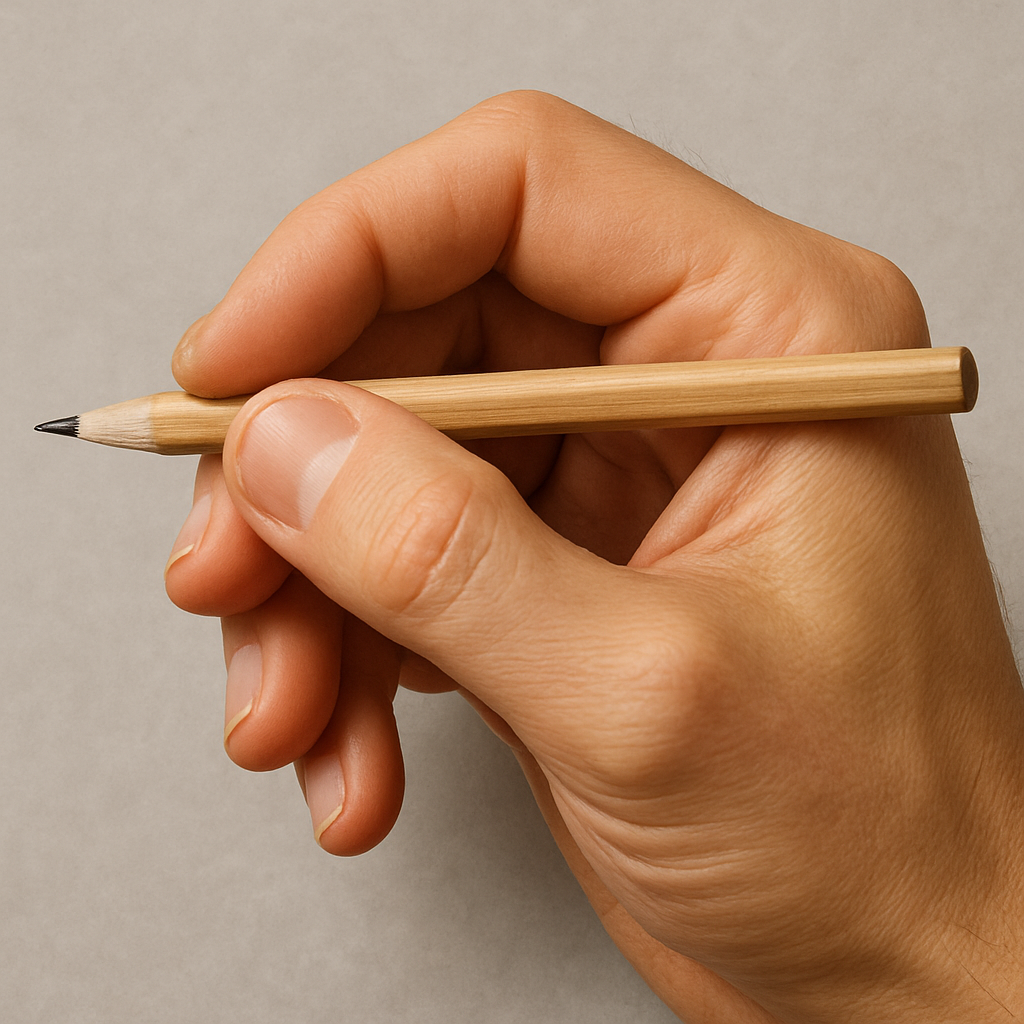
Imagine holding a brush instead of a pen: relaxed, flexible, and slightly offset from your fingertips. This “tripod” grip—thumb, index, and middle finger forming a gentle cradle—gives you control over pressure while keeping your hand relaxed.
Try this: place the pencil about one inch from the tip, let it rest lightly between your thumb and index finger, and let your middle finger support from underneath. Your ring finger can rest lightly on the paper for stability.
Does that feel odd? It does at first, but think about the moment when you finally get that smooth gradient on a portrait—suddenly the new grip makes sense.
For sketching quick ideas, a looser “overhand” grip works wonders. Flip the paper slightly, let the pencil rest between your thumb and the side of your hand, and use your whole forearm to draw long, sweeping lines.
And when you need precision—like drawing fine architectural details—bring the pencil closer to the tip and tighten the grip just enough to guide, not to choke.
Remember, the goal isn’t a rigid rule but a toolbox of options you can switch between depending on what you’re drawing.
So, as you pick up your HB or charcoal pencil today, experiment with these grips. Notice how your hand feels, how the line responds, and let that feedback guide you.
Ready to see the difference? Let’s dive in and explore each grip in detail, so you can choose the right one for every drawing challenge.
When you’re sitting at a desk in a bustling Mumbai studio, the air buzzing with chatter and the scent of fresh charcoal, you’ll notice that a cramped grip quickly drains your energy. By opening up your hand, you let blood flow more freely, which translates to steadier lines even during long sessions.
Another common mistake is holding the pencil too far from the tip when you need fine detail. That distance magnifies any tremor, turning a crisp line into a jittery mess. Bring the pencil tip closer to your fingers for those tight hatching sections, and you’ll feel the difference immediately.
Pressure is a game‑changer, too. With a relaxed tripod grip you can modulate how hard you press simply by adjusting the weight of your hand, not by squeezing the pencil. Light strokes stay light, dark values stay dark—no need to constantly sharpen.
And don’t forget the role of the paper texture. A smoother Bristol paper pairs nicely with a lighter grip, while a rougher charcoal paper benefits from a firmer hold that lets the lead bite into the fibers.
Finally, give yourself permission to switch grips mid‑drawing. Start with an overhand grip for bold outlines, transition to the tripod for shading, and finish with a fingertip hold for the tiniest details. That fluidity keeps the creative flow alive.
By the end of this article you’ll have a clear roadmap for each situation, so the next time you reach for a pencil you’ll do it with confidence—not confusion.
TL;DR
Mastering how to hold a pencil for drawing transforms shaky strokes into smooth, confident lines, letting you sketch longer without hand fatigue.
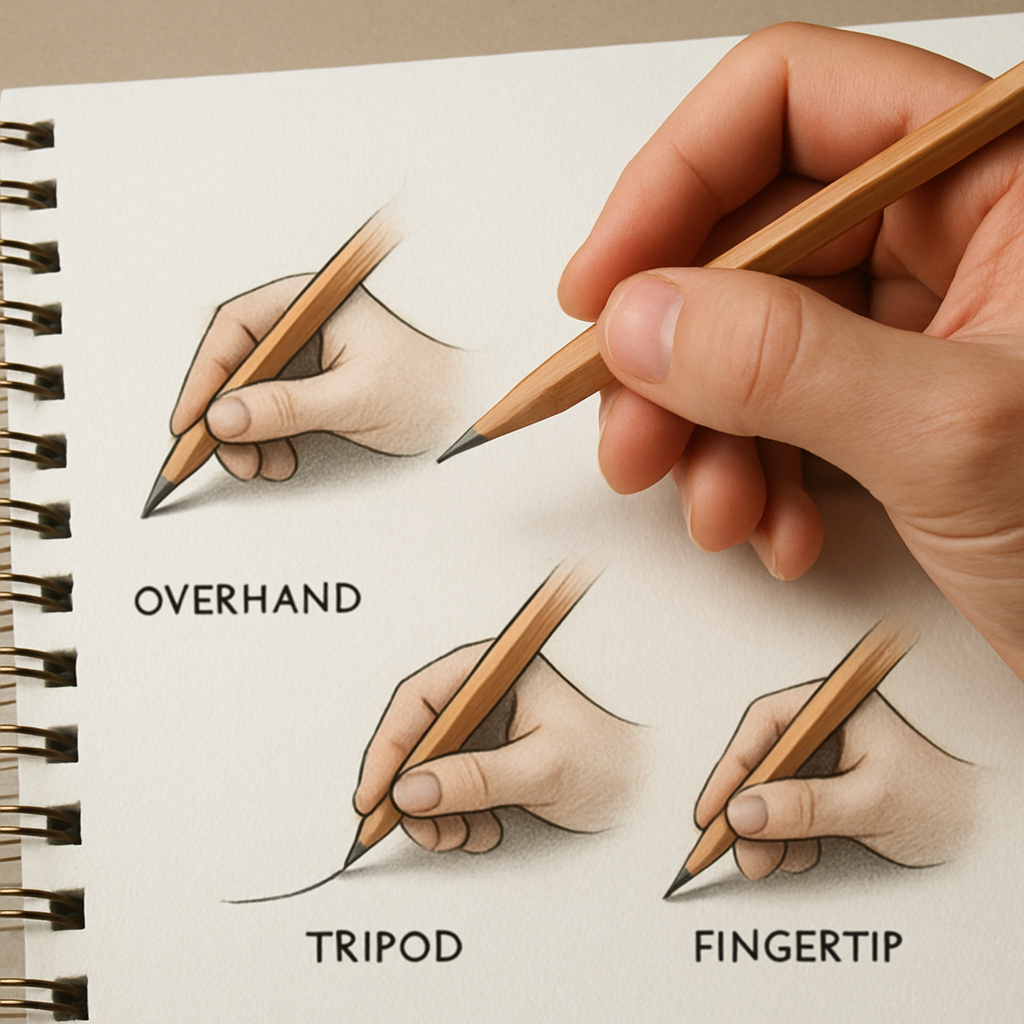
Use our simple grip guide—overhand for bold outlines, tripod for shading, fingertip for fine detail—and watch your art flow naturally, whether you’re a student, hobbyist, or professional today.
Step 1: Position Your Hand
Now that you’ve loosened up the grip, let’s talk about where your hand actually sits on the page. It might sound trivial, but the position of your hand is the foundation for every line you draw.
Think about the last time you tried to sketch a long, sweeping curve and your wrist cramped up. That pain isn’t because you’re using the wrong pencil—it’s because the hand is too close to the paper, forcing your muscles into a static, uncomfortable posture. When you shift the hand back just a few centimeters, you give your forearm room to breathe, and the line follows naturally.
Start by placing your palm about an inch away from the tip of the pencil. Let the pencil rest lightly between your thumb and index finger, with the middle finger supporting from underneath. Your ring finger can hover or rest gently on the paper for extra stability, but don’t press down hard. This “floating” position keeps tension low and lets you pivot the wrist smoothly.
There are two primary hand positions you’ll toggle between. The overhand grip—where the pencil runs along the side of your hand and you use the whole forearm—works wonders for bold outlines and gestural sketches. Flip the paper slightly, let the pencil rest against the side of your hand, and let the arm drive the movement.
When you need finer control, shift into the tripod grip. Bring the pencil closer to the tip—about a half‑inch from the point—so the weight of the lead does most of the work. Your thumb, index, and middle finger form a gentle cradle. This reduces tremor and lets you modulate pressure by simply adding or releasing a tiny amount of hand weight.
Pressure is the secret sauce behind line value. With the hand positioned farther back, you can feather a line by barely touching the paper, then deepen it by letting your forearm settle into a slightly heavier stance. No need to squeeze the pencil; let gravity do the heavy lifting.
For many of our students in India, especially those juggling long classroom hours, a relaxed hand position means they can sketch for hours without fatigue. We’ve seen art majors at Delhi University switch from a cramped grip to the fingertip position and suddenly finish a detailed botanical study in half the time.
Here’s a quick visual that walks you through the hand placement step‑by‑step:
Take a moment after watching the video to try each grip on a scrap of paper. Notice how the overhand grip feels like drawing with a brush, while the tripod feels like you’re guiding a tiny ruler.
Finally, make a habit of checking your hand position every few minutes. Ask yourself: “Is my palm too close? Is my wrist tense?” Adjust, stretch, and keep the flow going. By the end of today’s practice, you should be able to switch between grips without thinking, letting the line dictate the hand, not the other way around.
Step 2: Form the Tripod Grip
Now that your hand is in the right spot, it’s time to shape the grip that will actually move the pencil.
Think about holding a tiny camera—your thumb and index finger act like the mount, while the middle finger is the stabilizer. That tiny “V” between thumb and index is the heart of the tripod grip.
Start by letting the pencil rest lightly on the fleshy ridge where your thumb meets the side of your index finger. Your thumb should press just enough to keep the pencil from rolling, but not so hard that you feel tension.
Next, curl your index finger just enough to cradle the side of the pencil. It’s not a firm clamp; imagine you’re gently cradling a newborn bird.
Slide your middle finger underneath, letting it support the shaft about an inch back from the tip. The middle finger should feel like a soft shelf—enough to guide the pencil, but not a forceful press.
And what about the ring finger? Let it rest lightly on the paper or hover just above the surface. This tiny touch gives you extra balance without stealing freedom from the tripod.
Does that sound too “hand‑y”? Try it with a regular HB pencil you have at home. You’ll notice the pencil feels heavier in your hand, but the weight is distributed across three fingers, not just one.
Check Your Alignment
Ask yourself these quick questions:
- Is the pencil balanced about an inch from the tip?
- Do thumb and index form a relaxed “V” with a small gap?
- Is the middle finger lightly supporting, not squeezing?
- Is your wrist slightly bent, not locked straight?
If you answered “yes” to most, you’ve nailed the tripod grip.
Notice how the pencil now swivels around the pivot point at the thumb‑index junction. That pivot is what lets you vary pressure simply by shifting the weight of your hand, not by tightening your grip.
So, why does this matter for a long sketch session in a bustling Mumbai studio? With the tripod grip, blood keeps flowing to your fingers, and you avoid that dreaded “hand dead after five minutes” feeling.
Fine‑Tuning for Different Tasks
When you’re shading a soft charcoal portrait, you’ll want the pencil a touch farther from the tip—around one and a half inches. That extra length gives you a broader range of motion and lets you lay down gentle gradients.
When you need razor‑sharp detail—say, the tiny window panes on a historic building—you’ll bring the pencil closer, about half an inch from the tip. The grip stays the same, but the shorter lever gives you more control.
And if you’re switching between graphite and colored pencils, the grip adapts automatically. The key is to keep the three‑finger cradle consistent; the pencil’s material won’t change the fundamentals.
Here’s a quick practice drill: draw a straight line across the page, then, without lifting the pencil, transition into a smooth curve, and finish with a tight spiral. Feel how the tripod grip lets you flow from one shape to the next without readjusting.
Do you feel any tension creeping in? Pause, shake your hand gently—like resetting a compass—and return to the grip. That tiny reset can dissolve stiffness in seconds.
Common Mistakes to Dodge
One mistake beginners make is “pinching” the pencil between thumb and index, turning the grip into a pen‑like clamp. That kills the natural rotation and makes your hand fatigue fast.
Another is letting the middle finger hover too high, which removes the stabilizing shelf and forces the wrist to work harder.
Finally, avoid gripping the pencil too far back on the shaft. The farther you hold, the larger the lever, and the more any tremor gets magnified.
By keeping the tripod grip compact and relaxed, you maintain precise control while letting your arm and forearm guide the larger strokes.
Ready to test it out? Pick up any sketchbook, place your hand as described, and doodle a quick coffee cup. Feel the line glide smoother, the pressure shift effortlessly, and notice how your hand stays relaxed even after a minute or two.
That’s the power of the tripod grip—simple, adaptable, and surprisingly comfortable. Master it, and the rest of the grips we’ll explore later will feel like natural extensions of this foundation.
Step 3: Adjust Pressure and Angle
Why pressure matters
When you press too hard, the graphite bites into the paper, leaving a harsh, uneven line that wears out your lead faster.
When you press too light, the stroke can wobble or disappear, especially on textured surfaces.
Finding the middle ground lets you keep the line crisp without exhausting your pencil.
Feel the pivot, not the push
Think of the pencil as a tiny lever. The real magic happens at the pivot point where your thumb meets your index finger.
Instead of squeezing the shaft, let the weight of your hand settle onto the paper. The pressure you feel on the line is actually the weight of the arm transferring through that pivot.
So, ask yourself: are you “gripping” the pressure or “letting” the pressure?
Step‑by‑step pressure adjustment
1. Start with a feather‑light line. Rest the pencil on the page, hold the tripod grip, and draw a short line without any intentional force.
2. Notice the gap. If the line looks faint, gently lower the pencil a fraction—think of a whisper, not a shout.
3. Increase incrementally. Add just enough weight to darken the line to the shade you need, then stop. You’ll feel a subtle shift in the muscles of your forearm.
4. Check the angle. Tilt the pencil so the lead points slightly toward the paper rather than straight out. A 45‑degree angle works for most graphite, while charcoal loves a flatter, broader edge.
5. Repeat on both sides of the page. Your hand may drift; reset the pivot each time you lift the pencil.
Real‑world examples
Imagine you’re sketching a bustling Mumbai market. For the distant stalls you want a soft, atmospheric tone—hold the pencil about 1½ inches from the tip, keep the pressure whisper‑light, and angle the lead flat. The graphite will glide, creating a gentle wash of tone.
Now switch to the foreground, a vendor’s bright fruit basket. Bring the tip closer, maybe half an inch from the point, and add a touch more pressure. The line darkens, the edges sharpen, and the fruit pops off the page.
Notice how the same grip works, but the pressure and angle change the story you’re telling.
Practical drills to train your hand
Pressure ladder. Draw a series of parallel lines, each one a shade darker than the last. Start with a barely‑visible stroke, then gradually add a bit more weight. You’ll develop a feel for the exact amount of force needed for different values.
Angle swap. Take a single line and redraw it three times: first with the tip pointing straight down, then at a 30‑degree tilt, and finally flat against the paper. Compare how the line width and texture shift. This drill teaches you to match the angle to the material—graphite, charcoal, or colored pencil.
Speed test. Set a timer for 30 seconds and fill a box with continuous strokes, keeping the pressure consistent. When the timer ends, look for any unintended dark spots or feathering. Adjust your grip and repeat until the box is uniformly shaded.
Tips for different media
Graphite works best with a medium‑leaning angle (about 45 degrees) and a light‑to‑medium pressure. Charcoal, being coarser, loves a flatter angle and a slightly firmer hand—think of a gentle press rather than a hard shove.
Colored pencils demand a delicate touch. Too much pressure can break the pigment core and create a chalky surface. Keep the lead almost parallel to the paper and use a feather‑light hand for subtle hues.
Common pitfalls and how to avoid them
**Pitfall 1:** “Holding the pencil like a pen.” This forces the wrist into a stiff position, making pressure control impossible. Reset to the tripod grip and let the arm do the work.
**Pitfall 2:** “Pressing with the thumb.” The thumb is a stabilizer, not a driver. If you feel the thumb doing the heavy lifting, relax it and shift the weight to the middle finger and forearm.
**Pitfall 3:** “Ignoring the paper texture.” Smooth Bristol paper lets you use a lighter touch; rough watercolor paper grabs the lead, so you’ll need a tad more pressure to avoid skipping.
By paying attention to these details, you’ll turn pressure from a mystery into a tool you can dial in at will.
Quick checklist before you draw
- Grip: tripod, relaxed.
- Pivot point: thumb‑index junction.
- Angle: 45° for graphite, flatter for charcoal.
- Pressure: feather‑light for light values, medium for darker areas.
- Paper match: adjust pressure for texture.
Now you have a practical roadmap for adjusting pressure and angle. Grab your sketchbook, try the ladder drill, and watch your lines gain confidence without burning out your hand or your lead.
Step 4: Compare Grip Styles
Why compare?
You’ve tried the tripod, the overhand, and the fingertip hold. But which one actually works best for the kind of line you need right now? The answer isn’t a one‑size‑fits‑all; it’s a toolbox of options you can reach for depending on the task.
Think about a busy Mumbai market sketch you did earlier. The bold outlines needed a loose, overhand grip, while the delicate shading on a vendor’s silk scarf called for the tripod. By matching grip to purpose, you get consistency without fatigue.
Grip style cheat sheet
| Grip | Ideal Use‑Case | Key Benefits |
|---|---|---|
| Tripod (thumb‑index‑middle) | Shading, hatching, medium‑detail work | Stable, balanced pressure; easy arm‑driven motion |
| Overhand (palm‑side) | Broad outlines, gestural sketches, charcoal | Maximum leverage; lets forearm dictate weight |
| Fingertip (near tip) | Fine details, tiny textures, technical drawing | Precision control; minimal lever arm |
Notice the pattern? The farther your grip is from the tip, the more power you get, but the less precision you have. The closer you are, the opposite happens.
Real‑world scenarios
Scenario 1 – Architectural rendering: You need razor‑thin line work for window panes. Switch to a fingertip grip, hold the pencil about half an inch from the tip, and keep your wrist relaxed. The result is a clean, consistent line that won’t wobble.
Scenario 2 – Charcoal landscape: Broad strokes for sky and ground demand an overhand grip. Rest the pencil on the side of your hand, let the whole forearm swing, and press lightly. Because charcoal is forgiving, you can vary pressure without worrying about breaking the lead.
Scenario 3 – Academic sketch‑note: You’re in a lecture, capturing diagrams fast. The tripod grip lets you shift between quick outlines and soft shading without re‑positioning your hand. It’s the sweet spot for speed and legibility.
Actionable steps to test each grip
- Pick a simple shape – a circle or a square.
- Draw the shape three times, each with a different grip.
- After each attempt, note three things: line consistency, hand fatigue after 30 seconds, and how easily you could vary pressure.
- Rank the grips for that particular shape. The highest‑ranked grip becomes your default for similar elements.
This quick drill gives you data‑driven insight rather than guesswork.
Expert tip from Drawing Pencils Guru
In our experience, mixing grip styles within a single piece feels natural once you train your brain to cue the right grip for the right line. For example, start a portrait with an overhand grip for the loose outline, switch to the tripod for mid‑tone shading, and finish the eyelashes with a fingertip hold. The transition feels seamless if you practice the three‑step drill above.
If you’re curious about how pencil grades affect grip comfort, check out our HB Pencil Meaning Explained: A Clear Guide for Writers and Artists. Understanding the hardness can help you decide whether a softer lead needs a lighter grip or a harder lead benefits from a firmer hold.
Quick checklist before you switch grips
- Is the paper texture matching the grip’s pressure range?
- Does your wrist feel relaxed, not locked?
- Can you maintain consistent line weight for at least 20 seconds?
- Do you feel any strain in thumb or forearm?
Answering “yes” to most means you’ve found the right grip for that moment. If not, experiment with a different style and run the drill again.
By comparing grip styles deliberately, you turn a vague feeling of “this feels weird” into concrete, repeatable technique. Your hand stays healthier, your lines stay cleaner, and you finally get the confidence to tackle any drawing challenge.
Step 5: Practice Exercises
Now that you’ve tried the tripod, overhand, and fingertip grips, it’s time to turn theory into muscle memory. The best way to lock a new habit in is with short, focused drills that you can squeeze into a coffee break or a rainy‑day sketch session.
Exercise 1: Grip Switch Sprint
Grab a sheet of plain paper and a standard HB pencil. Start with the overhand grip and draw a straight line across the page. Without lifting the pencil, shift your hand into the tripod grip and continue the line for another inch. Finally, bring the pencil tip right up to your thumb and finish the line with a fingertip hold.
Notice how the line weight changes automatically. If it feels jerky, pause, shake your hand out, and try again. Do this three times, then record which transition felt the smoothest. That quick sprint trains your brain to cue the right grip on the fly.
Exercise 2: Pressure Ladder
Draw a column of ten parallel strokes, each about two inches long. Begin with the lightest possible pressure, then increase the weight just a hair for the next line, and keep adding until the tenth line looks dark enough to shade a shadow.
Use the same grip for the whole ladder – try it first with the tripod, then repeat the ladder using an overhand grip. You’ll see how pressure feels different depending on the grip, and you’ll learn the sweet spot for each style.
Exercise 3: Shape‑by‑Shape Challenge
Pick three simple shapes: a circle, a square, and a triangle. Draw each shape three times, rotating the grip each round (tripod → overhand → fingertip). After you finish, compare the consistency of the edges and how long your hand stayed relaxed.
For students in Indian art classes, this drill is great because it mirrors the quick‑draw exercises teachers love. For professional illustrators, it reveals which grip gives you the cleanest line on tight deadlines.
Exercise 4: Speed Shading Box
Draw a 5 × 5 cm box. Fill the top half with a feather‑light shading using the fingertip grip, then switch to the tripod for the middle band, and finish the darkest shadows with the overhand grip. Time yourself – aim for under 45 seconds.
When the timer stops, glance at the transition zones. Do the values blend smoothly, or is there a harsh edge? Adjust the pressure or grip length until the gradients melt together.
Exercise 5: Real‑World Sketch Test
Head to a bustling spot – a local market, a college campus, or even your kitchen counter. In one minute, capture the overall scene using the overhand grip for the big shapes. Then, for the next minute, switch to the tripod and add mid‑tone shading. Finally, spend thirty seconds on fine details like a vendor’s logo or a coffee cup handle with the fingertip hold.
This mini‑field study forces you to decide on the spot which grip serves the current need, just like a professional illustrator working under a deadline.
Quick Checklist Before You Finish
- Did you feel any strain in your thumb or forearm?
- Are the line weights consistent across grip changes?
- Can you maintain the same pressure for at least 20 seconds?
- Did the transitions feel natural, or did you have to pause?
If you answered “yes” to most, you’re on track. If not, repeat the drills tomorrow, focusing on the weak spot. Consistency beats intensity – a five‑minute daily routine beats a one‑hour marathon once a month.
Remember, the goal isn’t to master every grip perfectly in one sitting; it’s to build a reliable toolbox you can reach into whenever a drawing calls for it. Keep these exercises handy, revisit them whenever you notice hand fatigue, and watch your confidence grow line by line.
FAQ
What is the best grip for beginners learning how to hold a pencil for drawing?
Most newbies feel comfortable with the classic tripod grip – thumb, index and middle finger forming a gentle cradle about an inch from the tip. It gives you enough stability to keep lines smooth, yet it’s loose enough to avoid cramping. Start by resting the pencil on the fleshy ridge where your thumb meets your index finger, let the middle finger support from underneath, and keep your wrist slightly bent. Practicing a few minutes a day will let your hand remember the relaxed shape without forcing it.
How does the tripod grip affect line pressure and control?
The tripod grip lets the weight of your hand, not your fingers, dictate pressure. Because the pivot point sits at the thumb‑index junction, a slight shift in arm weight changes the darkness of the line without you having to squeeze. This means you can glide from a feather‑light sketch to a deep shadow just by relaxing or adding a tiny bit of arm pressure. The result is smoother transitions and far less hand fatigue over long sessions.
Can I switch grips mid‑drawing without ruining the flow?
Absolutely – think of each grip as a tool in a toolbox. When you need a bold outline, slide into an overhand grip; for shading, drop back to the tripod; and for tiny details, bring the tip close with a fingertip hold. The key is a quick reset: pause, shake the hand out, and let the pencil settle in the new position. A smooth switch feels natural once you’ve practiced the three‑step drill of drawing a line, changing grip, and continuing without lifting the pencil.
What common mistakes cause hand fatigue when learning how to hold a pencil for drawing?
One big culprit is gripping the pencil too tightly, as if you were writing a formal letter. That turns the hand into a clenched fist and spikes fatigue within minutes. Another is holding the pencil too far back on the shaft – the longer lever amplifies any tremor. Finally, locking the wrist flat prevents natural arm movement. Loosen your grip, keep the pencil about an inch from the tip, and let your wrist stay slightly bent for a relaxed, fatigue‑free experience.
How does paper texture influence the way I should hold my pencil?
Smooth Bristol or hot‑pressed paper loves a light grip and a flatter angle – the lead can glide without digging. Rough watercolor or charcoal paper, on the other hand, benefits from a firmer hold and a slightly steeper angle so the tip can bite into the fibers. Adjust the distance from the tip accordingly: a bit farther for smooth surfaces, closer for gritty ones. That tiny tweak keeps your lines consistent and prevents the pencil from slipping.
Is there a difference in grip when using graphite versus charcoal or coloured pencils?
Yes, the medium changes the sweet spot. Graphite is dense, so a relaxed tripod grip with the tip a touch farther from the fingers gives you fine control without breaking the lead. Charcoal is softer and tends to crumble, so an overhand grip with a flatter angle lets you apply broader pressure without crushing the core. Coloured pencils sit somewhere in between – a fingertip grip works well for precise colour placement, while the tripod is great for layering soft tones.
How can I practice grip changes efficiently during a short sketch session?
Set a timer for five minutes and pick a simple object – a coffee cup, a fruit, anything you see around you. Start with an overhand grip to outline the basic shape, then switch to the tripod for mid‑tone shading, and finish with a fingertip hold for highlights or tiny texture. After each switch, note how the line weight feels and whether any tension appears. Repeating this drill daily builds muscle memory so the right grip becomes second nature.
Conclusion
We’ve walked through every nuance of how to hold a pencil for drawing, from the relaxed tripod to the bold overhand and the pinpoint fingertip grip. If you’ve felt that moment of tension melt away as the pencil glided, you already know the difference a good grip makes.
Remember the three quick checks: the pencil sits about an inch from the tip, your thumb‑index “V” stays gentle, and your wrist stays slightly bent. Those tiny adjustments let you control pressure without cramping, whether you’re shading a charcoal skyline or detailing a delicate Indian rangoli.
So, what’s next? Grab a sketchbook, set a timer for five minutes, and run the grip‑switch sprint we described. Notice how the line weight changes automatically – that’s the muscle memory building right now.
In our experience at Drawing Pencils Guru, artists who practice these drills see steadier lines and longer, fatigue‑free sessions. Keep the routine simple, stay curious, and let each sketch teach your hand a new trick.
Ready to make every stroke feel natural? Keep experimenting, share your progress with fellow creators, and remember: the best grip is the one that lets your ideas flow without a fight.
Every artist’s journey starts with a simple hold, so keep refining daily.
