
Ever opened a fresh sketchbook and stared at a blank page, wondering why your colors look flat instead of the rich, luminous tones you imagined?
You’re not alone—most artists, whether they’re studying in Delhi’s art colleges or doodling in a coffee shop in Mumbai, hit that wall when they first try to layer colored pencils.
What if I told you the secret isn’t a magic brand, but a simple mindset shift and a handful of techniques you can start using today?
In our experience at Drawing Pencils Guru, we’ve seen beginners transform a dull gray wash into a vibrant sunset simply by mastering the order and pressure of each layer.
Layering is like building a story: you lay down the outline, then add background details, then sprinkle highlights, and finally fine‑tune the texture. Skipping steps or pressing too hard too early can muddy the colors, leaving you frustrated.
So, how to layer colored pencils without turning your paper into a muddy mess? First, choose the right paper—something with a bit of tooth gives the pigment something to grip. Second, start with the lightest hues and gradually work toward the darkest. Third, vary your pressure; a gentle touch lays down a translucent wash, while firmer strokes add depth.
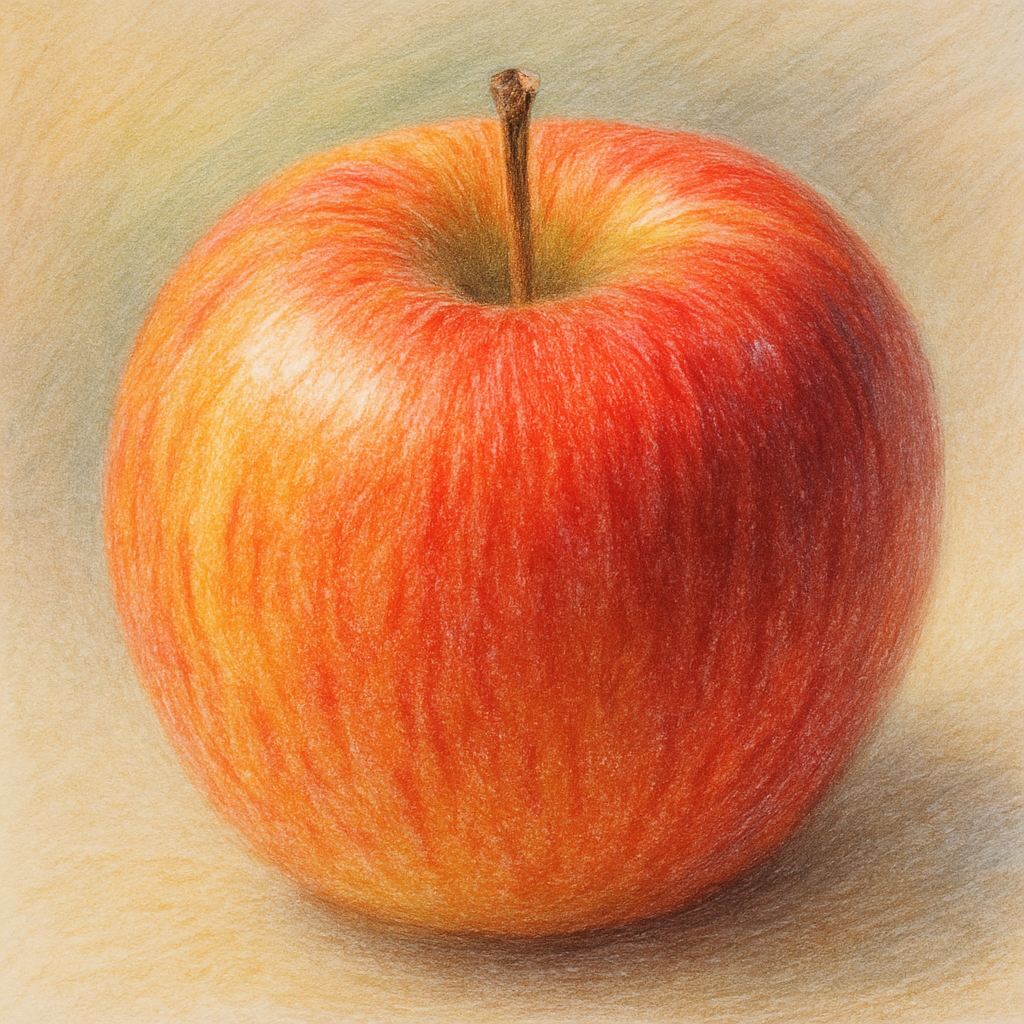
Imagine you’re drawing a mango. You’d begin with a pale lemon‑yellow, then layer a warm orange, and finally deepen the edges with a rich amber. Each layer builds on the one before, creating that three‑dimensional pop we all crave.
Feel that moment when the colors start to sing together? That’s the payoff of thoughtful layering, and it’s totally within reach for anyone with a pencil and a bit of patience.
Ready to experiment? Grab your favorite set, pick a piece of textured paper, and give those three steps a try. By the end of this guide, you’ll know exactly how to layer colored pencils like a pro.
TL;DR
Mastering how to layer colored pencils transforms flat sketches into vibrant, three‑dimensional artwork by using the right paper, light‑to‑dark hues, and pressure control. Follow our simple three‑step process—choose textured paper, start with the lightest tones, then build deeper shades—so you can confidently create rich, realistic color blends every time today.
Step 1: Gather the Right Materials
Before you even think about the first stroke, ask yourself: do you have the right canvas for the story you want to tell with colored pencils? It’s a tiny question that makes a huge difference. The paper you choose is the silent partner in every layered piece – it decides whether your colors will glow or get stuck in a dull haze.
Here’s what we’ve learned at Drawing Pencils Guru: a paper with a decent amount of “tooth” gives the pigment something to cling to. If the surface is too smooth, the waxy cores will slide off, and you’ll end up with a patchy wash that looks more like a watercolor spill than a controlled layer.
Paper texture matters
Think of textured paper like a gentle sandpaper for your pencils. A 120‑140 g/m² sketchbook with a medium‑to‑rough finish is a solid starter for most Indian art students and hobbyists. Brands like Canson XL or Strathmore 400 series are affordable, and they hold pigment without tearing when you press harder later on.
But what if you’re working on a larger illustration or a professional portfolio piece? You might graduate to heavyweight Bristol board (300 g/m²) with a vellum surface. The extra weight prevents buckling when you layer dark hues, and the subtle tooth still gives you that necessary grip.
Choosing the right pencils
Not all colored pencils are created equal. Soft‑core pencils (often labeled 2B‑4B) lay down color with less pressure, which is perfect for those translucent under‑layers. Hard‑core pencils (2H‑4H) retain their point longer and are ideal for fine details or the final shadows.
In our experience, a balanced set that mixes both soft and hard leads saves you from constantly swapping brands. If you’re buying a new set, look for a range that includes at least three light, three medium, and three dark values in each hue you plan to use.
Essential tools besides paper and pencils
A blending stump might feel like a luxury, but it’s practically a must‑have for smoothing transitions without over‑working the paper. A good quality eraser – think vinyl or kneaded – helps lift excess pigment without tearing the tooth.
And don’t forget a reliable sharpener. A rotary sharpener keeps the lead fine and consistent, which is crucial when you’re building layers that need crisp edges.
So, how do you pull all these pieces together? Start by laying out a small workspace: a clean sheet of your chosen paper, your pencil set sorted by hardness, a blending stump, and an eraser within arm’s reach. This simple arrangement removes friction and lets you focus on the creative flow.
Ready for a quick visual demo? Below is a short video that walks through the exact materials we recommend and shows how they feel in the hand.
Notice how the artist swaps between a soft peach pencil for the base wash and a harder burnt umber for the final shadows. The paper’s texture catches each layer, preventing the colors from sliding into each other.
Now that you’ve seen the tools in action, it’s time to test them yourself. Grab a piece of textured paper, sketch a simple shape – maybe a mango or a sunrise – and experiment with laying down the lightest hue first. Don’t worry about perfection; the goal is to feel the paper’s grip and the pencil’s response.
When you’re satisfied with the first layer, gently blend with the stump, then add a darker shade, and repeat. You’ll start to see depth emerging, just like building a story one paragraph at a time.
Step 2: Prepare Your Paper Surface
Now that your toolbox is ready, the real magic starts with the paper you choose. Think of the paper as the stage – if the floor is uneven, even the best dancer will stumble.
First, feel the texture. Run your fingertip across a sheet of Strathmore 400; you should notice a gentle tooth, like a fine sandpaper that isn’t too aggressive. That tooth is what catches the waxy pigment and lets you build layers without the paper turning into a mushy gray blob.
Why tooth matters
When you press a light wash of lemon‑yellow on a smooth surface, the pigment often slides off, leaving a faint streak. On a medium‑tooth paper, those same strokes lodge into the fibers, giving you a solid base to darken later. The Virtual Instructor notes that Bristol vellum, Canson Mi‑Teintes, and Clairefontaine PastelMat all have varying degrees of tooth, each influencing how many layers you can comfortably apply.
For most beginners in India’s bustling art classes, Strathmore 400 strikes the perfect balance – it holds up to three or four light washes before you need to switch to a heavier hand.
Pick the right side
Some papers, like Canson Mi‑Teintes, have two distinct sides: a heavy‑tooth side and a smoother side. Use the heavy side for the initial layers, then flip to the smoother side when you’re ready to burnish or add fine details. This simple flip can save you from over‑working a single surface.
Stonehenge paper, a 100% cotton option, is another favorite among our students because its soft feel still provides enough grip for layered work while being forgiving if you need to lift pigment with a kneaded eraser.
Test before you commit
Grab a scrap piece and do a quick “color test”: draw a thin line of your lightest yellow, then a darker orange over it. If the orange sits on top cleanly and you can see the yellow underneath, you’ve got the right paper. If the orange bleeds or the yellow disappears, try a paper with a bit more tooth.
Here’s a quick checklist you can print and stick to your studio wall:
- Feel the tooth – it should be noticeable but not gritty.
- Check both sides if the paper is double‑sided.
- Do a color‑test with your lightest and darkest hues.
- Make sure the paper is thick enough (minimum 120 gsm) to handle pressure.
And remember, the paper you pick now will affect every later step, from blending to burnishing.
Expert tip: prime for extra smoothness
If you love the ultra‑smooth look of a gessoed surface, apply a thin coat of acrylic gesso on a medium‑tooth pad and let it dry. The gesso fills the tooth, giving you a canvas‑like surface that’s perfect for colorless blending stumps. Our students in Mumbai swear by this trick when they want that glass‑like finish without sacrificing layer control.
One of our senior instructors says, “Start with a toothy paper, then experiment with a gesso‑primed layer when you need that extra polish.” It’s a small step that makes a huge difference in the final vibrancy.
Still unsure which paper to grab? Check out our Choosing the Best Paper for Colored Pencils: A Detailed Guide for a side‑by‑side comparison of the top options.
Looking for visual inspiration? The layered landscapes at Gratitude Studios showcase how a well‑prepared surface can make color sing. And if you ever want to turn a finished layered sketch into wearable art, IGZ Clothing offers a platform to print your designs on tees.
So, what’s the next move? Grab a sheet, feel the tooth, run that quick color test, and you’ll be set to start layering with confidence.
Step 3: Master Basic Layering Techniques
Now that your paper is ready, it’s time to actually start building color. Think of each layer as a brushstroke in a story – the lighter you begin, the more room you have to add depth later.
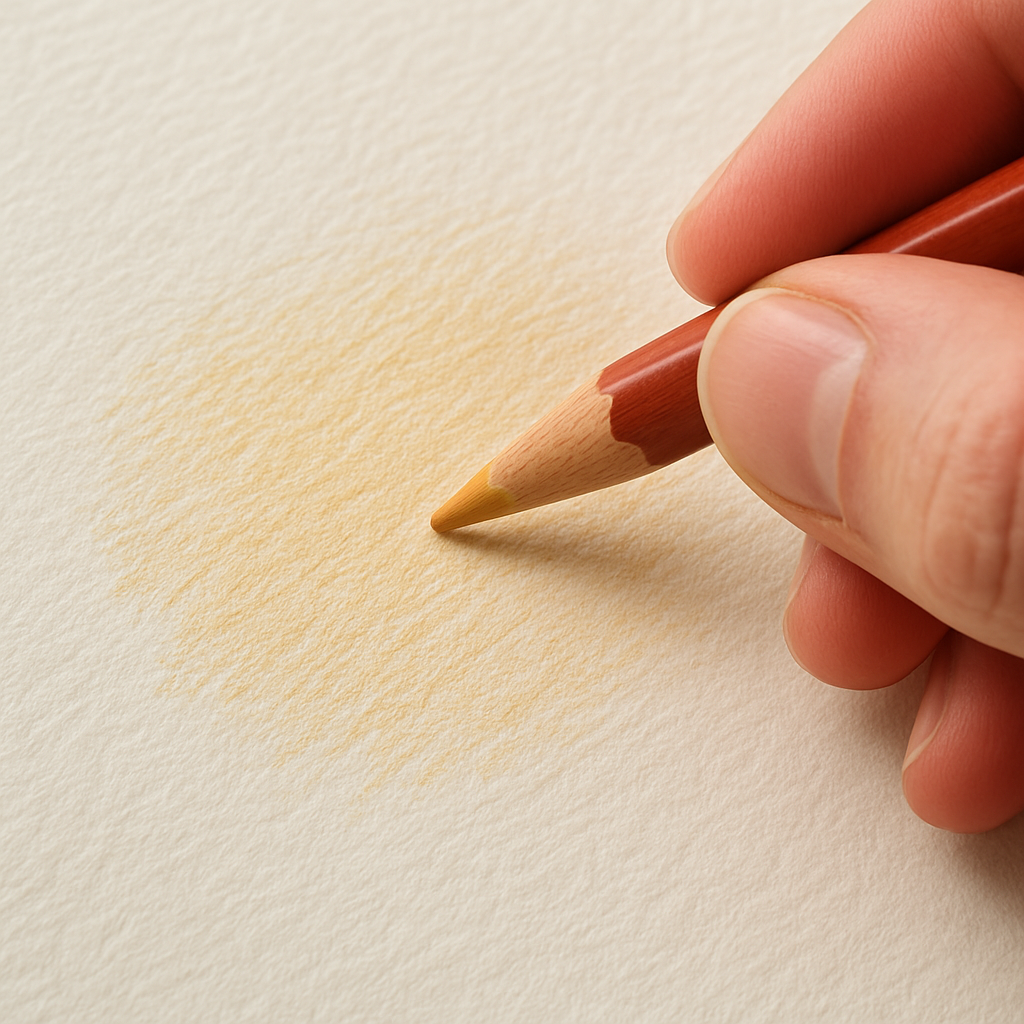
Start with a translucent base
Grab the lightest hue you’ll need for your subject. If you’re sketching a sunrise, that might be a pale lemon‑yellow or a soft peach. Apply it with a gentle hand, using circular motions or light hatching. The goal isn’t to cover the paper but to lay down a thin wash that will catch the pigment of every later layer.
Why keep it light? On a medium‑tooth surface the wax sits in the fibers; a thin wash lets the next color sit on top instead of mixing into a muddy gray.
Build up mid‑tones
Once the base is dry (a minute or two), reach for the next step in your value ladder – the mid‑tone. Increase pressure just enough to let the pigment settle deeper, but don’t press so hard that you flatten the paper. A useful trick is to use the side of the pencil lead for broader areas and the tip for tighter edges.
Example: For that sunrise, layer a warm apricot over the yellow, then a muted orange on the horizon line. You’ll start to see a sense of volume emerging, especially where the orange meets the yellow – the paper’s tooth keeps the two colors distinct.
Introduce the darkest values
Now comes the drama. The darkest pencils (deep orange, burnt sienna, or even a hint of charcoal) add contrast and define form. Apply them sparingly at the edges where light fades, and use a light hand to avoid over‑loading the fibers.
Real‑world scenario: A student in Delhi was trying to draw a mango. She started with a pale yellow, added a sunny orange, then finished with a rich amber only on the shaded side. The result looked three‑dimensional because each layer respected the tooth and didn’t crush the previous washes.
Blend without erasing the structure
After you’ve placed your layers, reach for a colorless blender or a soft blending stump. Glide it over the area you want smooth – the blender lifts a tiny bit of wax, allowing the underlying colors to meld without adding new pigment.
Tip from our senior instructor: “Blend in the direction of the light source; it keeps the illusion of depth intact.” A quick test on a scrap shows that a few strokes of the stump can turn a grainy orange wash into a silky gradient.
Lock in the layers with gentle burnish
When the colors look where you want them, a final light burnish seals the work. Use a light pressure with a white or neutral‑colored pencil, or even a clean blending stump, to smooth the surface. This step is optional, but it adds that “glass‑like” finish many artists love.
Remember, burnishing too early can flatten the tooth and make further layering impossible, so wait until you’re satisfied with the color relationships.
Check your progress – a quick self‑audit
- Do the lightest hues still peek through the darker areas?
- Is there a smooth transition between values, or do you see hard edges?
- Has the paper retained enough tooth to accept another layer if needed?
If you answered “yes” to the first two and “no” to the third, you’ve likely over‑burnished – give the paper a gentle rub with a kneaded eraser to lift a bit of wax and restore some texture.
Actionable checklist for basic layering
- Lay down a translucent base with the lightest color, using light pressure.
- Add mid‑tones, increasing pressure slightly and using the side of the lead for larger areas.
- Apply darkest values only at shadow edges, keeping pressure controlled.
- Blend each stage with a colorless blender, moving with the light source.
- Optional: Lightly burnish with a neutral pencil to lock colors.
- Run the self‑audit checklist before moving to the next subject.
Feeling confident? Try this on a simple fruit sketch – a banana, an apple, or a mango – and you’ll see how each layer builds depth without turning the paper into a gray mush.
For a visual walkthrough of these steps, watch this short demonstration on layering techniques.
Step 4: Advanced Layering Strategies and Color Mixing
Now that you’ve got the basics down, let’s push your pencils a little further. Advanced layering isn’t magic – it’s a mindset shift: think of each stroke as a tiny conversation between colors, not just a wash of pigment.
Ever notice how a mango looks more alive when the yellow‑orange edge is a touch brighter than the core? That tiny shift happens when you let the dominant hue sit first, then whisper a secondary color over it. It’s the same principle you’ll use for any subject.
1. Let the dominant color lead
Start with the hue you want to see most. If you’re drawing a sunset, lay down a soft peach as your base. Apply it with a light hand, letting the paper’s tooth capture the wax. Once the base is dry, go back with a slightly darker orange, but keep the pressure just enough to sit on top of the peach, not grind it flat.
Why does this work? The first layer stays visible through the second, preserving luminosity. You’ll see the effect in the video that walks through a similar technique here.
2. Use “dominant‑first” mixing for custom shades
When you need a hue you don’t own, think in layers instead of blending a bunch of pencils at once. Take red as your dominant color, then add a thin layer of yellow on top. Because red is the first layer, the result leans toward a rich orange rather than a pale one.
Flip the order – yellow first, red second – and you’ll get a lighter, more yellow‑biased orange. This trick lets you stretch a 12‑pencil set into dozens of shades, just like the color‑mixing guide on Sarah Renae Clark’s site demonstrates.
3. Introduce complementary accents sparingly
Complementary colors (like blue‑orange or red‑green) create punch when you let a tiny dash sit on top of a larger wash. Use a colorless blender to soften the edge so the two colors don’t turn muddy gray.
Remember the rule: the more dominant the first layer, the less likely you’ll get a dull mix. A single stroke of a cool blue on a warm orange sunset can add that sparkle of reflected sky.
4. Build depth with “layer‑and‑pause” cycles
After each pair of layers, step back. Look at the paper from a distance – does the light still peek through? If it does, you’ve kept enough translucency. If not, lift a bit with a kneaded eraser before moving on.
Repeating this pause‑and‑audit every 2‑3 layers prevents the dreaded “gray mush” and keeps the tooth alive for later details.
5. Lock in fine details at the end
When you’re satisfied with the overall color relationships, use a neutral‑colored pencil or a light burnisher to smooth only the areas you want glossy. Apply almost no pressure – just enough to seal the wax without flattening the paper.
This final lock‑in is optional, but it gives your work that glass‑like finish without sacrificing the ability to add one more subtle hue later.
Quick checklist for advanced layering
- Identify the dominant hue for each area.
- Lay it down light, let it dry, then add a secondary hue with slightly more pressure.
- Use a colorless blender to merge edges, especially with complementary accents.
- Pause, step back, and lift any excess with a kneaded eraser.
- Finish with a light burnish only where you want a polished look.
Try this on a simple fruit sketch – maybe a papaya. Start with a pale yellow base, add a richer orange as the dominant layer, then slip in a hint of green on the stem area. You’ll see a spectrum of tones emerge without ever opening a new box of pencils.
| Technique | Tool | Pressure |
|---|---|---|
| Dominant‑first layering | Soft‑core pencil | Light‑to‑medium |
| Complementary accent | Colorless blender | Gentle sweep |
| Fine‑detail lock‑in | Neutral burnisher | Very light |
Step 5: Adding Highlights and Final Details
Now that your layers have settled, it’s time to let the drawing breathe and show off those tiny sparks that make a sketch feel alive. Think of highlights as the little glints of sunlight on a mango skin or the flash of reflected light on a wet leaf – they’re the finishing touch that tells the viewer, “Hey, this is real.”
Why highlights matter
When you’re learning how to layer colored pencils, you’ll notice that the darker values often dominate the surface. Without a few lifted spots, the piece can look flat, no matter how many layers you built. A well‑placed highlight restores contrast, reinforces the light source, and creates that three‑dimensional pop we all crave.
In my own studio, I once spent an entire afternoon layering a tropical flower only to realize the petals looked “muddy” until I added a thin line of white pencil on the tip. That tiny edit turned the whole composition from dull to dazzling.
Step‑by‑step highlight routine
1. Identify the light source. Grab a piece of scrap paper and sketch a quick circle indicating where the light hits. This visual cue keeps you honest about where highlights belong.
2. Choose the right tool. A hard‑core white pencil (e.g., Prismacolor’s 2H) works great for fine glints, while a soft white (6B) can cover larger areas like a sunlit sky. Keep a neutral‑colored blender nearby to feather edges without adding pigment.
3. Lift, don’t add. Instead of drawing a white line over dark pigment, try lifting the wax with a clean kneaded eraser. Gently roll the eraser over the area you want bright; the wax peels away, revealing the paper’s natural tone.
4. Apply the highlight. If lifting isn’t enough, lightly dust the spot with white pencil using a feather‑light hand. Press just enough to leave a whisper of pigment – you want the paper’s tooth to still show through.
5. Blend subtly. Sweep a colorless blender over the edge of the highlight. This softens any hard line and integrates the bright spot into the surrounding hue, mimicking how light naturally diffuses.
6. Step back and assess. Move a few feet away. Does the highlight feel natural or forced? If it looks too bright, gently smudge it with a clean stump. If it’s too faint, add another micro‑stroke of white.
Real‑world examples
Imagine you’re drawing a ripe papaya. After establishing the orange‑green body, pick up a hard white pencil and lift a tiny crescent on the curve where the sun would hit. The result looks like a glossy skin that’s about to burst with flavor.
Another case: a cityscape at dusk. Use a soft white to highlight the glass of a skyscraper, then blend the edges with a colorless blender. The reflective surface suddenly feels metallic and alive.
One of our students in Mumbai tried these steps on a portrait of a peacock feather. By lifting highlights on the eye‑like “eyes” of the feather, the whole piece gained a regal sheen that impressed his professor.
Tips from the pros
Susan McCreevy recommends a light sandpaper swipe before adding final pencil highlights to remove any unwanted sheen from glue or adhesive layers. She notes that a smooth tooth makes the white pencil glide more predictably (adding final layers tutorial).
A quick YouTube demonstration shows how a seasoned artist adds a single white pencil stroke to a watercolor‑paper sketch, then uses a blending stump to soften it (how to add final highlights video). Watching the motion helps you internalize the delicate pressure needed.
Checklist for final details
- Confirm light source and mark it on a scrap.
- Use a hard white for fine glints; soft white for broader areas.
- Lift wax with a kneaded eraser before adding pigment.
- Blend edges with a colorless blender or clean stump.
- Step back, evaluate, and adjust pressure as needed.
Remember, the goal isn’t to over‑do it. A few well‑placed highlights can make a whole drawing feel finished, while too many will look like a snowstorm.
And here’s a little secret: when you’re unsure whether a highlight belongs, draw a faint gray line where the light would hit, then erase it after you test the white pencil. If the spot still looks right, keep it; if not, erase and try again.
Once you’ve locked in those highlights, give the entire piece a gentle dusting with a soft brush to remove any stray graphite. This tiny ritual signals to your brain that the artwork is truly complete.
Ready to see the difference? Grab your current sketch, follow the six‑step routine, and watch the paper come alive with a sparkle you didn’t think was possible.
Step 6: Preserving and Displaying Your Layered Artwork
You’ve just spent hours building those translucent washes, mid‑tones, and highlights. Now comes the part most artists skip: making sure the piece stays exactly as you left it.
Why preservation matters
Think about the last time you opened a sketchbook after a few months and saw the colors look a little dull. The wax in colored pencils is vulnerable to humidity, dust, and even the faintest touch. In our workshops across Delhi and Mumbai, we’ve watched promising student work fade simply because it was stored flat in a damp drawer.
So, what can you do to stop that from happening?
Step‑by‑step protection plan
1. Seal the surface with a light fixative. Choose an artist‑grade, non‑yellowing spray that works on wax. Hold the can 12‑14 inches away and mist the artwork in thin, even coats. Wait five minutes between layers; two coats are usually enough for a bright finish.
Need a place to start? Dick Blick’s colored‑pencil fixatives list several options that work well with Indian climate conditions.
2. Let the fixative cure completely. Resist the urge to frame immediately. A full 24‑hour cure gives the wax time to bond with the paper fibers, preventing smudging later.
3. Store flat, not rolled. If you must transport the piece, slide it into a rigid portfolio or a large archival envelope. Rolling can crack the delicate layers, especially on heavier paper like Strathmore 400.
4. Keep away from direct sunlight. UV rays break down pigments over time. If you display the work near a window, use UV‑filtering glass or acrylic. A simple matte glass can cut UV exposure by up to 99 %.
5. Control humidity. Aim for a stable 45‑55 % relative humidity. In monsoon‑prone cities like Kolkata, a dehumidifier in the studio makes a noticeable difference.
Displaying with impact
Now that your drawing is protected, think about how you want people to experience it. A common mistake is hanging a piece directly on a nail without a backing; the paper can sag and the edges may warp.
Use an archival mat board—acid‑free, 2‑mm thick—to give the artwork breathing room. Then frame with a float mount so the paper isn’t glued to the glass. The float creates a subtle depth that mirrors the layered look you just built.
Real‑world example: A college art club in Pune recently framed a series of layered mango studies. By using a UV‑filtering float frame, they reported that the colors stayed as vivid after a semester as they were on day one.
If you prefer a more informal vibe, consider a magnetic display board. Attach small magnets to the back of the paper (use museum‑grade adhesives) and swap pieces in a gallery‑style rotation. This method keeps the artwork flat and lets you showcase multiple works without permanent framing.
Quick checklist
- Apply 2 thin coats of non‑yellowing fixative, 5 minutes drying time each.
- Allow a full 24‑hour cure before handling.
- Store flat in an archival sleeve or rigid portfolio.
- Display behind UV‑filtering glass or acrylic.
- Maintain studio humidity at 45‑55 %.
- Use acid‑free mat board and float mounting for long‑term framing.
Give these steps a try with your next layered sketch. You’ll notice the difference the moment you open the portfolio—no smudges, no faded tones, just the same vibrant depth you worked so hard to create.
Conclusion
We’ve walked through every step of how to layer colored pencils, from picking the right paper to sealing the finished piece.
Remember, the magic happens when you start light, respect the paper’s tooth, and let each layer breathe before you add the next. If you ever feel the colors turning muddy, pause, lift a bit with a kneaded eraser, and let the paper regain its texture.
So, what should you try next? Grab a fresh sheet, lay down a translucent yellow wash on a mango sketch, then build orange and amber layers just as we described. Finish with a subtle highlight, spray a thin coat of fixative, and store it flat in an archival sleeve.
In our experience teaching students across Delhi and Mumbai, this routine turns a flat sketch into a vivid, three‑dimensional illustration that holds up for months.
Give yourself a quick checklist before you close the notebook: light base, mid‑tone build, dark accents, careful blending, gentle burnish, and proper preservation. Follow those checkpoints and you’ll see consistent results without the dreaded gray mush.
Ready to put the technique to work? Pick up your pencils tonight, experiment with a simple fruit, and watch the layers come alive. The next masterpiece is just a few strokes away.
FAQ
What is the ideal order of colors when I start how to layer colored pencils?
Begin with the lightest hue that matches the overall value of your subject. A translucent wash of lemon‑yellow or pale peach creates a base that lets later pigments sit on top without sinking too deep. Once the base dries, add mid‑tones with a slightly firmer pressure, then finish with the darkest values only where shadows belong. This light‑to‑dark sequence preserves luminosity and keeps the paper’s tooth alive.
How many layers should I apply before I blend?
In practice, three to four thin layers are enough before you reach for a colorless blender or a soft blending stump. Each pass adds a bit more pigment while still allowing the paper fibers to hold the wax. If you notice the surface getting gritty, pause, lift a touch with a kneaded eraser, then blend. This “layer‑and‑pause” habit stops the dreaded gray mush and gives you smoother transitions.
Can I use a kneaded eraser to fix mistakes while I’m layering?
Absolutely. A kneaded eraser is your safety net for both accidental pressure marks and over‑saturated spots. Gently press and roll the eraser over the area you want to lift; the wax peels away without tearing the paper. It’s especially useful after the third or fourth layer when the pigment starts to settle. Just remember to reshape the eraser frequently so you don’t spread unwanted color elsewhere.
What type of paper works best for how to layer colored pencils in humid Indian climates?
Medium‑tooth, acid‑free paper like Strathmore Colored Pencil Paper (Series 400) is a reliable choice. Its tooth holds enough pigment for several washes, and the surface is sturdy enough to survive occasional humidity spikes common during monsoon season. If you need an extra barrier, lightly seal the sheet with a spray‑fixative before you begin; it reduces moisture absorption while still letting you build layers.
Is it okay to use colored pencils on black paper for layering?
Yes, but treat the dark surface as a reverse palette. Start with white or light‑colored pencils to establish highlights, then layer transparent colors such as blues, purples, or reds on top. Because the paper already absorbs less light, you’ll need fewer layers to achieve depth. Keep the pressure light and use a colorless blender to merge the strokes; this prevents the whites from looking chalky.
How do I prevent my colors from turning muddy when I layer?
The key is to respect the paper’s tooth and avoid over‑pressing. Apply each hue in thin, translucent washes and let the previous layer dry before adding the next. If two colors start to blend into gray, lift the area with a kneaded eraser and re‑apply the lighter shade. Working in short, deliberate strokes rather than long, heavy ones also keeps the pigments from mixing unintentionally.
Do I need a fixative after I finish layering colored pencils?
Applying a light, non‑yellowing fixative is highly recommended, especially for works that will be displayed or stored long‑term. Spray two thin coats, waiting five minutes between passes, then let the piece cure for at least 24 hours. The fixative seals the wax, reduces smudging, and protects the colors from humidity—a simple step that makes your layered artwork last months, even in the Indian climate.
